Video Editor

Use free video software to create and edit videos of any complexity from a family greeting card to a company presentation. Cut, merge video files, apply visual and audio effects, use filtration and image correction, make slideshows and add an appropriate soundtrack. Use multi-color Chroma Key and advanced parameters settings to give your video a professional look. All popular video and audio formats are supported.

Read more about Video Editor...

Video Converter

This program is intended for converting video files from one format to another. Nearly all popular video formats are supported (both reading and saving). In addition, the program drastically simplifies the task of converting videos for playback on specific multimedia devices, such as iPhone, Samsung Galaxy or Huawei P30 Pro. The program is extremely easy to use, has a modern interface and all necessary video processing functions.

Read more about Video Converter...

Audio Converter

The audio converter will help you convert audio files from one format to another. All key audio formats and codecs are supported. The program also allows you to manage playlists and meta tags, extract audio from video files and save these tracks on your computer in any format.

Read more about Audio Converter...

Audio CD Grabber

This audio tool is intended for grabbing audio tracks from compact discs and saving them to the user’s computer in any format. Nearly all popular audio formats and codecs are supported. The program can also extract track details from the FreeDB server for automatic file renaming and updating meta tags.

Read more about Audio CD Grabber...

Multifunctionality

Multifunctionality

A wide array of multimedia processing tools in one free video software suite.

High speed

High speed

Our programs use fast
and high-quality algorithms optimized for single and multi-core CPU’s.

Affordability

Affordability

VSDC video software is freely available for download to Windows OS-based PCs and laptops.

How to apply effects to video or image with VSDC Free Video Editor

Add an image or video to the scene.

Adding image to scene

To add an effect you should double click the image on the timeline. A new tab with object name will appear.

Effects editing mode for image object

Now open the “Editor” tab on the ribbon command bar and click the “Video effects” (or “Audio effects”) button to see the list of the available effects.

Let’s choose as an example a blur effect "Filters->Blur". A new window is open allowing you to set the object position in time. You can chose the point where the effect should start, its duration and dynamics depending on the parent object duration. The selected effect will appear on the timeline.

Editing blur properties for image object

The effect will be immediately applied to the image.

Blur effect for image object

You can configure other effect parameters in the properties window. Click the effect on the timeline and open the “Properties window” tab at the right of the scene area. For the Blur effect, the available parameters are the following: blur intensity, original and final blur levels which enable to make effect of stepless object blur or increasing of stepless contrasting effect.


You can get more information about the program on Free Video Editor' description page.

How to set properties of object position in time

Video editor enables to work with different objects, namely: "Sprite", "Duplicate", "Line", "Rectangle", "Ellipse", "Tooltip", "Image", "Sound", "Video", "Movement" and also with a large quantity of video and audio effects.

You can add these objects using the same methods which are divided into three stages: choice of object, setting up its position in time and on the scene. For more information about the first and the third stages see example of adding video and image to the scene in section "How to open video file or image for editing".  In the present section we shall explain how to set object when it is added to the scene.

When you add object to the scene or when you apply effect to object you see the following window which sets object/effect position in time:

Object position properties

In this window you may set time of object appearance to the scene (effect start time), duration of display (effect duration), as well as its dynamics upon change of parent object duration. Let’s review in details each parameter:

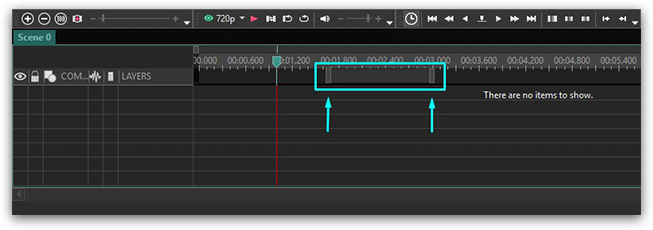
  • By work area – sets time of appearance and duration as per the marked working area on timeline (duration of video and audio objects is set not according to working area duration, but in accordance with duration of video and audio material in a file).

    Timeline work area

  • From cursor position - sets time of appearance starting from cursor position on timeline and automatically sets duration to the end of the scene (duration of video and audio objects is set not to the end of the scene but according to video and audio material in a file).
  • To cursor position  – sets time of appearance starting from beginning of parent object (scene or sprite) to cursor position on timeline (duration of video and audio objects is set not to cursor position but according to video and audio material in a file).
  • Whole parent duration - sets time of object appearance and its duration equal to parent object duration. Connection of object duration with parent object duration is also set ("Lock end position").
  • From scene begin - sets time of appearance starting from parent object. Object duration is manually set (except for video and audio objects which have duration set according to duration of material).
  • To scene end - sets time of object disappearance equal to time of parent object disappearance. Duration is manually set. Connection of object appearance time and its duration with parent object duration are also set ("Lock start position  and "Lock end position").
  • From manual position – time of object appearance and its duration are manually set.
  • To manual position – time of object disappearance and its duration are manually set.
  • Lock start position  - sets connection of object appearance time with parent object duration, i.e. if parent object duration is changed object appearance time will be automatically recalculated.
  • Lock end position -  sets connection of object duration with parent object duration, i.e. if parent object duration is changed object duration will be automatically recalculated.

We recommend to choose "Whole parent duration" option for filters and other effects covering the whole duration of parent object, because in this case "Lock end position" option is set and when object duration is changed, effect duration will be automatically changed.

At the same time for transition effects we recommend to choose "From scene begin" or "To scene end". In such case options "Lock start position" and "Lock end position" are set the way that when object duration is changed, duration of effect will not be changed, and effect finish time will always coincide with time of object disappearance if you choose option "To scene end".


You can get more information about the program on Free Video Editor' description page.

How to use VSDC Free Video Editor


You can get more information about the program on Free Video Editor' description page.

How to use VSDC Free Video Editor (2)

Getting started
New to VSDC? Get started faster with these step-by-step tutorials
Cinematic transitions
Learn how to apply and customize unique transition effects available in VSDC
Audio editing
Find out how to achieve common audio editing tasks and apply sound effects
Text effects
Want to use text in your video? Here are the tutorials to help you out
Inspiration
Use these editing guides to get inspired for your next project
Color correction
Master our color correction tools and create eye-catching videos
Speed effects
Learn how to apply speed effects like a pro
Special effects
Make your movie stand out using our special effects
Quick tips
Looking for a quick solution to your problem? Check out these tips
Motion tracking & animation
Find out how to make objects move in your video

How to Add Files in Video Editor

If you are just starting out in the video editor, the first step in creating a new project is adding a file.

VSDC Video Editor is very convenient because it allows its users to easily add and edit video, audio and images of all possible formats and codecs, of any duration and any size.

Let’s explore a few methods for adding files.

Method 1: Using the Menu

Start a new project by clicking on the “Blank Projectoption on the start page or on the “New Projectoption in the top horizontal menu. Set the resolution, framerate, rename your project if necessary and click on “Finish”.

How to Start a New Project

If you already have a saved project, click on the “Open Projectoption in the menu bar and find it in the window that appears.

How to open a finished project

If you need the project settings (resolution, framerate, etc.) to match the parameters of a certain video file, click on the “Import Contentoption. Then find your video in the opened window and the program automatically adjusts the project according to the selected file.

Customizing project parameters to the parameters of a specific video file

When you create a new project, an empty scene appears on the screen.

Your screen after starting a new project

To add a file, you need the “Editortab: click on it, then click on the “Add Objectoption, select the appropriate file type (image, audio or video) and add the selected object by clicking on it twice with the left mouse button.

Adding image, audio or video to a scene and timeline

After that the “Object Position Settingswindow opens, where you can adjust the parameters at your discretion if necessary.

Adjusting the settings as you need

If it is a new project, some settings can be not available.

Click on “OK” and your file appears on the scene and timeline.

Method 2: Using the Toolbar

Start a new project or continue a previously started one (see Method 1).

On the vertical toolbar on the left of the scene, find the appropriate icon to place the file of the type you need (image, audio object or video object).

Find the appropriate icon to place the file type you need (image, object or video)

Select the desired object position settings, click “OK”, and the file appears on the scene and timeline.

Method 3: Using Drag-and-Drop Tool

Another useful feature of the VSDC Video Editor is the possibility to drag and drop objects from your computer into the editor.

To add an object this way, open the File Explorer, left-click the file you want and drag it onto the stage or timeline. The file appears immediately.

Dragging a file onto the stage using file explorer

Method 4: Using the Resources Window

The Resources Window contains all the files (images, video and audio) you are working on in the project. You can place all the files here at once when you start a project, which you can then drag and drop from this window to the scene and timeline as you work on the project.

Using the drag-and-drop tool described in Method 3, left-click on the file you need in File Explorer and drag it into the Resources Window. You can also use the + icon at the bottom of the Resources Window.

Dragging a file to the resources window using file explorer

Then left-click on the object and drag it to the scene or timeline. The file appears immediately.

NB! If you need to set the position of a file when adding it to the scene, open the options (top right corner), click on the “Editor Options” option and check the “Set Object Position Parameters when Adding Video or Image to the Scene” box.

Using Methods 1 and 2, when you select the file you want, the mouse cursor takes the shape of a crosshair and you will manually place it by selecting the desired position and size of the object.

Using Methods 3 and 4, the object appears in the Resources Window even if you drag it onto the scene as described in Method 3, from where you can move it onto the scene and timeline. When you do it, the mouse cursor also takes the shape of a crosshair, and you manually place the file at the position and size you need.

Conclusion

Now you know how to add a file to VSDC Video Editor. We hope you found this article useful.

If you are a beginner, we also recommend you to read our article about VSDC basic operations.

In addition, before finishing your project, read the instructions on how to export the video and save it to your computer in the format you need.

Do you still have questions?

Contact us via email at This email address is being protected from spambots. You need JavaScript enabled to view it. or on Facebook and X.


You can get more information about the program on Free Video Editor' description page.

Page 35 of 35

News

VSDC Christmas Update 9.4: Enhanced Effect Management, 100+ Background Templates and Streamlined Editing

This holiday season embraces new beginnings with the latest update of VSDC Video Editor! We’ve listened to your feedback and decided to focus on enhancing the tools you love most—all while laying the...

VSDC 9.3: 150+ Templates, Text Transformer, Sprite Auto-Detect and GUI Update

Change is all about improvement, and this process wouldn't be possible without your input. After carefully reviewing your feedback, we’ve addressed several key issues and introduced updates designed...

Best Special Effects Software

Intro In 2024 the options range for creating visual effects is incredibly diverse and it becomes more and more challenging to identify the top choices. Here you can find a guide to the top visual FX...

VSDC 9.2: AI Segmentation Models, 300+ Transitions, VSDC Cloud and New Templates Pack

Are you ready to explore new heights with the latest major VSDC update? Finally, Version 9.2 is here! Packed with groundbreaking features, including the new AI-powered Segmentation tool, this update offers...

How Black and White Movies Were Colorized

Are you a fan of classic black and white films? Ever been curious about how they would appear if they were in color? Many filmmakers have pondered the same, leading to numerous classic movies being colorized....

The Best Online Video Editors in 2024: Benefits and Drawbacks

July 15, 2024 published by Amy Shao In today’s digital landscape, the popularity of video content is gaining momentum, with users increasingly turning to video creation both for personal advantage and...

New Transition Addition Methods, RAW/BRAW Files Support and Free Waveform

Welcome to the next level of video editing with VSDC's latest release, Version 9.1! Packed with an array of fresh features and enhancements, this update is designed to make your video editing experience...

VSDC 8.3 – 100+ New Templates, Key Editor Window, AV1 and Enhanced GUI

Welcome to the latest VSDC update, Version 8.3! We've been working hard and we’re ready to present a feature-packed release for you to discover an exciting array of over 100 fresh free video templates,...

Free video editing in 2024: Unlock Your Creativity without Breaking the Bank

May 7, 2024 published by Tom Shinat In today's digital world creativity reigns supreme. It offers endless possibilities for individuals and brands to captivate audiences and leave a lasting impression....

6 iMovie Alternatives for Windows You Should Try in 2024

June 15, 2024 published by Amy Shao Of all video editing tools for Mac, iMovie is our favorite one, and we’ve recommended it many times on this blog. iMovie comes pre-installed on most Apple devices;...
 

Screen Recorder Box

This program allows you to capture the video of your desktop and save it on your PC in various formats. Coupled with a video editor, the program is a great tool for creating presentations, tutorials and demo videos.

Read more about Screen Recorder...


Video Capture Box

The program captures video from external devices and records it to computer in a free format. You can save video from video tuners, webcams, capture cards and other gadgets.

Read more about Video Capture...


Reviewed by


"VSDC Free Video Editor is a surprisingly powerful, if unconventional video editor"

- PC Advisor


"This video editor gives you tons of control and editing power"

- CNet


"The editor handles many common formats and boasts a good deal of capabilities when it comes time to alter lighting, splice video, and apply filters and transitions in post production"

- Digital Trends