How to Create a Slideshow Using VSDC Wizard
If you're passionate about creating slideshows, but don’t understand how to do it in VSDC, this article is an absolute must-read for you! It's packed with in-depth answers to many of your burning questions, such as:
- How can I create a slideshow in VSDC? The article walks you through the entire process—from importing your photos and videos to adding the finishing touches and exporting the whole project.
- Where is the slideshow creation tool located in VSDC? Learn exactly where to find the slideshow creation tool within VSDC's interface.
- What transitions are available for slideshows, and how can I access them? Transitions can make your slideshow more dynamic and engaging. Here you’ll explore the wide variety of transition effects that VSDC offers, from simple fades to more complex ones.
If you have similar questions about this tool in VSDC, rest assured—you're in the right place to find answers. Let’s dive in!
Make sure you have VSDC 9.3version or higher installed
Before we start, it's essential to know that the slideshow creation tool in VSDC is called the VSDC Wizard. It operates as a separate window called the Files Sequence Wizard, accessible in several ways within the VSDC Video Editor.
How to Access the VSDC video editor Wizard
The fastest way to access the Wizard is directly from the main window. Simply launch VSDC Video Editor and select the “Create Slideshow” option. You'll then be prompted to specify settings for your slideshow, such as the title, resolution, frame rate, and other parameters. Once you've adjusted these settings, click on “Finish” to proceed, and you'll be directed to the Files Sequence Wizard.
Another method to initiate the Wizard is from a new project. To do this, click on “Blank Project” in the main window or select the “New Project” icon with a green plus on the top panel. After specifying your project settings in the pop-up window, click on “Finish”. Then navigate to the “Editor” tab on the top panel and select the first option on the left, labeled “Run Wizard”, represented by a magic wand icon.
Note: when using the method “from a new project”, the slideshow's resolution and other settings will automatically match the project settings you've defined at the project's start.
If you're already working on a project and wish to create a slideshow from files on the timeline, you can do it directly within the existing project. Simply select the desired files by holding the mouse button, then expand the menu under the “Run Wizard” option on the Ribbon. Choose “Edit Objects Sequence”, and you'll be able to create a slideshow from your selected timeline files.
Inside the Files Sequence Wizard
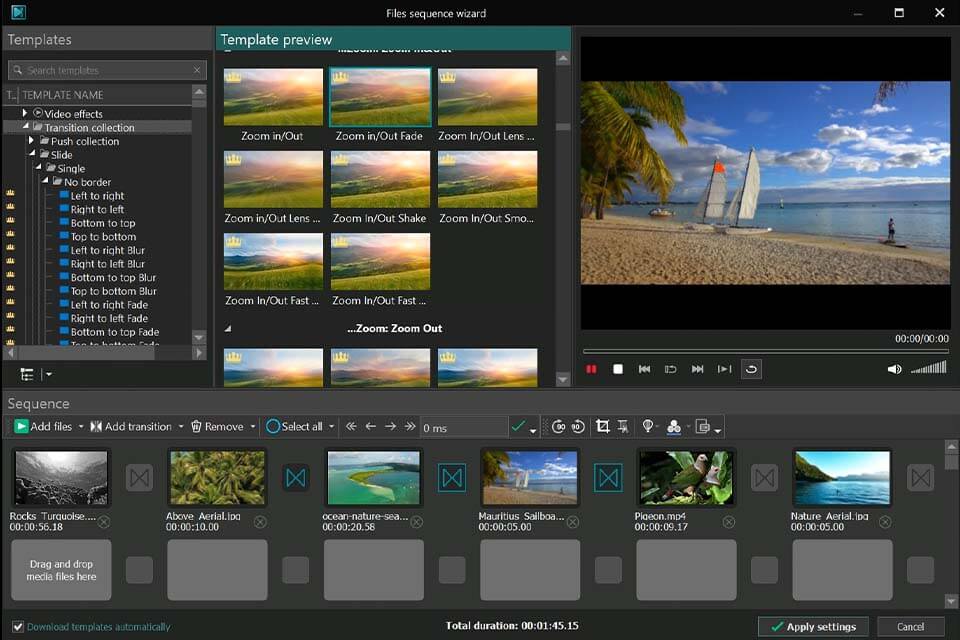
When you enter the “Files Sequence Wizard” window, you’ll see that its interface is divided into several sections:
- Transition Templates Window: This is where you can choose transition effects for your slideshow.
- Transition Preview Window: Here you can preview the transition effects you've selected.
- Slideshow Preview Window: This section allows you to preview the entire slideshow or individual files with the applied transitions.
- Sequence Panel: In this area your media files and transitions are displayed and arranged, allowing you to organize your slideshow.
How to Add Media Files to the Sequence Panel
Now when you have opened Files Sequence Wizard and reviewed its contents, the next step is to add media files to the Sequence Panel. This panel will display all the media files that will be part of your project.
Note: You can skip this step if you open the Wizard within the existing project. In this case, the files you select from the timeline will automatically appear on the Sequence Panel.
However, if you access the Wizard through one of the other two options, here's how to add files to the Sequence Panel. You have several methods to choose from:
- Drag and drop: You can simply drag and drop files from your computer directly onto the Sequence Panel.
- Use the cells: Click on an empty cell on the Sequence Panel to open your file explorer and select files.
- Add files option: Alternatively, use the “Add Files” button in the upper left corner of the Sequence Panel. If you click on the dropdown arrow, you will have two choices:
- Add files: This opens the file explorer, allowing you to add new files to the panel. If files already exist on the panel, new files will be added to the end of the current sequence.
- Insert files: If you want to place a file between existing ones, select the file that should come after the new one and choose Insert File. The new file will be added in front of the selected one.
How to Manage Files on the Sequence Panel
After you have added the media for your slideshow for further editing, you might want to make some changes and rearrange your files on the Sequence Panel. You can do it by clicking and holding the left mouse button on a file and dragging it to another position to swap the files.
Additionally, above the Sequence you’ll find several toolbar options represented by arrow icons that allow you to move selected files:
- To beginning: Moves the selected file to the beginning of the Sequence, shifting all files that were placed before it forward.
- Forward: Moves the selected file one position toward the beginning of the Sequence, while the file currently in that position shifts forward.
- Backward: Moves the selected file one position toward the end of the Sequence, while the file currently in that position shifts backward.
- To end: Moves the selected file to the end of the Sequence, shifting all files that were placed after it backward.
How to Delete Files from the Sequence Panel
For convenient removal of files from the "Sequence" panel, there are several methods available. You can delete unwanted files by selecting them on the panel and pressing the Delete key on your keyboard. Each file on the panel also features a red cross icon for quick deletion.
To delete multiple files at once, you can use the "Remove" option on the toolbar above all files: simply select the files you want to remove and click the corresponding button.
If you need to delete all files simultaneously, just click on the arrow next to the "Remove" option and choose "Remove all files" from the dropdown menu.
How to Edit Files on the Sequence Panel
For editing files there are the following tools on the Sequence:
- Select All: Selects all the objects on the Sequence Panel. If you expand this option’s menu, you’ll also see “Invert Selection”, which selects all files and deselects the current one. This is useful when you need to delete or modify several objects at once (e.g., for rotating them).
- Duration Field: Allows you to adjust the duration of photo files in the slideshow (in seconds) or displays the duration of the selected video files. If you set a duration for photo files, be sure to click the green checkmark to apply the changes.
- Rotate 90 Degrees: Rotates the selected file(s) 90 degrees clockwise.
- Rotate -90 Degrees: Rotates the selected file(s) 90 degrees counterclockwise.
- Crop Borders: Helps you crop the selected file.
- Cutting and Splitting: Allows you to split the selected video into parts or trim unnecessary segments.
- Quick Styles: Lets you apply one of the available preset styles or filters to the selected file.
- Background Color: Allows you to change the background color of the selected file.
- Properties: Opens a separate window displaying the properties of the selected file.
Take into account that if you click on the file name in the Objects Explorer on the left, the Properties Window will open on the right. Additionally, if you click on “Click here to add effect” under the object’s name, an additional menu will open, allowing you to add video or audio effects.
Note: All of the options mentioned above are also available by right-clicking on the object.
How to Apply Video Transitions
For many of you the most enjoyable step in creating slideshows is applying video transitions. Before starting it, make sure the “Download templates automatically” option is enabled in the bottom left corner of the window. This way you won’t have to wait for templates to download before using them.
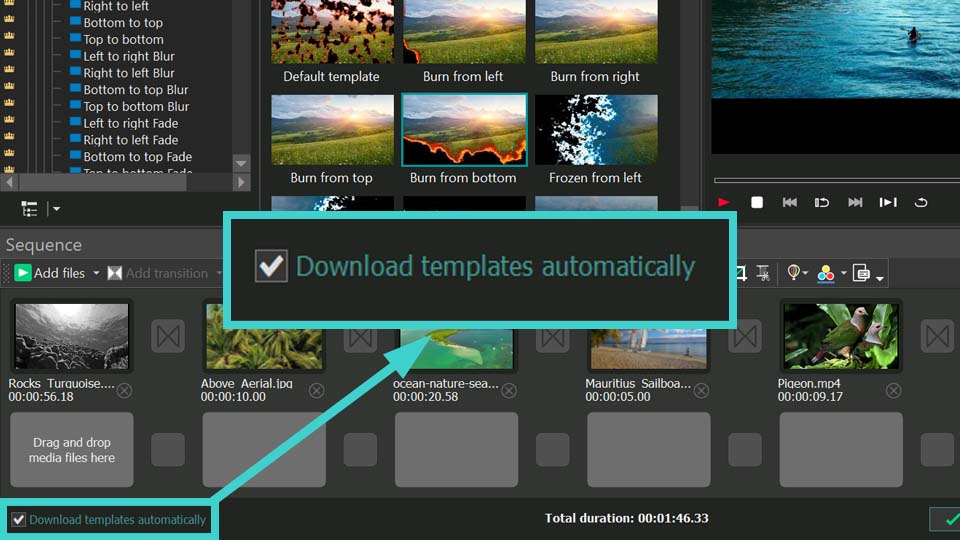
To add a transition, first you need to choose it in the Templates window. You can click on a transition group in the Templates window to display all transitions from that group in the Preview Template window.Alternatively, you can click on a specific transition in the Templates window to show only its preview. The preview in the Preview Templates window will activate when you hover your mouse over it.
Once you’ve chosen your transition, click and hold the left mouse button on the desired effect, then drag it to the required transition point on the Sequence Panel.
You can also pre-select one or more transition points on the Sequence Panel, then select a transition effect in the Templates or Preview Templates window and click on the “Add a transition” option. This will apply the selected transition to the chosen positions.
Note:
- If you expand the “Add a transition” menu, you’ll see the “Add a random transition” option, which applies a random effect from the Templates window to the selected position.
- There is also the “Add random transitions to all files” option, which applies random transitions to all files.
How to Modify Video Transitions
If you need to change a transition, the process is identical to applying it. Simply add a new transition in place of one you want to replace. You can also adjust the transition duration in the Duration field (in seconds) and immediately view the result in the Preview window.
To modify multiple transitions at once, you can use the following tools:
- Select All: Selects all transitions on the Sequence Panel based on your current selection. If one transition is selected, this option will select all others.
- Invert Selection: Available in the dropdown menu under “Select All”, this option selects all transitions except the current one.
If you need to delete a transition, you can select it and press the “Delete” key on your keyboard or use the “Remove” option in the toolbar. To delete all transitions, expand the “Remove” menu and select “Remove all transitions”.
How to Preview the Slideshow
To preview the slideshow, use the Preview window on the right. By default, it only displays the currently selected file on the Sequence Panel, and the “Loop Playing” option is enabled, meaning playback will automatically repeat. This is useful when you’re still building the slideshow and want to review your files and transitions.
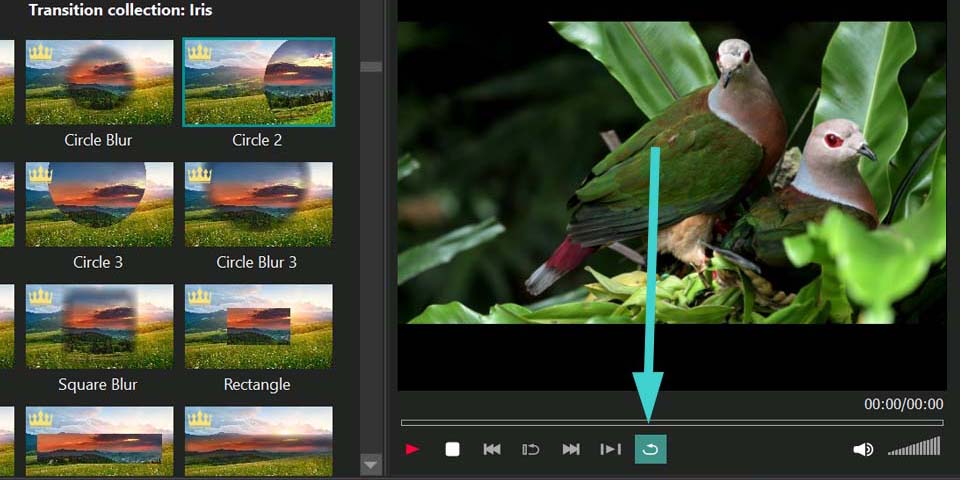
Once your slideshow is created, enable the second-to-last option, “Play all objects in the sequence”, and then press the red “Play” button to play the entire slideshow.
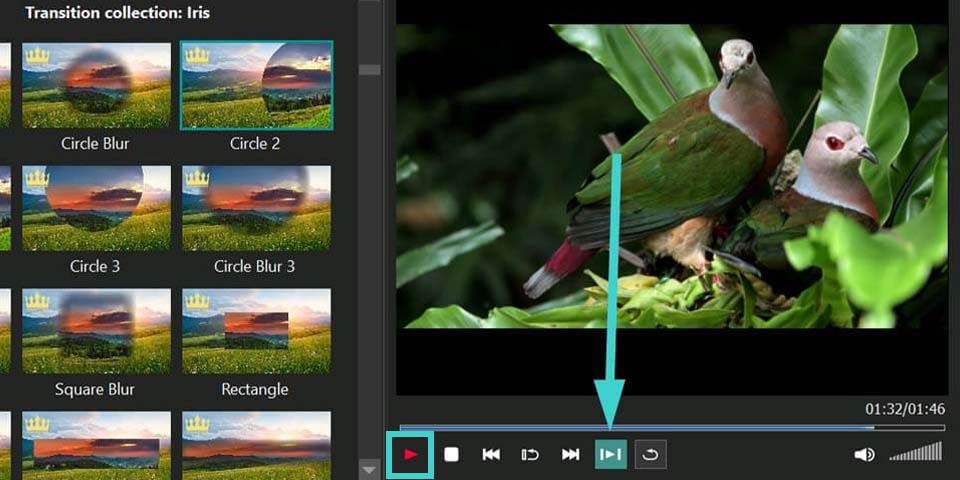
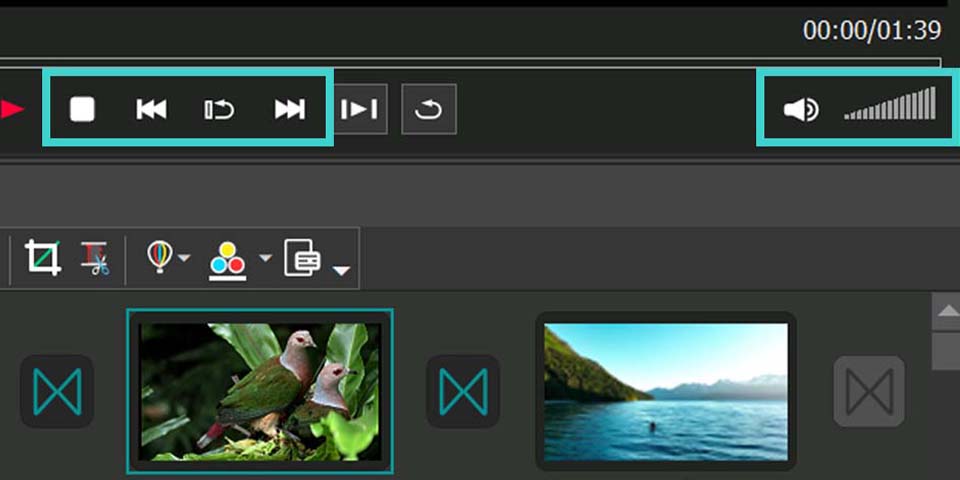
Additionally, the Preview window offers several controls:
- Stop Playing: Stops the playback.
- Play the Previous Object (it is active, if you have already clicked on “Play all objects in the sequence”): Moves the playback to the previous file in the sequence.
- Repeat Currently Playing Object: Repeats the playback of the current file.
- Play the Next Object (it is active, if you have already clicked on “Play all objects in the sequence”): Moves the playback to the next file in the sequence.
- Mute Audio: Mutes the sound, and there is also a volume adjustment slider.
You can also see the full duration of the slideshow or the selected file in the Preview window. Note that the total slideshow duration is displayed at the bottom of the Wizard.
How to Apply Settings and Finalize the Slideshow
Once you're satisfied with the preview, click on the “Apply Settings” button and your slideshow will appear on the main timeline of VSDC Video Editor.
If you need to make any changes after applying the settings, simply select the sequence on the timeline, then go to the Ribbon on the “Editor” tab, click the dropdown menu under “Run Wizard” on the left, and select “Edit Object Sequence”. The Files Sequence Wizard will reopen, allowing you to make adjustments.
After that, you can proceed to export your project. Read this article to learn how to export and save your project in the desired format.
We hope you found this article helpful and that you've explored all the linked resources to fully understand this new tool. To discover more possibilities, be sure to check out our tutorial video on our YouTube channel.
If you have any questions, don't hesitate to email us at This email address is being protected from spambots. You need JavaScript enabled to view it. or reach out to us on social media platforms like Facebook, X, Reddit or Discord.