 User Help Manual
  Learn FAQ
  Send us feedback
 ")


VSDC Premium Templates: What They Are & How to Use Them
Spotted the crown-marked templates in the VSDC Template Window? Do you know what they’re for? The answer is already here!
These are Premium templates, designed to help you create eye-catching videos! With them you can create professional-looking videos in just a few minutes, saving time on setting up animations, transitions and many other elements.
These ready-made templates provide everything you need for a wide range of tasks: beautiful backgrounds, stylish and unique titles, smooth transitions between slides, images or videos, vibrant and emotional LUTs and even pre-configured slideshows where all you need to do is add your media! Best of all – most of these templates include PRO features, but even if you're using the FREE version, you can still export your project without limitations just by purchasing these templates!
Navigating the Template Window in VSDC
Before we dive into activating and applying Premium templates, let’s first explore how all templates are organized in the Template window. There are three main categories: Free templates, PRO templates and Premium templates. Here’s how you can easily distinguish them.
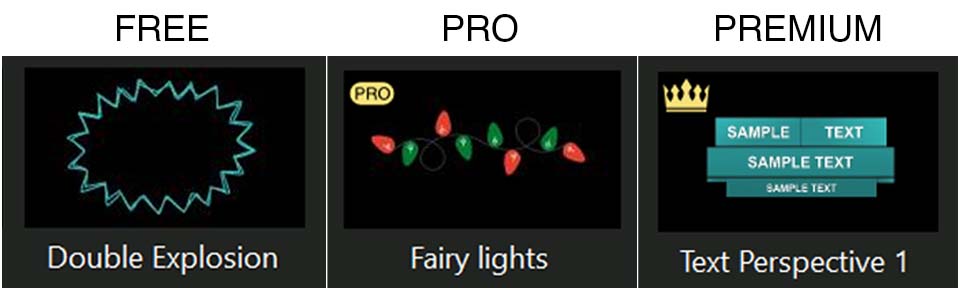
Free Templates
Free templates are available to all VSDC Video Editor users and do not have any special markings, so questions about them rarely arise.
You can access a wide variety of free options and easily find what you need using the search bar in the Template window.
PRO Templates
PRO templates are marked with a PRO label and a small lock icon in the Template Preview window (to view them, click the small arrow on the right side of the Template window). These templates are available for all users to apply, but only PRO version holders can export them.
Premium Templates
Premium templates, as mentioned earlier, are marked with crowns, and in the Template Preview window, they also have lock icons. The color of the crown indicates whether the template has been downloaded from the server: a blue crown means the template has not been downloaded yet, while a yellow crown means the download is complete and the template is ready to use.
Please note that in case the crown icons are not displayed, it's better to browse the templates through the Template Preview window.
These templates are available for all users to edit in the video editor, but exporting a project with them is only possible after purchasing the full collection or collections that include the applied template. Once purchased, both Free and PRO users can export their projects with these Premium templates.
How to Activate a Premium Template using VSDC Catalog
The VSDC Catalog is the easiest way to explore and purchase the best template collections for your needs. It provides a complete overview of all available packs, allowing you to preview each collection, watch a short demo video and read descriptions outlining their purpose and functionality.
Do you prefer transitions, animated backgrounds or something else? Browse through the available collections and pick the perfect option for your project!
Once you've made your choice, click BUY, fill out the checkout form and complete your order. After purchasing, you will receive a unique activation key via email. To activate your template collection:
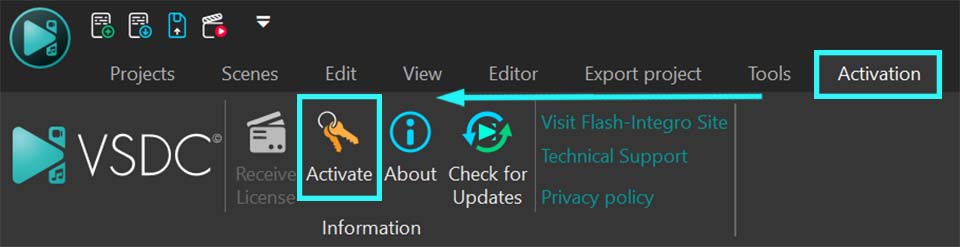
- Go to the Activation tab in VSDC
- Click “Activate” and enter the key you received via email when purchasing the template collection
- Restart your video editor.
After activation, open the Template window, find your purchased collection and start using the templates! To ensure smooth access, download the templates before applying them by selecting the ones you need, right-clicking and choosing the “Download templates” option. Once the crowns turn yellow, the templates are ready to use.

How to Activate a Premium Template inside the Video Editor
Here the process is even simpler because you get a preview of how the template will look in your project before purchasing. Let’s say you apply a template, and when exporting the project, a notification appears indicating the use of a premium feature (marked as an Image, Template or Sprite with a lock icon).

If you decide to export your project with this template, you’ll need to purchase it. Simply click on the Unlock in the window that appears during the export stage. This will take you to the checkout page, where you can complete your purchase. Once you receive your activation key via email, activate your collection through the Activation tab in VSDC and restart the video editor.
Working with Templates: Applying, Customizing and Adapting for Your Project
When using templates, the main goal is often to save time and effort by simplifying complex tasks. After all, why reinvent the wheel when you can use a ready-made solution? But here’s the best part—you can customize templates in a way that makes them uniquely yours!
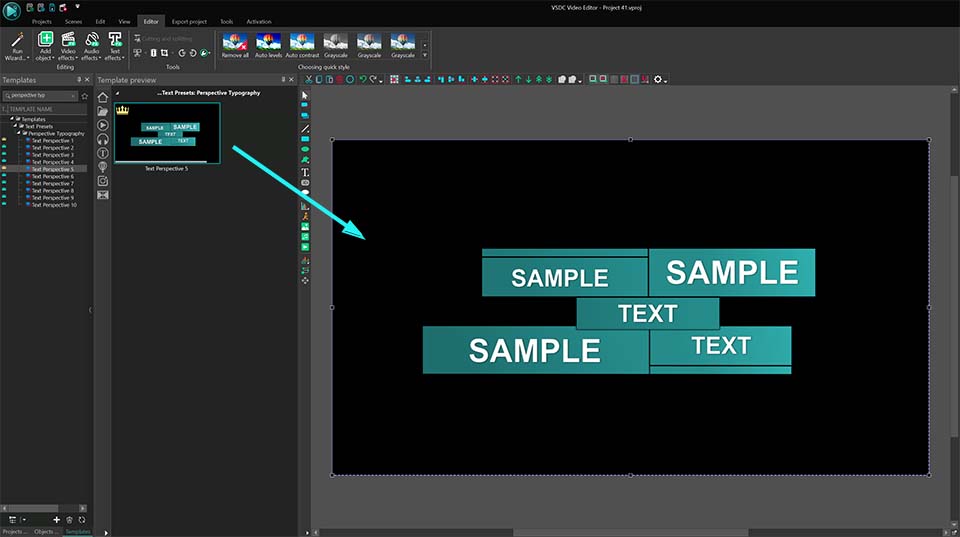
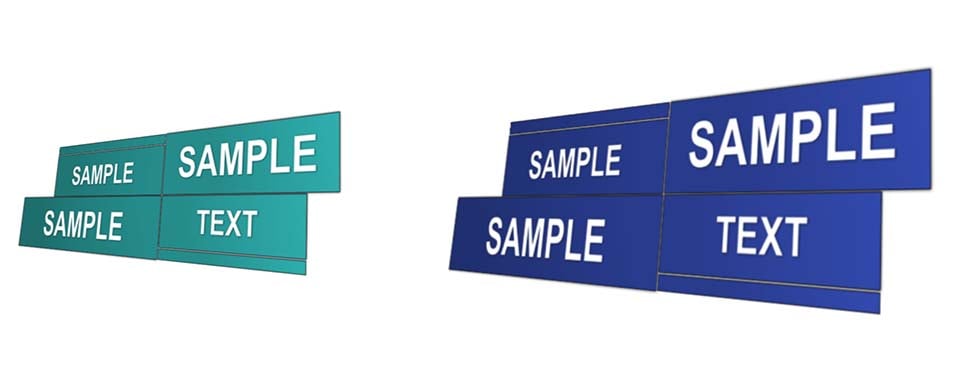
For example, let’s take a text-based template from the Premium Perspective Typography pack. Say you want to create a standout headline. Open the Template window, find the Perspective Typography folder and preview different templates. Choose a template—for instance, Text Perspective 5—and drag it onto the scene or the timeline.
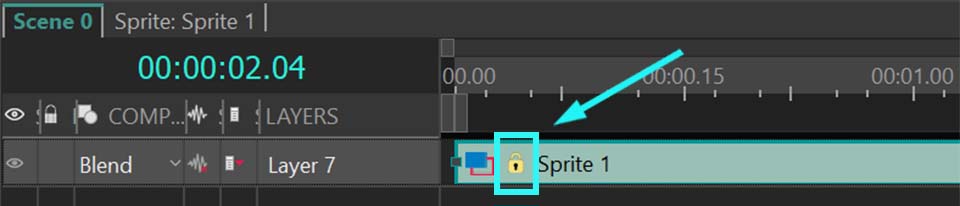
If the template hasn't been purchased yet, you'll notice a lock icon on the timeline and a notification in the bottom-right corner stating: "This is a Premium template available only for previewing. To export the project, please purchase it".
You can fully customize the template before purchasing. Since it appears as a sprite, you can explore its structure and modify individual elements—such as animation speed, color, Zoom intensity, etc.—before deciding to buy the pack.
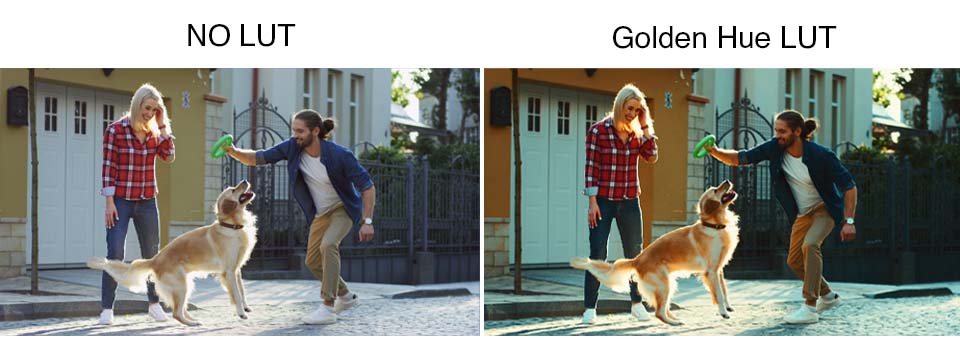
For another example, let’s see a premium LUT template. When you apply it to a video object, it’s automatically applied within that object. Unlike text-based templates, LUT templates are easier to adjust since they contain a single effect. You can modify them directly through the Properties window (don’t forget to select the LUT object on the timeline). Just click on Edit LUT there and adjust the color grading based on your desired tone and mood.
In our example, we use the “Golden Hue” template (the “Filmic Tones” LUT collection):

The only type of templates that work differently than previously described are transitions (this applies to Free, Pro and Premium templates). Typically, transitions are used between two videos to create a smooth visual flow from one to the next. To apply a transition, press and hold the ALT key, then use the left mouse button to drag the edge of the second video over the first one until a line appears between them. Finally, select the transition you want and drag it onto the space between the two objects.
There aren’t as many customization options for transitions as in the previous examples, but you can always adjust the transition duration. By extending the area between the two objects where the transition is applied, you can increase its duration, making it smoother. Conversely, by reducing this area, you can shorten the transition time, making it quicker and more abrupt.
See the example video with the transition Push top to bottom:
Now you know everything about our Premium Templates! We hope this article has been helpful to you. Learn more about the capabilities of VSDC Video Editor and what you can create with it.
Have you seen all our new premium packs? Share your thoughts with us on our Facebook, YouTube, X, Reddit or Discord!
If you have any questions or suggestions, feel free to reach out to our support team via email—we’d love to hear from you at This email address is being protected from spambots. You need JavaScript enabled to view it.!
© 2011-2025, www.videosoftdev.com, FLASH-INTEGRO LLC. Privacy policy | Terms of use | About us
All trademarks referenced herein are the sole property of their respective owners.
Copying any materials from this site allowed only with written consent of Site Administration.