Video Editor

Use free video software to create and edit videos of any complexity from a family greeting card to a company presentation. Cut, merge video files, apply visual and audio effects, use filtration and image correction, make slideshows and add an appropriate soundtrack. Use multi-color Chroma Key and advanced parameters settings to give your video a professional look. All popular video and audio formats are supported.

Read more about Video Editor...

Video Converter

This program is intended for converting video files from one format to another. Nearly all popular video formats are supported (both reading and saving). In addition, the program drastically simplifies the task of converting videos for playback on specific multimedia devices, such as iPhone, Samsung Galaxy or Huawei P30 Pro. The program is extremely easy to use, has a modern interface and all necessary video processing functions.

Read more about Video Converter...

Audio Converter

The audio converter will help you convert audio files from one format to another. All key audio formats and codecs are supported. The program also allows you to manage playlists and meta tags, extract audio from video files and save these tracks on your computer in any format.

Read more about Audio Converter...

Audio CD Grabber

This audio tool is intended for grabbing audio tracks from compact discs and saving them to the user’s computer in any format. Nearly all popular audio formats and codecs are supported. The program can also extract track details from the FreeDB server for automatic file renaming and updating meta tags.

Read more about Audio CD Grabber...

Multifunctionality

Multifunctionality

A wide array of multimedia processing tools in one free video software suite.

High speed

High speed

Our programs use fast
and high-quality algorithms optimized for single and multi-core CPU’s.

Affordability

Affordability

VSDC video software is freely available for download to Windows OS-based PCs and laptops.

How to fix a vertical video with VSDC Free Video Editor

Alright, let's face it. With mobile cameras taking over, the way we record video and the way we watch it have changed. You can love it or you can hate it, but vertical videos are everywhere today. It all started with people just being forgetful and holding their phones vertically when recording. Today, however, many brands create vertical videos on purpose because they look more authentic when published on social media which is (surprise!) consumed on mobile phones that are held vertically most of the times.

Who would have expected that back in 2014, huh?

But can I fix a vertical video if I don’t like the way it looks?

Yes, you can. You don't have to follow those modern media trends if you don't like them. And you certainly don't have to put up with two ugly black bars on either side of your footage, if you accidentally record it vertically - or what is called a portrait mode.

VSDC Free Video Editor offers several ways how to fix vertical videos, and below we'll show you what they are.

Download VSDC Free Video Editor for Windows

One of the most popular hacks is to blur the sides of a vertical video. This is an elegant way to get rid of the black side bars.

Vertical video fix #1 – blurring its sides

  • Add your footage to the timeline. To do that, click ‘Add object’ >> ‘Video’ and select the required file from the explorer.
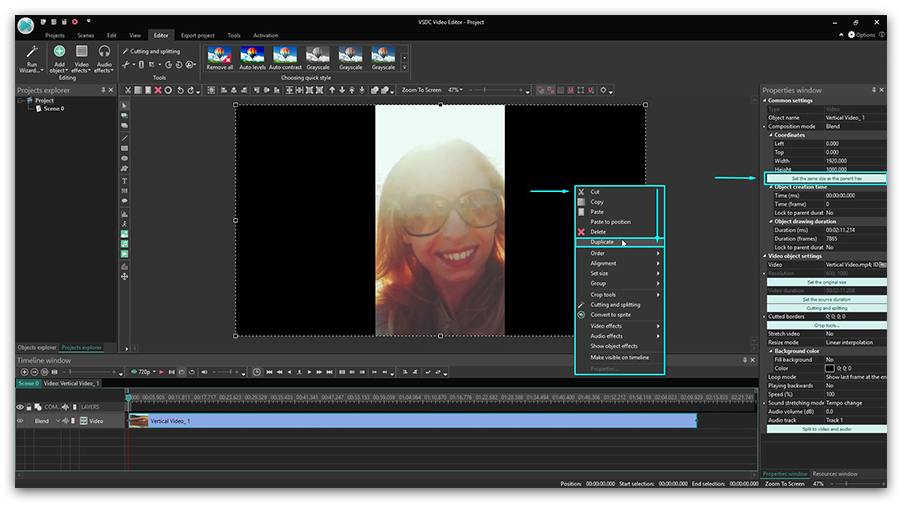
  • Use the right mouse button to click on the video and select ‘Duplicate’.
  • For the new video object, set the same size as the original video has. See the illustration below. How to duplicate an object in VSDC
  • Then go to the ‘Cutting and splitting’ tab at the top menu and choose ‘Auto cropping’. It will stretch the duplicated video to the size of the entire scene and create the effect of a background.
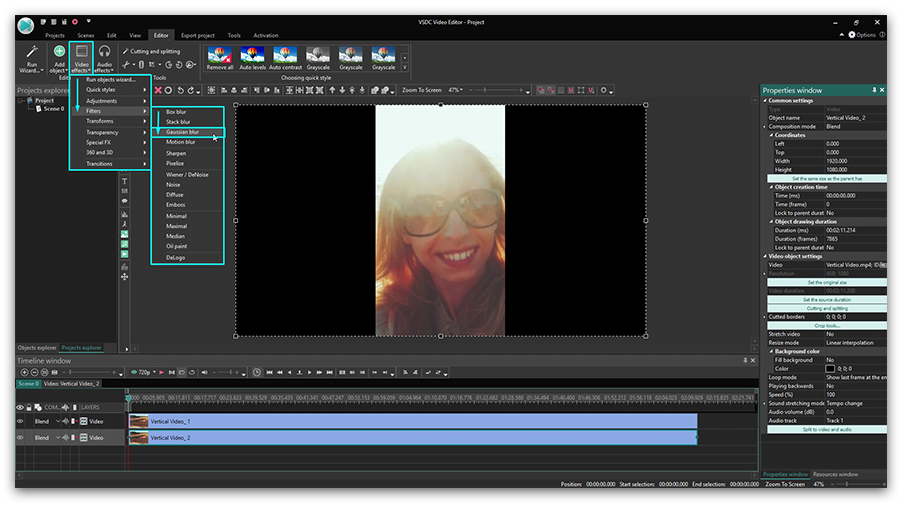
  • Now, to finalize fixing your vertical video, you only need to blur its sides. To do that, in the ‘Video effects’ tab, select ‘Filters’ >> ‘Gaussian blur’. See the illustration below.
  • Go to the Properties window and adjust the blur level to achieve the desired result. The Properties window tab can be found on the right side of the program interface.
  • Enjoy the new look of your vertical video! By the way, you can use any other video or image for the blurred background effect if you don’t want to duplicate the original one.

How to apply Gaussian blur

Vertical video fix #2 – creating a project with the same resolution as in your original video

Blurring the sides of a vertical video is the most popular way to make it look decent but there is also a roundabout approach to it. You can just use the resolution the video is recorded in and create a project with the same size parameters. Technically, your video will remain in a “vertical format” but you’ll get rid of the black borders.

Here is how to do it:

  • Add your vertical video to the timeline.
  • Go to the View tab in the top menu – you’ll open a Project explorer.
  • Click on your project name and go to the Properties window to find the scene’s size parameters.
  • Reduce the scene’s width (and height if needed) to the size of your original video. See the video tutorial below.
  • Now, click on the video object and go to the Properties window to use the “Set the same size as the parent has” button. This action will make the video perfectly fit the size of the scene.

Now you have a perfect vertical video without black bars on the sides. Note that once you perform it, all the objects – videos and images you add to the project – will be automatically adjusted to the new size of the scene.

Vertical video fix #3 – rotating a video that loads horizontally

Sometimes what happens is that we - the forgetful ones - start recording a video in a portrait mode and then rotate the phone to a landscape mode while the video is still being recorded. Or even the other way around! As a result, you can get a vertical video loading horizontally when played.

You can fix that too. In fact, it will literally require you a few seconds and a couple of clicks:

  • Add your video to VSDC video editor timeline.
  • Click ‘Rotate’ on the toolbar above the scene and preview the result.
  • If your video appears to be larger than the scene size, you can manually reduce its size or adjust the parameters using the Properties window.

Rotate buttons in VSDC

Now that you know how to use VSDC as a vertical video editor to blur the sides of the footage or change the scene size, you may want to check other guides for creating a great movie. We have over 200 of them on our YouTube channel. Don't forget to subscribe!


You can get more information about the program on Free Video Editor' description page.

How to create a voice over, using video editing software

Many videos require voice commentaries. Educational clips, how-tos, game walkthroughs, video blogs - all are typically produced with use of voice over software. There are various solutions to record your voice and add it to the footage. In fact, there are even 3-rd party tools for voice recording and processing audio on a professional level. Those are used in professional audio recording studios, for example. Yet, some video editors also have embedded tools for recording voice commentaries. VSDC Video Editor is one of them.

There are two ways to use VSDC as a voice over software. The first one belongs to the free version of VSDC video editor, and the second - a more advanced way - is available in VSDC Pro version. Below we'll take a close look at both ways, and explain how you can make use of the audio recording feature for your videos.

In both cases you'll need a microphone which is either embedded or connected to your computer. The biggest difference between the two, is the sequence of steps required from a user:

  • In VSDC free version, you can create an audio commentary using an embedded Voice Recorder. Once you record an audio piece, you'll be able to add it to you project and apply to the required video fragment.
  • In VSDC Pro version, you'll use a Voice Over software feature. That means, the voice recording is carried out along with the video preview in one and the same window. It allows for adding audio comments at required parts of the movie easier and more precisely.

Method #1. How to use VSDC as a free voice over software

  • Open the editor, go to the ‘Tool’ tab and select ‘Voice Recorder’

    The embedded Voice Recorder is located in the 'Tool' tab

  • If you need the audio to be recorded in a prticular format, first you should choose it. VSDC voice recorded offers a lot of popular audio formats such as MP3, AAC, WAV and etc.

    There are plenty of available audio formats such as MP3, AAC, WAV and etc

  • Second, select the audio device you're going to use for recording.

    Select an appropriate audio device for recording

  • If necessary, you can check the option to split your recordings by their duration or by size.

    This option splits your recording by its duration or by size automatically

  • To start recording your voice, click the corresponding button.

    The corresponding button that starts recording is here

  • When your voice comments are ready, go to your project and add the audio files to the timeline - precisely where it needs to be added.

    Add recorded audio files to the project

Method #2 How to use VSDC Pro as a more advanced voice over software

  • Add your video where you want to add your voice.
  • Click the ‘More Tool’ button on the panel above the scene and select ‘Voice Over’.

    'Voice Over' can be found in the 'More Tool' menu on the panel above the scene

  • Preview the video and decide where you’d like to add your comments.
  • Move the cursor to the moment of the video where the recording is supposed to start.
  • Click the ‘Start Recording’ button.

    Click the ‘Start Recording’ button to record your voice

  • Record your voice using the microphone.
  • At the end of recording click ‘Stop recording’.

    To finish your commentary click ‘Stop recording’

  • Click on the ‘Playlist’ button to see the list of recordings.

    The 'Playlist' button shows the list of recordings

  • Close the voice over window.
  • Your recording will appear on the timeline automatically.

    Your recording will appear on the timeline automatically

Even though both ways help you get the job done, VSDC Pro version makes a more precise voice over software, saving your time and effort. So, if audio recording is not a one time job, but rather a regular task you 'll have to deal with frequently, you should probably consider it as a more convenient tool.

If you're looking for using voice over software in your video production process, you can also check out our YouTube channel to see how quickly and easily you can utilize VSDC for that purpose.


You can get more information about the program on Free Video Editor' description page.


How to Stabilize Video in VSDC Video Editor – Guide on Setting Up the Best Parameters

So, you got a shaky footage, and now you’re looking for the way to fix it? You’re on the right page then. Watch this guide and read the instruction below to see how to quickly stabilize your video using VSDC Video Editor.

Truth be told, most videos shot on the go without special equipment (camera stabilizer mount) come out shaky – just in a varying degree. That happens when you’re holding a camera and your hands start making sporadic movements, or when it’s attached to a drone or a vehicle so that you’re shooting and moving at the same time. Yes, action camera owners, that is especially relevant for you.

Gladly, there is a way to easily remove jittering and achieve a perfectly stable image in the process of post-production. In fact, the Video Stabilization tool is among the most demanded features of VSDC video editing suite. And if you’re curious about how it works, the secret is in the ability to shift video frames. It allows for excluding the shaky effect while any gaps created in the process are being filled with the information from the previous frames.

In our inbox, we often see questions from users on what the best stabilization settings are. So, we decided to address this in a separate tutorial. Below, you’ll see a guide compiled with help one of our dear users who submitted the parameters that worked best for his footage. After being tested, they appeared to be efficient for most shaky videos, so we’re happy to share the secret setup with you.

The parameters used in this tutorial are 'Shakiness' and 'Smooth zoom'. Here is a step-by-step breakdown of the process:

Open VSDC Video Editor and proceed to ‘Tools’. Select ‘Video stabilization’.

Find 'Video stabilization' among available tools

Click ‘Open file’ to add the footage you’re willing to stabilize.

Click Open file to add shaky footage

Find ‘Shakiness’ among available settings. This parameter detects how shaky a video is and how quickly your camera changes positions and takes control of these movements. Set the Shakiness rate to the maximum using the arrows.

Set the Shakiness rate to the maximum

Once you’ve done that, find the ‘Smooth zoom’ dropdown menu in the upper toolbar. This setting allows you for smoothly zooming in the footage.

Select 'Use the smoothed zoom' as shown on the screenshot below.

Select 'Use the smoothed zoom' for smoothly zooming in the footage

After performing these actions, you should get a stabilized video, no matter how shaky the original was. So, if there is nothing else you’d like to change in it, just proceed to the ‘Formats’ tab and choose the most appropriate output format. Remember that in VSDC, you can change export profile settings – format, codec, resolution, quality, width, and height - when necessary. If this is the case, click on the “Edit profile” button at the bottom right corner.

A wide range of output formats is available at the 'Format' tab

Once you’re done, click on the red ‘Export project’ sign.

To download VSDC Free Video Editor, please, proceed here - http://www.videosoftdev.com/free-video-editor/download

To subscribe for VSDC Pro annual license, please, place your order.

Got any questions? Drop us a line at This email address is being protected from spambots. You need JavaScript enabled to view it. or send us a message via Facebook!

Find more awesome tutorials on our YouTube channel - https://www.youtube.com/user/FlashIntegro/videos


You can get more information about the program on Free Video Editor' description page.


How to Reduce Audio Noise with VSDC Free Video Editor

Sometimes footage may sound “noisy” simply because there were too many background sounds when you were recording it. Don’t rush to hit the “Delete” button, though. In most cases, you can easily fix it.

In this instruction, we’ll show you how to reduce audio noise from your recording using VSDC Free Video Editor. If you don’t have the tool yet, you can download it from the official page.

VSDC Free Video Editor provides two powerful Audio Denoise filters: Median filter and Audio gate.

Audio gate is one of the most commonly used techniques in audio production post-processing. This filter comes in especially handy when you work with live recordings trying to remove the unwanted sounds between passages, because it is so efficient at recognizing steady noise sources – such as rumble, hiss, and hum – and reducing them to the minimum.

Technically, when you apply Audio gating, you control when and to what degree audio passes through a channel. In other words, you create a gate to filter the sounds in the video.

Audio Gate feature

You may want to apply gating for three reasons:

  1. To reduce the unwanted external sounds
  2. To reduce some natural channel noise
  3. To use Audio gate as a special effect

Here is how it works. Gates are controlled by setting several parameters:

  • Threshold. Decibel level in which the gate opens or closes. The higher the threshold, the louder the sound (stronger the signal) must be to open the gate.

    Threshold settings

  • Attack. Controls the speed of the gate opening and consider very fast attack time for percussive instruments. Slower times (10 ms or more) for everything else.

    Attack settings

  • Release. The release time is key to a natural sounding audio decay. For noise elimination with an electric guitar, set the parameter much higher.

    Release settings

  • Reduction. Sets the amount of signal reduction.

    Reduction settings

  • Ratio. It determines how much compression is applied. For example, if the ratio is set to 4:1, every 4dB of signal that crosses the threshold will be compressed down to 1dB.

    Ratio settings

  • Knee. Determines how the compressor responds once the signal crosses the threshold. A hard knee clamps down right away, while a soft knee causes the compressor to gradually kick in as the signal gets further past the threshold.

    Knee settings

  • Make-up gain. A control that raises the level of the signal, once it has been processed, to the desired level for the next stage of the signal.

    Make-up gain settings

Now that we’ve walked through the process of applying Audio gate, let’s take a look at how Median filter works.

Median filter helps you eliminate impulse noise in your footage. In a nutshell, this can be ideal for removing unwanted, frequent sharp sounds like clicks and pops.

Median Denoise filter

  • FFT block size. FFT (Fast Fourier Transform) is an important measurement method which converts a signal into individual spectral components and thereby provides frequency information about the signal.

    FFT block size parameter

  • Window type. There are several different types of windows used to reduce spectral leakage when performing a Fourier Transform on time data and converting it into the frequency domain.

    Window type parameter

  • Overlap mode. The setting determines what percentage of the FFT size block of data points is re-used for the next trace. Overlap processing can be used to provide high resolution in both the frequency and time axis.

    Overlap mode parameter

  • Overlap coefficient. High overlap percentages and low FFT block sizes provide the highest time resolution but take longer to process the data file.

    Overlap coefficient parameter

Hopefully, this was helpful. Even though it may sound (or look) overwhelming, once you start – you’ll see how fast and easy audio noise reduction really is. Now go and try it yourself!

To download VSDC Free Video Editor, please, proceed here - www.videosoftdev.com/free-video-editor/download.

Find more awesome tutorials on our YouTube channel - www.youtube.com/user/FlashIntegro/videos.


You can get more information about the program on Free Video Editor' description page.


How to Use Audio Spectrum Visualizer in VSDC Free Video Editor

One of the most popular requests on the VSDC YouTube channel has long been an Audio Spectrum Visualizer. It’s a handy tool that helps you animate your soundtrack, and you can use it for lyrics videos, your online radio broadcasts, or any other music-related projects.

Now, it’s been a few years since we added audio spectrum to the VSDC toolset, and here is what you’ll be able to do with it:

  • Create a linear audio spectrum
  • Create abstract audio visualization
  • Create a circular audio spectrum

And since VSDC is a full-featured video editor, you’ll be able to add titles, lyrics, and stylish effects such as raindrops and foggy glass. Plus, there are 500+ terrific presets available for the VSDC audio visualizer. You’ll be able to create a unique music video and customize the animation to your needs.

Download VSDC Free Video Editor

In this post, you’ll find a guide to using VSDC audio spectrum visualizer and creating your first sound animation. Stay tuned!

How to use audio spectrum visualizer in VSDC

To create a basic audio spectrum, follow the steps below.

  1. Import your file to VSDC. It can be a video file with a sound or a separate audio file.
  2. On the left-hand side toolbar, find the Audio visualization icon and make a click on it (see the illustration below). Then select Spectrum.Spectrum
  3. Now, do you want to visualize the audio track of your video file? If so, just close the explorer window that will pop up once you choose the Spectrum. You would use it if you wanted to visualize an external soundtrack located on your PC. We’ll get to that later.
  4. In the next window, you’ll be asked about the object position. Decide if you want the spectrum to appear from the beginning of the video or from the cursor position (if it’s not placed at the start of the video), then click Ok
  5. Click anywhere on the scene and drag the mouse while keeping the left button pressed to place the audio spectrum on the scene. You can move and resize it at any time.audio spectrum on the scene
  6. Next, open the Properties Window tab on the right-hand side of the dashboard, scroll down to the Audio objects settings, and select Resources - Object on scene. If you can’t find the Properties window, right-click on the audio spectrum object and select Properties.
  7. Finally, in the Audio field located below, choose the file you want to visualize the sound from. For instance, if it’s the sound from the video, the name of the video file will show up in the dropdown menu.

Once you’ve performed these actions, use the Preview button to see how the audio spectrum visualizer will look during the playback. Notice that the default style and colors are already pre-configured. Below, we’ll show you how to turn your audio spectrum into a circle or an abstraction. Plus, we’ll talk about changing the spectrum style and colors.

How to create a circle audio spectrum

Now that you know how to create a basic audio spectrum, let’s add a little twist to it. Say, you want to turn it into a circle. Here is how it’s done:

  1. Follow steps 1-7 to create a linear audio spectrum visualizer.
  2. Make sure the spectrum object is still selected in the scene and go to the Video effects menu. Select Transformation effects - Distort.
  3. In the Properties window, find the dropdown menu titled Type, and select Polar coordinates.

Once you create a circle audio spectrum, you’ll be able to change its size, radius, angle, and more! We suggest watching the video tutorial below to see the available options.

How to change the style and colors of the audio visualizer

To modify the spectrum, whether it’s linear or circular, go back to the Properties window with the audio spectrum settings. If you can’t find it, make a right-click on the spectrum object and select Properties, then follow these steps:

  1. Find the Audio spectrum object settings menu.
  2. Adjust your spectrum type by choosing between gradient peaks, dashes, lines, and lines with blur.
  3. Change the color theme by clicking on the three-dot icon (“…”) or the eyedropper tool in front of each color.
  4. Note, you can also change the opacity level by double-clicking on the Start, Middle, and End colors. The lower the opacity level is, the more transparent the audio spectrum will be.
  5. Use the Preview button to see how the changes are applied.

visualize the sound from

How to create an abstraction-style audio visualizer

Apart from the spectrum, there is a second way to visualize a sound wave. It’s called Audio abstraction. To create this object, repeat steps 1-5 from the beginning of this article. The only difference is, when you click the Audio visualization icon from the left-hand side toolbar, you need to choose Audio abstraction. Don’t forget to select the audio source in the Properties window on the right, and then adjust the object size according to your needs.

select the audio source

How to visualize a 3rd-party audio track

So far, we’ve shown you how to visualize the sounds from the uploaded video (or audio) file. However, you might need to animate an audio track from a different file and add that animation to your clip. With VSDC audio visualizer, you can do that, too.

Once you click on the Audio visualization icon and choose the desired option – Spectrum or Audio Abstraction – use the explorer that will pop up to choose the audio on your PC you’d like to visualize. Then place the spectrum box on the scene and extend it to the desired size.

For the spectrum, you can choose the animation type, as described above. For the abstraction, there are hundreds of presets available. To check them out, go to the Properties window and scroll down to the Audio abstraction object settings. You’ll find lots of presets and preset groups as illustrated below.

Audio abstraction

Now go ahead and try the VSDC free audio visualizer!

Here are three more tutorials that will surely pique your interest:

How to create a text mask in 3 minutes or less

How to quickly remove video background

How to crop video borders

Find more awesome tutorials on our YouTube channel.

News

VSDC Christmas Update 9.4: Enhanced Effect Management, 100+ Background Templates and Streamlined Editing

This holiday season embraces new beginnings with the latest update of VSDC Video Editor! We’ve listened to your feedback and decided to focus on enhancing the tools you love most—all while laying the...

VSDC 9.3: 150+ Templates, Text Transformer, Sprite Auto-Detect and GUI Update

Change is all about improvement, and this process wouldn't be possible without your input. After carefully reviewing your feedback, we’ve addressed several key issues and introduced updates designed...

Best Special Effects Software

Intro In 2024 the options range for creating visual effects is incredibly diverse and it becomes more and more challenging to identify the top choices. Here you can find a guide to the top visual FX...

VSDC 9.2: AI Segmentation Models, 300+ Transitions, VSDC Cloud and New Templates Pack

Are you ready to explore new heights with the latest major VSDC update? Finally, Version 9.2 is here! Packed with groundbreaking features, including the new AI-powered Segmentation tool, this update offers...

How Black and White Movies Were Colorized

Are you a fan of classic black and white films? Ever been curious about how they would appear if they were in color? Many filmmakers have pondered the same, leading to numerous classic movies being colorized....

The Best Online Video Editors in 2024: Benefits and Drawbacks

July 15, 2024 published by Amy Shao In today’s digital landscape, the popularity of video content is gaining momentum, with users increasingly turning to video creation both for personal advantage and...

New Transition Addition Methods, RAW/BRAW Files Support and Free Waveform

Welcome to the next level of video editing with VSDC's latest release, Version 9.1! Packed with an array of fresh features and enhancements, this update is designed to make your video editing experience...

VSDC 8.3 – 100+ New Templates, Key Editor Window, AV1 and Enhanced GUI

Welcome to the latest VSDC update, Version 8.3! We've been working hard and we’re ready to present a feature-packed release for you to discover an exciting array of over 100 fresh free video templates,...

Free video editing in 2024: Unlock Your Creativity without Breaking the Bank

May 7, 2024 published by Tom Shinat In today's digital world creativity reigns supreme. It offers endless possibilities for individuals and brands to captivate audiences and leave a lasting impression....

6 iMovie Alternatives for Windows You Should Try in 2024

June 15, 2024 published by Amy Shao Of all video editing tools for Mac, iMovie is our favorite one, and we’ve recommended it many times on this blog. iMovie comes pre-installed on most Apple devices;...
 

Screen Recorder Box

This program allows you to capture the video of your desktop and save it on your PC in various formats. Coupled with a video editor, the program is a great tool for creating presentations, tutorials and demo videos.

Read more about Screen Recorder...


Video Capture Box

The program captures video from external devices and records it to computer in a free format. You can save video from video tuners, webcams, capture cards and other gadgets.

Read more about Video Capture...


Reviewed by


"VSDC Free Video Editor is a surprisingly powerful, if unconventional video editor"

- PC Advisor


"This video editor gives you tons of control and editing power"

- CNet


"The editor handles many common formats and boasts a good deal of capabilities when it comes time to alter lighting, splice video, and apply filters and transitions in post production"

- Digital Trends