Video Editor

Use free video software to create and edit videos of any complexity from a family greeting card to a company presentation. Cut, merge video files, apply visual and audio effects, use filtration and image correction, make slideshows and add an appropriate soundtrack. Use multi-color Chroma Key and advanced parameters settings to give your video a professional look. All popular video and audio formats are supported.

Read more about Video Editor...

Video Converter

This program is intended for converting video files from one format to another. Nearly all popular video formats are supported (both reading and saving). In addition, the program drastically simplifies the task of converting videos for playback on specific multimedia devices, such as iPhone, Samsung Galaxy or Huawei P30 Pro. The program is extremely easy to use, has a modern interface and all necessary video processing functions.

Read more about Video Converter...

Audio Converter

The audio converter will help you convert audio files from one format to another. All key audio formats and codecs are supported. The program also allows you to manage playlists and meta tags, extract audio from video files and save these tracks on your computer in any format.

Read more about Audio Converter...

Audio CD Grabber

This audio tool is intended for grabbing audio tracks from compact discs and saving them to the user’s computer in any format. Nearly all popular audio formats and codecs are supported. The program can also extract track details from the FreeDB server for automatic file renaming and updating meta tags.

Read more about Audio CD Grabber...

Multifunctionality

Multifunctionality

A wide array of multimedia processing tools in one free video software suite.

High speed

High speed

Our programs use fast
and high-quality algorithms optimized for single and multi-core CPU’s.

Affordability

Affordability

VSDC video software is freely available for download to Windows OS-based PCs and laptops.

VSDC Premium Templates: What They Are & How to Use Them

Edit Faster with VSDC Templates: Free, PRO & Premium Options

Spotted the crown-marked templates in the VSDC Template Window? Do you know what they’re for? The answer is already here!

These are Premium templates, designed to help you create eye-catching videos! With them you can create professional-looking videos in just a few minutes, saving time on setting up animations, transitions and many other elements.

These ready-made templates provide everything you need for a wide range of tasks: beautiful backgrounds, stylish and unique titles, smooth transitions between slides, images or videos, vibrant and emotional LUTs and even pre-configured slideshows where all you need to do is add your media! Best of all – most of these templates include PRO features, but even if you're using the FREE version, you can still export your project without limitations just by purchasing these templates!

Navigating the Template Window in VSDC

Before we dive into activating and applying Premium templates, let’s first explore how all templates are organized in the Template window. There are three main categories: Free templates, PRO templates and Premium templates. Here’s how you can easily distinguish them.

The Difference Between Free, PRO and Premium Templates in VSDC

Free Templates

Free templates are available to all VSDC Video Editor users and do not have any special markings, so questions about them rarely arise.

You can access a wide variety of free options and easily find what you need using the search bar in the Template window.

PRO Templates

PRO templates are marked with a PRO label and a small lock icon in the Template Preview window (to view them, click the small arrow on the right side of the Template window). These templates are available for all users to apply, but only PRO version holders can export them.

Premium Templates

Premium templates, as mentioned earlier, are marked with crowns, and in the Template Preview window, they also have lock icons. The color of the crown indicates whether the template has been downloaded from the server: a blue crown means the template has not been downloaded yet, while a yellow crown means the download is complete and the template is ready to use.

Please note that in case the crown icons are not displayed, it's better to browse the templates through the Template Preview window.

These templates are available for all users to edit in the video editor, but exporting a project with them is only possible after purchasing the full collection or collections that include the applied template. Once purchased, both Free and PRO users can export their projects with these Premium templates.

How to Activate a Premium Template using VSDC Catalog

The VSDC Catalog is the easiest way to explore and purchase the best template collections for your needs. It provides a complete overview of all available packs, allowing you to preview each collection, watch a short demo video and read descriptions outlining their purpose and functionality.

Do you prefer transitions, animated backgrounds or something else? Browse through the available collections and pick the perfect option for your project!

Once you've made your choice, click BUY, fill out the checkout form and complete your order. After purchasing, you will receive a unique activation key via email. To activate your template collection:

  • Go to the Activation tab in VSDC
  • Click “Activate” and enter the key you received via email when purchasing the template collection
  • Restart your video editor.

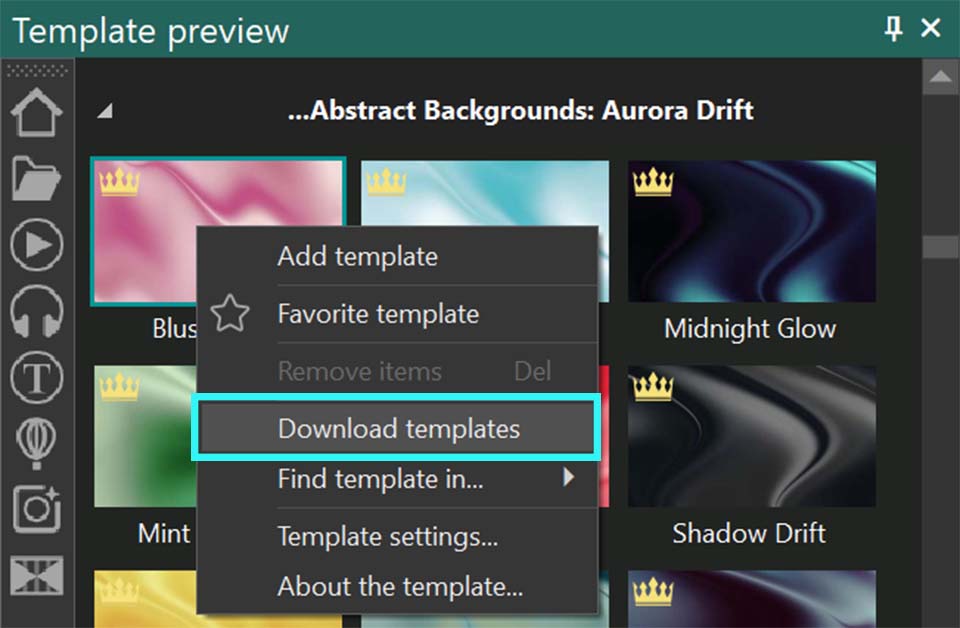
After activation, open the Template window, find your purchased collection and start using the templates! To ensure smooth access, download the templates before applying them by selecting the ones you need, right-clicking and choosing the “Download templates” option. Once the crowns turn yellow, the templates are ready to use.
How to Activate a Premium Template inside the Video Editor

Here the process is even simpler because you get a preview of how the template will look in your project before purchasing. Let’s say you apply a template, and when exporting the project, a notification appears indicating the use of a premium feature (marked as an Image, Template or Sprite with a lock icon).
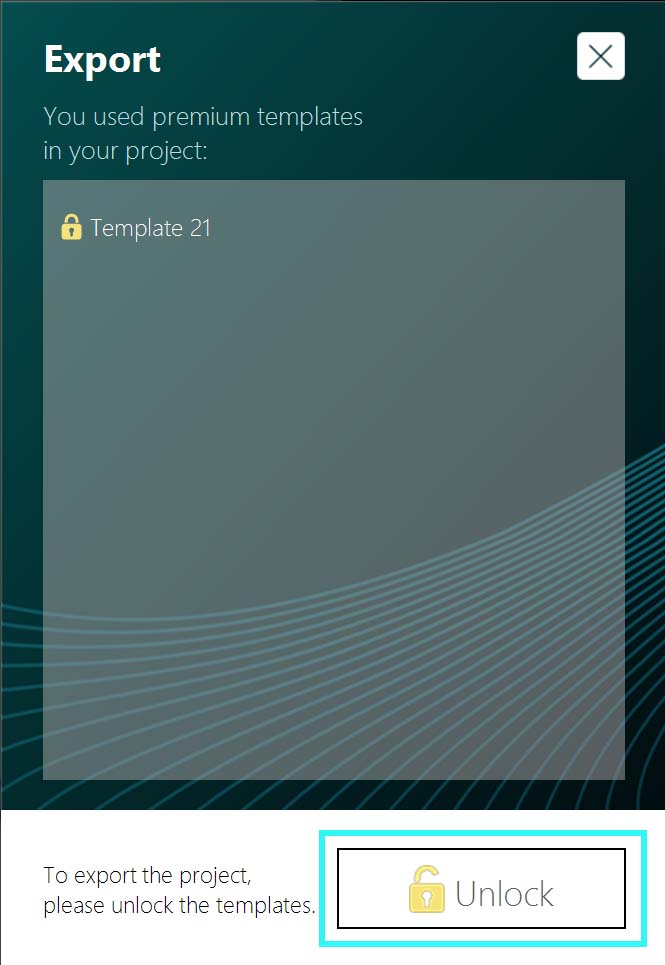
If you decide to export your project with this template, you’ll need to purchase it. Simply click on the Unlock in the window that appears during the export stage. This will take you to the checkout page, where you can complete your purchase. Once you receive your activation key via email, activate your collection through the Activation tab in VSDC and restart the video editor.

Working with Templates: Applying, Customizing and Adapting for Your Project

When using templates, the main goal is often to save time and effort by simplifying complex tasks. After all, why reinvent the wheel when you can use a ready-made solution? But here’s the best part—you can customize templates in a way that makes them uniquely yours!

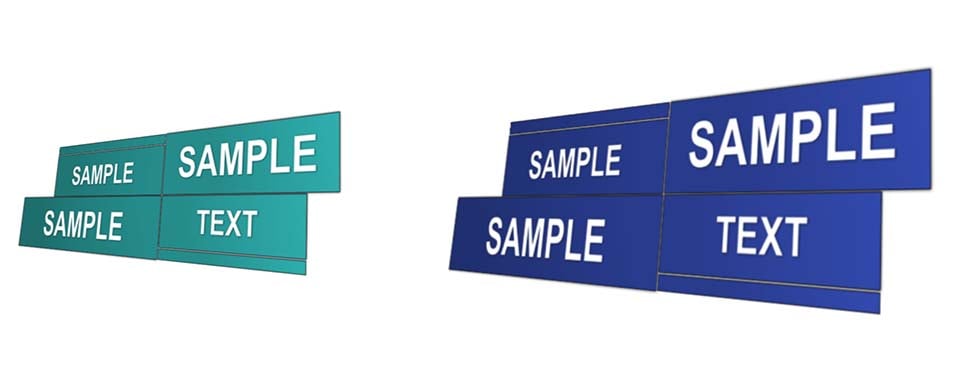
For example, let’s take a text-based template from the Premium Perspective Typography pack. Say you want to create a standout headline. Open the Template window, find the Perspective Typography folder and preview different templates. Choose a template—for instance, Text Perspective 5—and drag it onto the scene or the timeline.
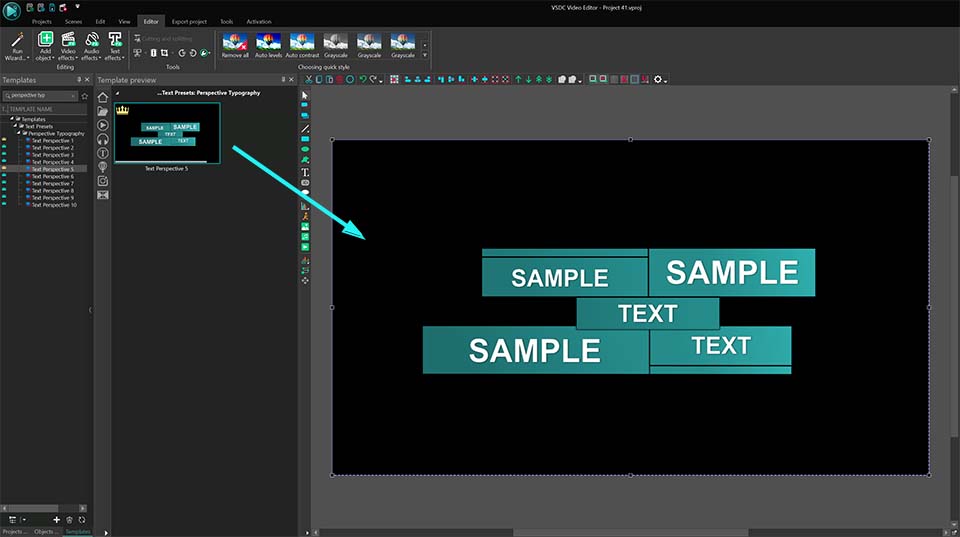
If the template hasn't been purchased yet, you'll notice a lock icon on the timeline and a notification in the bottom-right corner stating: "This is a Premium template available only for previewing. To export the project, please purchase it".

You can fully customize the template before purchasing. Since it appears as a sprite, you can explore its structure and modify individual elements—such as animation speed, color, Zoom intensity, etc.—before deciding to buy the pack.
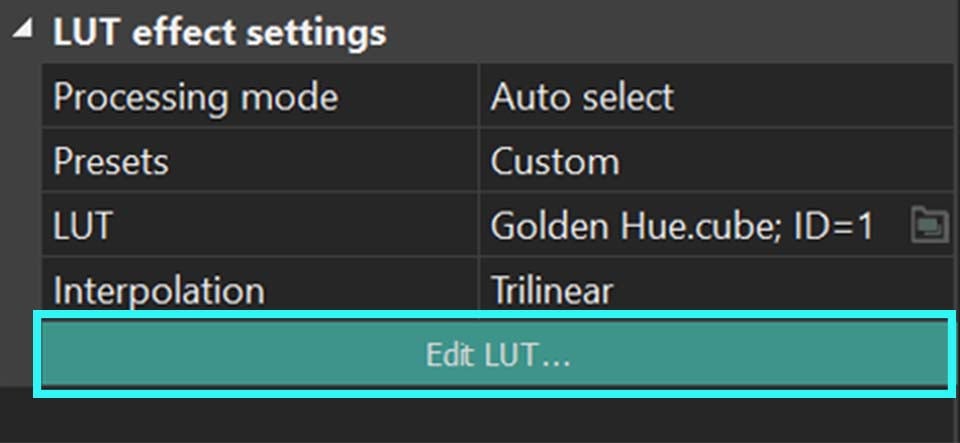
For another example, let’s see a premium LUT template. When you apply it to a video object, it’s automatically applied within that object. Unlike text-based templates, LUT templates are easier to adjust since they contain a single effect. You can modify them directly through the Properties window (don’t forget to select the LUT object on the timeline). Just click on Edit LUT there and adjust the color grading based on your desired tone and mood.

In our example, we use the “Golden Hue” template (the “Filmic Tones” LUT collection):
The only type of templates that work differently than previously described are transitions (this applies to Free, Pro and Premium templates). Typically, transitions are used between two videos to create a smooth visual flow from one to the next. To apply a transition, press and hold the ALT key, then use the left mouse button to drag the edge of the second video over the first one until a line appears between them. Finally, select the transition you want and drag it onto the space between the two objects.

There aren’t as many customization options for transitions as in the previous examples, but you can always adjust the transition duration. By extending the area between the two objects where the transition is applied, you can increase its duration, making it smoother. Conversely, by reducing this area, you can shorten the transition time, making it quicker and more abrupt.

See the example video with the transition Push top to bottom:

Now you know everything about our Premium Templates! We hope this article has been helpful to you. Learn more about the capabilities of VSDC Video Editor and what you can create with it.

Have you seen all our new premium packs? Share your thoughts with us on our Facebook, YouTube, X, Reddit or Discord!

If you have any questions or suggestions, feel free to reach out to our support team via email—we’d love to hear from you at This email address is being protected from spambots. You need JavaScript enabled to view it.!

How to transform text with VSDC: morphing letters, text reveal and text stroke animations, light effects, and more

How to Transform and Animate Text with VSDC

If your titles need a visual boost to grab attention, this article is for you. We’ll show you how to achieve striking results with our text conversion tool, first introduced in VSDC 9.3. With this powerful feature you can design a variety of text animations, including letter morphing, text reveals, stroke effects, light animations, and beyond. The possibilities are endless, driven by your creativity and how you tweak the settings. Prefer a quicker route? Try our presets and skip the adjustments altogether.

Ready to dive deeper? Keep reading for detailed descriptions.

Make sure you have the latest version of VSDC Video Editor installed!

Getting Started

To begin, launch VSDC Video Editor and create a new project by selecting the “Blank Project” option on the start page or by choosing “New Project” from the top horizontal menu. A pop-up window will appear, allowing you to set the desired resolution and frame rate. You can also rename your project if needed. Once you've configured all the settings, click on “Finish” and start adding a text object.

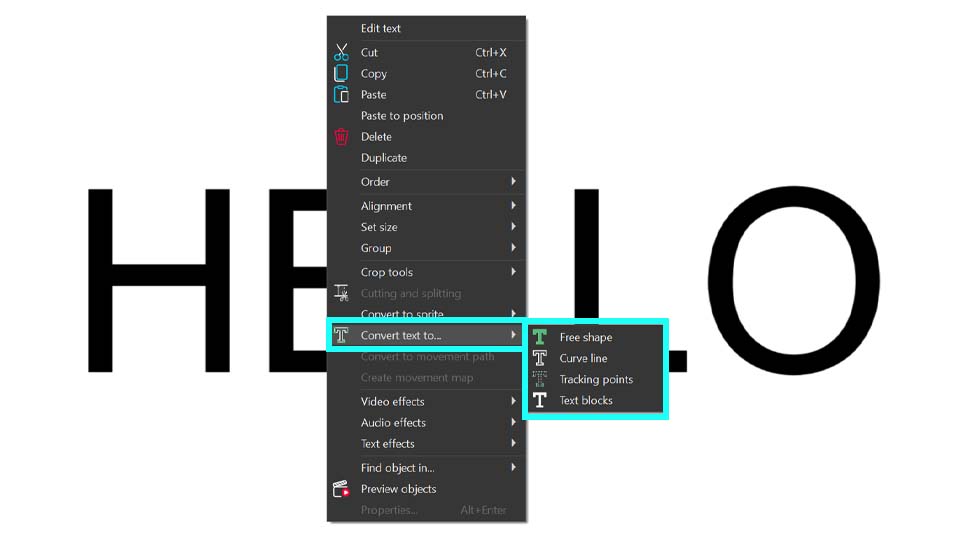
Press the ESC key to remove the blinking text cursor, then right-click on your text either on the scene or on the timeline and navigate to “Convert the text to”. Here you'll find four conversion options:

  • Free Shape
  • Curve Line
  • Tracking Points
  • Text Blocks

Selecting and customizing conversion modes

Once you've chosen your desired conversion mode, a settings window tailored to that mode will appear. Details about this window are provided in the next paragraph.

Text Conversion Tool Window

Let’s explore the interface of the Text Conversion Tool. While specific settings vary depending on the selected mode, the layout remains nearly identical across all of them. For instance, let’s have a look at the "Text Blocks" mode. To open it, right-click on your text object (make sure there is no blinking cursor—press ESC if needed), navigate to "Convert text to..." and select "Text blocks". The settings window will open, displaying its interface.

In the center you’ll find all the necessary settings for your text effects. In the following paragraphs you will learn how to work with them. On the left you’ll see the template window, where templates applicable to your text are listed. Remember that the template window is available only for “Text Blocks” and “Free Shape”.

On the right there is the preview window, allowing you to see how your text animation and the templates from the template window work. When you choose a template from the template window, it automatically appears in the preview. The text with applied templates and settings will only be visible after clicking on the “Preview” button located in the left corner of the central window. You can also use this button in case you accidentally close the preview area. Just click on it, and this area will be displayed again.

Note: To quickly access frequently used templates you can add them to your list of favorites. To do this, right-click the template you like and select the “Favorite template” option in the main template window. It will then appear under Favorite in the top-right corner, marked by the star-icon.

When you click on the same star-icon in the text conversion window, the templates you chose (effects or transitions) that can be applied to text will be displayed there.

Next to the “Preview” option you can see three buttons. The first one, "Move to sprite", automatically groups all objects created during the conversion into a single sprite. This is very useful when working with large amounts of text, as it prevents new objects from occupying too much space on the timeline and worsening navigation. If you need the objects to remain on the main timeline, simply click on the middle button, "OK". If you decide not to convert the text, click on the third button, "Cancel", or just close the window.

One more important option is the "Hide text afterwards" checkbox. If checked, your original text layer will be hidden after you click on “OK” or “Move to sprite” finishing the conversion process. If you prefer to keep it visible, simply uncheck this option. If you've already closed the settings window and want to adjust this, you can return the visibility of this layer by clicking the "eye" icon on the left side of the timeline.

Now let’s delve into the specific settings for each mode, guide you through the configuration process and demonstrate how to create simple text animations.

Text Reveal with the “Text Blocks” mode

After selecting the “Text Blocks” mode in the previous section, we’ll continue working with it. The settings window for this mode is already open, so let’s explore the purpose of each option.

The first one is the "Preset" feature, designed for users who prefer not to adjust numerous settings. Simply select a preset by clicking the arrow next to this option. For example, choose "Paint Brush - Words" from the drop-down menu.

If you want to see all of the presets one by one, make sure that you have the “Auto preview” checkbox enabled. This way you can view each preset without having to click the Preview button each time.

Once you’re satisfied with the result, choose between "Move to sprite" or "OK", depending on how you prefer to organize the objects on the timeline.

If you want to create your own text animations, it's essential to understand how the various settings work. Mastering these settings allows you to craft thousands of unique text animations, including the popular Typewriter effect, which requires adjusting only two parameters in this window: “Split by” and “Fade in”.

If you've experimented with presets before, it’s necessary to clear the automatically applied values in the fields to input your own settings. Simply close and reopen the text conversion window.

Let’s see the "Split by" option located under the “Preset”. It allows you to specify the elements into which the text object can be divided:

  • Characters: Splits the text into letters.
  • Words: Splits the text into words.
  • Sentences: Splits the text into sentences.

Selecting "Characters", for example, will transform each character into a separate text object on the timeline, giving you the flexibility to position them and apply effects to them individually. To see how your objects locate on the timeline, click on OK to go out from the text conversion window.

A better result can be achieved in combination with other settings. For example, with the “Fade-in” option that configures how your text blocks will appear on the scene. There are several variants for it:

  • Don't use: No fade-in effect is applied.
  • All at once: All text blocks appear simultaneously.
  • One by one: Text blocks appear sequentially from the first to the last.
  • One by one reversed: Text blocks appear sequentially from the last to the first.
  • Random order: Text blocks appear in a random sequence.

Let’s choose “One by one” and see the result. The text objects are automatically placed on the timeline so that they appear on the scene one by one. Isn't the result similar to the Typewriter effect?

If the fade-in seems to be too fast, you can improve it with the "Fade-in duration" option that sets the time interval during which all text blocks appear. This setting can be activated when "one by one", "one by one reversed" or "random order" Fade-in values are set.

For example, if we set “Fade-in” to "One by one" and “Fade in duration” to 3000 ms (3 seconds), all text blocks should appear within three seconds one by one. The timeline will automatically shift the time of appearance of each text block and you’ll get such result:

If you want the first character not to be on the screen immediately, but to appear a little later, e.g. a second after the beginning of the video, use the option "Fade-in overlap" that allows a simultaneous shift of the beginning of displaying all text blocks on the timeline. This parameter works together with Fade-in duration.

  • If we set Fade-in overlap to a value greater than 0, all text blocks shift to the left on the timeline, meaning they start appearing earlier.
  • If we set Fade-in overlap to a value less than 0, all text blocks shift to the right on the timeline, meaning they start appearing later.

As we want our text to start a bit later, we need to set this parameter to a value below 0 to delay the start of the text appearance, shifting it to the right. Let’s set it to -1000 ms, so the text appears one second after the video begins. Click on “Preview” to make sure of it and see how it looks on the timeline.

The highlight of this process is the Fade-in effect, which brings your text to life beautifully. You can select a template from the drop-down list or drag and drop it from the template window into the dedicated cell labeled “drag and drop effect here” (available only for "Free Shape and "Text Blocks"). When you select a template in the template window, its preview automatically appears on the left of the text conversion window. To see how this transition applies to your text, simply click on the "Preview" button.

For example, let’s choose the "Paint Brush: Top-Right Corner" effect and see the result—it’s stunning, isn’t it?

If you find that your text reveals too quickly, you can adjust the "Fade-in effect duration" to control the timing of its appearance. For example, set the duration to 3000 ms and you’ll notice that the animation becomes much smoother and more gradual.

Now that we’ve covered the Fade-in settings, let’s move on to the Fade-out parameters.

The "Fade-out" option is similar to the "Fade-in" parameter but controls the disappearance of text blocks:

  • Don't use: No fade-out effect is applied.
  • All at once: All text blocks disappear simultaneously.
  • One by one: Text blocks disappear sequentially starting from the first one.
  • One by one reversed: Text blocks disappear sequentially in reverse order.
  • Random order: Text blocks disappear in a random sequence.

In the video below you can see the text animation combined with all the previously configured settings and the “One by one reversed” option. With this effect all the letters of your text will disappear rapidly, creating a dynamic transition.

If you add the value for "Fade-out duration" that is similar to "Fade-in duration", but specifies the time interval during which all text blocks should disappear from the scene, the text disappearance will be smoother.

For example, if “Fade-out” is set to “one by one reversed” and “Fade-out duration”to 2000 ms, all text blocks will disappear within two seconds by the end of the playback.

Let’s move to the next option in the settings window, Fade-out overlap, that is similar to Fade-in overlap, but adjusts the simultaneous time shift of disappearance of all text blocks on the timeline. This parameter works in combination with Fade-out duration.

  • If the value of this parameter is greater than 0, the shift is performed to the right toward the end of the timeline.
  • If the value is less than 0, the shift is performed to the left, toward the beginning of the timeline.

Adding a transition from the "Fade-out effect" is a sure way to captivate your audience! You can easily apply the same effect used for Fade-in by clicking “Copy from fade-in” or choose a different effect from the drop-down list. Alternatively, you can drag and drop a new effect from the template window. So you can create a unique finishing touch for your text.

For our example we’ll use the "Paint brush: top-right corner" transition. However, feel free to select any other transition that suits your desired effect.

If your text vanishes too quickly, you can adjust the "Fade-out effect duration" to prolong the disappearance time. For a balanced animation, try setting it to 3000 ms, the same value as the “Fade-in effect duration”.

In this example we achieve an impressive reveal effect where the text is displayed with a brush stroke that also fades away in the same manner. By exploring the numerous options available, you can mix and match effects, unlocking over a thousand unique text animations!

Text Morphing with the "Free shape" mode

When for the "Convert text to" option the "Free shape" mode is activated, the text object you add to the scene is transformed into a group of free shapes. This type of conversion is especially useful for creating animations where letter shapes morph from arbitrary forms. It also allows you to work in greater detail with the color of each letter — as individual freeform objects — so you can adjust color gradients or set color changes using keyframes.

We start the same way we do in other modes: right-click on your text object and navigate to "Convert text to...". Select "Free Shape" here. You can choose from the same presets available for “Text Blocks” or input your custom values to create a unique effect.

For example, you can replicate the values shown in the video below to create a stunning Burning Text Reveal effect, complete with a matching disappearing effect.

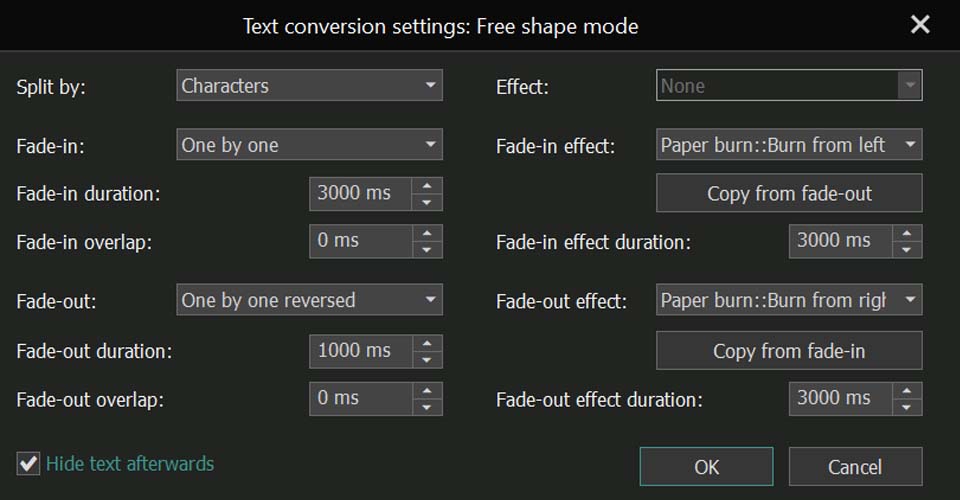
But as we convert our text in Free shapes, we can do lots of other things. For example, we can create the Morph Text animation. We don’t need any preset here, so please male sure that you have nothing chosen for this option. Let’s set the "split by" parameter to "by character", "Fade-in" to "one by one" and choose the desired fade-in duration and fade-in overlap (we set them to 3000 ms and -1000 ms accordingly).

For completing your work with this window we recommend clicking on "Move to sprite". The “Free shape” mode often creates many objects on the timeline, so organizing them all in one place is preferable.

To achieve morphing letter animations, create duplicates of each free shape on the timeline and adjust them gradually so that the shape transforms into a recognizable letter over time. It means that for each character you need to create several free shapes differently located on the timeline so that it gradually turns from a shape into a letter. In this way you’ll get frame-by-frame animation of your letters appearing from shapes.

The possibilities with free shapes don't end there. For example, you can also design impressive animated gradient logos and texts. For a detailed guide on creating them and exploring the various settings in the properties window to experiment with your text, watch our tutorial video.

Stroke Text with the “Curve Line” mode

The next mode we are going to discuss is "Curve line". When for "Convert text to" the "Curve line" mode is activated, the text object you add to the scene is transformed into a group of curves. This conversion is ideal for creating animations that outline the appearance of letters.

In the conversion settings window you'll find parameters that differ from those we discussed previously. Before analyzing these settings, note that each character may consist of multiple curves and the number of them can vary depending on the font and is determined by the font creator, not the video editor.

When you open this window, you'll notice right away that the template window is absent, unlike in the two previous modes. That is why, you won’t find any transitions in the fields for Fade-in and Fade-out effects. Keep in mind that it is not available for this mode and for the next one, "Tracking Point". So, don’t be surprised if you don’t see them while working with these options.

Let’s move on to the settings window for this conversion type, starting with the "Preset" parameter. Here, you'll find a variety of templates specific to this mode, different from the previous two modes. These include options for Stroke animations, allowing you to choose how your letters appear (one by one, random or all at once) and control the speed of the effect (slow, medium, fast).

If you want to create your own text effect, use the options available here. You’ll notice a new option—the "Mode" parameter—which wasn’t available in the two previous modes. This setting allows you to specify which curves to edit:

  • Both: Manipulate all curves of each letter in the source text object.
  • Even: Work with all even-numbered curves of each letter.
  • Odd: Focus on all odd-numbered curves of each letter.

If you want to work with the whole text, the best option is "Both", as it allows you to see all the curves of your characters. Choosing "Even" or "Odd" will only display some curves, which do not fully represent your letters.

In result when you select "Both", we have our text outlined:

You can add a smooth animation to it, making each letter appear one by one on the screen. To achieve this, use the settings you already know: set "Fade in" to "one by one" and choose "Duration" for the Fade-in effect. The timing of the Fade-in and effect duration parameters will depend on how long you want the full text to take to appear. We set them both to 3000 ms.

Just look at this! After adjusting three settings your own Stroke Text animation is ready!

Light Text Animations with the "Tracking points" Mode

The fourth type of conversion, Tracking points, is used to create animations that highlight letters along their contours, such as a running light effect.

Before we show you the effect, please note that, unlike other conversion types, conversion objects of this mode are created within the original text on the timeline and don’t make the text object itself invisible. That’s why the "Move to sprite" and "Hide text afterwards" options are disabled.

The settings in this mode differ slightly: parameters related to object fade-out, such as "Fade-out", "Fade-out duration", and "Fade-out overlap", are disabled. Additionally, the "All at once" option is not available for "Fade-in", and it’s not possible to view the "Fade-in effect" or its associated settings, as well as those connected to the "Fade-out effect". Presets are also disabled. These changes highlight the specific features of this mode.

Here, as in the previous section, curve lines are essential because the number of curves determines the number of effects applied to the text. So it is important to set the "Mode" parameter, which, as in the previous section, includes the following options:

  • Both: All curves of each letter in the original text object are used to create the highlighting effect.
  • Even: Only the even-numbered curves of each letter are highlighted.
  • Odd: Only the odd-numbered curves of each letter are highlighted.

Only in this mode can you find the "Effect" parameter. It determines the effect used to highlight the outlines of letters. The available options in it are:

  • None: No effect is applied.
  • LensFlare: Applies a sun glare effect to highlight the letter outlines.
  • BokehGlare: Uses a bokeh glare effect to highlight the letter outlines.

By adjusting all these settings, you will already get a perfect Light animation.

For example, let’s set "Mode" to "Both", "Effect" to "LensFlare", "Fade-in" to "One by one" and "Fade-in duration" to 10000 ms. This high value for the duration is necessary because the example phrase below is quite long, and the animation needs enough time to play out. Setting it to a lower value would make it too fast.

As a result, we have the following:

A more mysterious animation can be achieved if we change some parameters for LensFlare effects we have inside our text object. To do this, select all of them on your timeline and go to its properties window. Here you can adjust the flare intensity, light ray strength, color tone of your flares, visible area, etc. to enhance the visual impact.

By decreasing the value for the "Visible area" option, we create text that is highlighted with a glow in the dark.

That's only a small honor of what can be done with this tool!
Don’t hesitate to explore these modes and their properties window to uncover a variety of additional animations and effects.

We hope you found this article helpful and that you've explored all the linked resources to fully understand this new tool. To discover more possibilities, be sure to check out our tutorial video on our YouTube channel.

Do you still have questions? Let us know!

Feel free to contact us via email at This email address is being protected from spambots. You need JavaScript enabled to view it. or connect with us on our social media: Facebook, X, Reddit or Discord.

How to transform text with VSDC: morphing letters, text reveal and text stroke animations, light effects, and more

How to Transform and Animate Text with VSDC

If your titles need a visual boost to grab attention, this article is for you. We’ll show you how to achieve striking results with our text conversion tool, first introduced in VSDC 9.3. With this powerful feature you can design a variety of text animations, including letter morphing, text reveals, stroke effects, light animations, and beyond. The possibilities are endless, driven by your creativity and how you tweak the settings. Prefer a quicker route? Try our presets and skip the adjustments altogether.

Ready to dive deeper? Keep reading for detailed descriptions.

Make sure you have the latest version of VSDC Video Editor installed!

Getting Started

To begin, launch VSDC Video Editor and create a new project by selecting the “Blank Project” option on the start page or by choosing “New Project” from the top horizontal menu. A pop-up window will appear, allowing you to set the desired resolution and frame rate. You can also rename your project if needed. Once you've configured all the settings, click on “Finish” and start adding a text object.

Press the ESC key to remove the blinking text cursor, then right-click on your text either on the scene or on the timeline and navigate to “Convert the text to”. Here you'll find four conversion options:

  • Free Shape
  • Curve Line
  • Tracking Points
  • Text Blocks

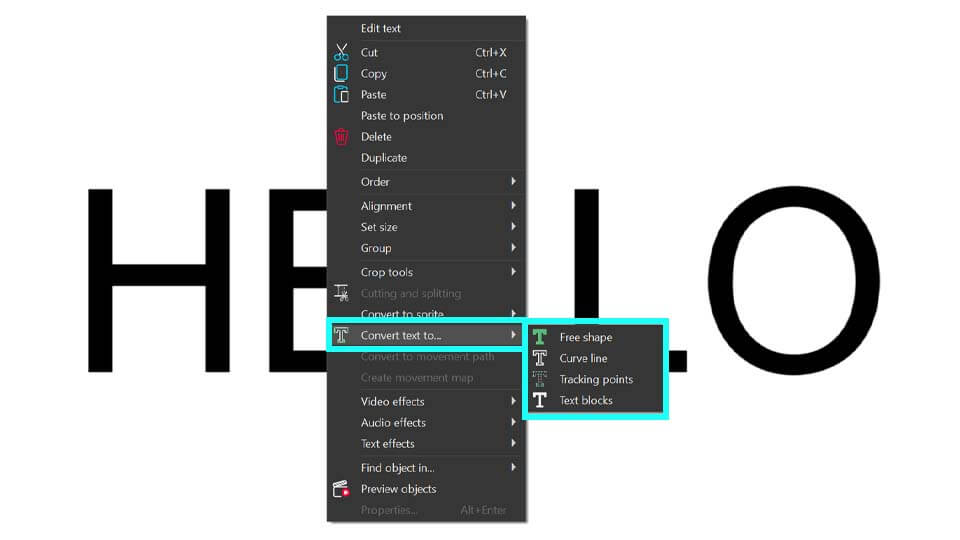
How to find the tool and its options for text conversion

Once you've chosen your desired conversion mode, a settings window tailored to that mode will appear. Details about this window are provided in the next paragraph.

It's essential to finalize your text before setting the values in this window. Once you've completed the conversion, any modifications like resizing or adding new words won’t be reflected, as the conversion is strictly based on the initial text object. To solve this problem, you can undo the conversion by selecting the Undo option above the preview window and reconvert your text.

In the following sections we will explore the specific settings available for each mode, guide you through the configuration process and demonstrate how to create some simple text animations, which you can use for your projects.

Text Reveal with the "Text Blocks" mode

Let’s start with the "Text blocks" option. With this mode you can achieve a similar result as with the Typewriter effect, but much faster. You only need to add a text object to the scene and convert it to text blocks, with each block containing one letter, one word or one sentence. The selected appearance or disappearance effect will be applied simultaneously to all text blocks of the specific text object.

To start text block conversion, right-click on your text object (make sure there is no blinking cursor; press ESC if necessary), navigate to "Convert text to..." and select "Text blocks". After that the settings window appears where you can see different options. Let’s discover what result we can achieve with them.

The first option, "Split by", allows you to specify the elements into which the text object can be divided:

  • Characters: Splits the text into letters.
  • Words: Splits the text into words.
  • Sentences: Splits the text into sentences.

In the lower-left corner of this settings window there's a "Hide text afterwards" checkbox. If checked, your original text layer will be hidden after you click on OK. If you prefer to keep it visible, simply uncheck this option. If you've already closed the settings window and want to adjust this, you can return the visibility of this layer by clicking the "eye" icon on the left side of the timeline.

Selecting "by characters", for example, will transform each character into a separate text object on the timeline, giving you the flexibility to position them and apply effects individually.

A better result can be achieved in combination with other settings. For example, with the "Fade-in" option that configures how your text blocks will appear on the scene. There are several variants:

  • Don't use: No fade-in effect is applied.
  • All at once: All text blocks appear simultaneously.
  • One by one: Text blocks appear sequentially from the first to the last.
  • One by one reversed: Text blocks appear sequentially from the last to the first.
  • Random order: Text blocks appear in a random sequence.

Let’s choose the “one by one” option and see the effect it creates. We remind you that if you want to make any adjustments in the conversion settings after you’ve completed the process, you’ll need to reconvert it, as the previous conversion is finalized. Just use the Undo option above the preview window.

You see that the text objects are automatically placed on the timeline so that they appear on the scene one by one. Isn't the result similar to the Typewriter effect?

If the fade-in seems to be too fast, you can improve it with the "Fade-in duration" option that sets the time interval during which all text blocks appear. This setting can be activated when "one by one", "one by one reversed" or "random order" Fade-in values are set.

For example, if we set "Fade-in" to "one by one" and "Fade in duration" to 3000 ms (3 seconds), all text blocks should appear within three seconds one by one. The timeline will automatically shift the time of appearance of each text block and you’ll get such result:

If you want the first character not to be on the screen immediately, but to appear a little later, e.g. a second after the beginning of the video, use the option "Fade-in overlap" that allows a simultaneous shift of the beginning of displaying all text blocks on the timeline. This parameter works together with Fade-in duration.

  • If we set Fade-in overlap to a value greater than 0, all text blocks shift to the left on the timeline, meaning they start appearing earlier.
  • If we set Fade-in overlap to a value less than 0, all text blocks shift to the right on the timeline, meaning they start appearing later.

As we want our text to start a bit later, we need to set this parameter to a value below 0 to delay the start of the text appearance, shifting it to the right. Let’s set it to -1000 ms, so the text appears one second after the video begins.

Fade-out is similar to the Fade-in parameter but controls the disappearance (end of display) of text blocks:

  • Don't use: No fade-out effect is applied.
  • All at once: All text blocks disappear simultaneously.
  • One by one: Text blocks disappear sequentially starting from the first one.
  • One by one reversed: Text blocks disappear sequentially in reverse order.
  • Random order: Text blocks disappear in a random sequence.

In the video you can see the effect of the "one by one reversed" option in combination with all the previous values for settings. All the letters of your text will disappear quickly.

If you add the value for "Fade-out duration" that is similar to "Fade-in duration", but specifies the time interval during which all text blocks should disappear from the scene, the text disappearance will be smoother.

For example, if “Fade-out” is set to “one by one reversed” and “Fade-out duration”to 2000 ms, all text blocks will disappear within two seconds by the end of the playback. The timeline will automatically shift the time of disappearance of each text block.

Let’s move to the next option in the settings window, Fade-out overlap, that is similar to Fade-in overlap, but it adjusts the simultaneous time shift of disappearance of all text blocks on the timeline. If the value of this parameter is greater than 0, the shift is performed to the right toward the end of the timeline. If the value is less than 0, the shift is performed to the left, toward the beginning of the timeline. This parameter works in combination with Fade-out duration.

The most interesting settings of the settings window are Fade-in and Fade-out effects, that allow to set a specific effect for the appearance and disappearance of text blocks. You can choose any transition from this list making your text look more eye-catching.

For example, let’s choose the “Paint brush: top-left corner” option for Fade-in effect. Now our text doesn't just appear smoothly, it's drawn out!

If we add a transition from “Fade-out effect”, your text is sure to surprise your audience! You can apply the same effect you have chosen for Fade-in by clicking on "Copy from fade-in" or apply another effect from the drop-down list.

Look at the result with the “Paint brush: top-right corner” transition. Isn’t it impressive?

Of course, you can choose any other transition for these effects.

If you don’t like that your text reveals or disappears too quickly, you can use Fade-in effect duration and Fade-out effect duration that are designed to set the time of appearance and disappearance of your text accordingly. Let’s set both of them to the value of 3000 ms and see that our animation is much smoother now.

In this example, we achieve an impressive reveal effect where the text is displayed with a brush stroke that also fades away in the same manner. However, feel free to experiment with other variations!

Text Morphing with the “Free shape” mode

When for the "Convert text to" option the "Free shape" mode is activated, the text object you add to the scene is transformed into a group of free shapes. This type of conversion is especially useful for creating animations where letter shapes morph from arbitrary forms. It also allows you to work in greater detail with the color of each letter — as individual freeform objects — so you can adjust color gradients or set color changes using keyframes.

We start the same way we do in other modes: right-click on your text object and navigate to "Convert text to...". Select "Free Shape" here. The settings window that appears afterward has the same settings we discussed for text blocks. Let’s choose here such values:

free shape mode Setting the values

In the result we have Burning Text Reveal with the same disappearing effect.

But as we convert our text in Free shapes, we can do lots of other things. For example, we can create the Morph Text animation. Let’s set the "split by" parameter to "by character", "Fade-in" to "one by one" and choose the desired fade-in duration and fade-in overlap (we set them to 3000 ms and -1000 ms accordingly).

To achieve morphing letter animations, create duplicates of each free shape and adjust them gradually so that the shape transforms into a recognizable letter over time. It means that for each character you need to create several free shapes differently located on the timeline so that it gradually turns from a shape into a letter. In this way you’ll get frame-by-frame animation of your letters appearing from shapes.

Moreover, with free shapes, you can design impressive animated gradient logos and texts. For a detailed guide on creating them and exploring the various settings in the properties window to experiment with your text, watch our tutorial video.

Stroke Text with the “Curve Line” mode

When for "Convert text to" the "Curve line" mode is activated, the text object you add to the scene is transformed into a group of curves. This conversion is ideal for creating animations that outline the appearance of letters.

In the conversion settings window you'll find parameters that differ from those we discussed previously. Before analyzing these settings, note that each character may consist of multiple curves and the number of them can vary depending on the font and is determined by the font creator, not the video editor.

Let's move to the settings window for this type of conversion and start with the Mode parameter, which specifies which curves to edit:

  • Both: Manipulate all curves of each letter in the source text object.
  • Even: Work with all even-numbered curves of each letter.
  • Odd: Focus on all odd-numbered curves of each letter.

If you want to work with the entire text, the best option is "Both," as it allows you to see all the curves of your characters. Choosing "Even" or "Odd" will only display some curves, which do not fully represent your letters.

In result we have our text outlined:

You can add to it a smooth animation, making each letter appear one by one on the screen. To achieve this, set "Fade in" to "one by one" and choose "Duration" for the Fade-in effect. The timing of the Fade-in and effect duration parameters will depend on how long you want the full text to take to appear.

We set them both to 3000 ms.

Just look at this! After adjusting three settings your Stroke Text animation is ready!

As shown in our previous examples, you can also add a Fade-out animation.

Note: the transitions for Fade-in and Fade-out effects are unavailable in this mode.

Light Text Animations with the “Tracking points” Mode

The fourth type of conversion, Tracking points, is used to create animations that highlight letters along their contours, such as a running light effect.

Before we show you the effect, please note that, unlike other conversion types, conversion objects of this mode are created within the original text on the timeline and don’t make the text object itself invisible.

The settings differ slightly as well. Parameters related to object fade-out, including fade-out, fade-out duration, fade-out effect, and fade-out effect duration, are disabled. Similarly, fade-in effect and fade-in effect duration are inactive, and the "All at once" option is not available for fade-in.

Only in this conversion type the Effect parameter becomes active and determines the effect used to highlight the outlines of letters. The available options in it are:

  • None: No effect is applied.
  • LensFlare: Applies a sun glare effect to highlight the letter outlines.
  • BokehGlare: Uses a bokeh glare effect to highlight the letter outlines.

Here, as in the previous section, curve lines are essential because the number of curves determines the number of effects applied to the text. Any glares you add will follow the curve lines defined by your font’s shape. So it is important to set the Mode parameter, which, as in the previous section, includes the following options:

  • Both: All curves of each letter in the original text object are used to create the highlighting effect.
  • Even: Only the even-numbered curves of each letter are highlighted.
  • Odd: Only the odd-numbered curves of each letter are highlighted.

By adjusting all these settings, you will already get a perfect Light animation.

For example, let’s set "Mode" to "Both", "Effect" to "LensFlare", "Fade-in" to "One by one" and "Fade-in duration" to 10000 ms. This high value for the duration is necessary because the example phrase below is quite long, and the animation needs enough time to play out. Setting it to a lower value would make it too fast.

As a result, we have the following:

A more mysterious animation can be achieved if we change some parameters in the properties window for LensFlare effects we have inside our text object. To do this, select all of them on your timeline and go to its properties window. Here you can adjust the flare intensity, light ray strength, color tone of your flares, visible area, etc. to enhance the visual impact.

By decreasing the value for the "Visible area" option, we create text that is highlighted with a glow in the dark.

That's only a small honor of what can be done with this tool!

Don’t hesitate to explore these modes and their properties window to uncover a variety of additional animations and effects.

We hope you found this article helpful and that you've explored all the linked resources to fully understand this new tool. To discover more possibilities, be sure to check out our tutorial video on our YouTube channel.

Do you still have questions?

Feel free to contact us via email at This email address is being protected from spambots. You need JavaScript enabled to view it. or connect with us on our social media Facebook, X, Reddit or Discord.

How to Create a Slideshow Using VSDC Wizard

How to make a video slideshow with Video Editor

If you're passionate about creating slideshows, but don’t understand how to do it in VSDC, this article is an absolute must-read for you! It's packed with in-depth answers to many of your burning questions, such as:

- How can I create a slideshow in VSDC?
The article walks you through the entire process—from importing your photos and videos to adding the finishing touches and exporting the whole project.

- Where is the slideshow creation tool located in VSDC?
Learn exactly where to find the slideshow creation tool within VSDC's interface.

- What transitions are available for slideshows, and how can I access them?
Transitions can make your slideshow more dynamic and engaging. Here you’ll explore the wide variety of transition effects that VSDC offers, from simple fades to more complex ones.

If you have similar questions about this tool in VSDC, rest assured—you're in the right place to find answers. Let’s dive in!

Make sure you have download windows versionVSDC 9.3version or higher installed

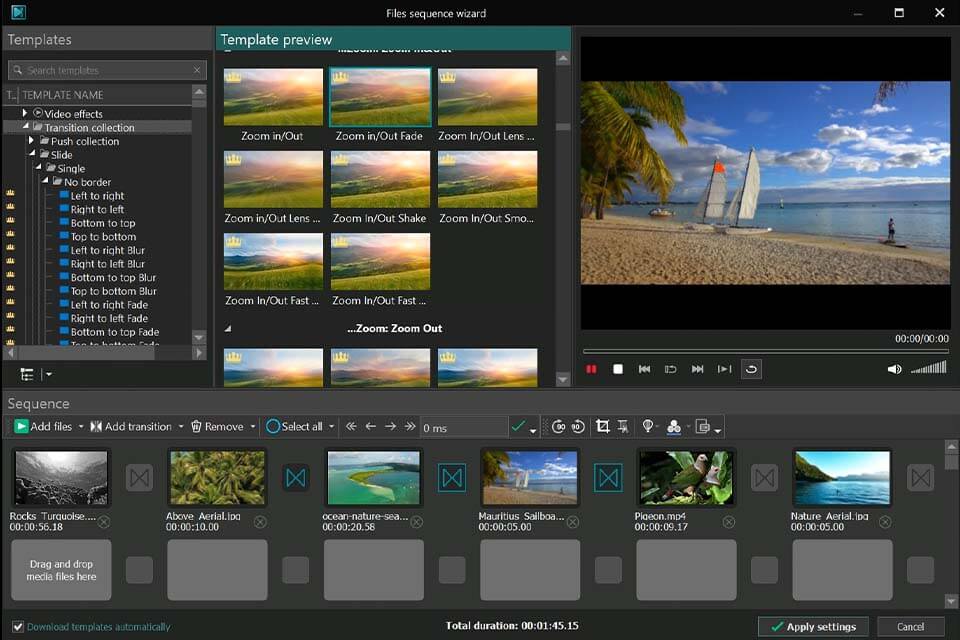
Before we start, it's essential to know that the slideshow creation tool in VSDC is called the VSDC Wizard. It operates as a separate window called the Files Sequence Wizard, accessible in several ways within the VSDC Video Editor.

Interface of the window

How to Access the VSDC video editor Wizard

The fastest way to access the Wizard is directly from the main window. Simply launch VSDC Video Editor and select the “Create Slideshow” option. You'll then be prompted to specify settings for your slideshow, such as the title, resolution, frame rate, and other parameters. Once you've adjusted these settings, click on “Finish” to proceed, and you'll be directed to the Files Sequence Wizard.

Another method to initiate the Wizard is from a new project. To do this, click on “Blank Project” in the main window or select the “New Project” icon with a green plus on the top panel. After specifying your project settings in the pop-up window, click on “Finish”. Then navigate to the “Editor” tab on the top panel and select the first option on the left, labeled “Run Wizard”, represented by a magic wand icon.

Note: when using the method “from a new project”, the slideshow's resolution and other settings will automatically match the project settings you've defined at the project's start.

If you're already working on a project and wish to create a slideshow from files on the timeline, you can do it directly within the existing project. Simply select the desired files by holding the mouse button, then expand the menu under the “Run Wizard” option on the Ribbon. Choose “Edit Objects Sequence”, and you'll be able to create a slideshow from your selected timeline files.

Inside the Files Sequence Wizard

When you enter the “Files Sequence Wizard” window, you’ll see that its interface is divided into several sections:

  • Transition Templates Window: This is where you can choose transition effects for your slideshow.
  • Transition Preview Window: Here you can preview the transition effects you've selected.
  • Slideshow Preview Window: This section allows you to preview the entire slideshow or individual files with the applied transitions.
  • Sequence Panel: In this area your media files and transitions are displayed and arranged, allowing you to organize your slideshow.

How to Add Media Files to the Sequence Panel

Now when you have opened Files Sequence Wizard and reviewed its contents, the next step is to add media files to the Sequence Panel. This panel will display all the media files that will be part of your project.

Note: You can skip this step if you open the Wizard within the existing project. In this case, the files you select from the timeline will automatically appear on the Sequence Panel.

However, if you access the Wizard through one of the other two options, here's how to add files to the Sequence Panel. You have several methods to choose from:

  • Drag and drop: You can simply drag and drop files from your computer directly onto the Sequence Panel.
  • Use the cells: Click on an empty cell on the Sequence Panel to open your file explorer and select files.
  • Add files option: Alternatively, use the “Add Files” button in the upper left corner of the Sequence Panel. If you click on the dropdown arrow, you will have two choices:
    • Add files: This opens the file explorer, allowing you to add new files to the panel. If files already exist on the panel, new files will be added to the end of the current sequence.
    • Insert files: If you want to place a file between existing ones, select the file that should come after the new one and choose Insert File. The new file will be added in front of the selected one.

How to Manage Files on the Sequence Panel

After you have added the media for your slideshow for further editing, you might want to make some changes and rearrange your files on the Sequence Panel. You can do it by clicking and holding the left mouse button on a file and dragging it to another position to swap the files.

Additionally, above the Sequence you’ll find several toolbar options represented by arrow icons that allow you to move selected files:

  • To beginning: Moves the selected file to the beginning of the Sequence, shifting all files that were placed before it forward.
  • Forward: Moves the selected file one position toward the beginning of the Sequence, while the file currently in that position shifts forward.
  • Backward: Moves the selected file one position toward the end of the Sequence, while the file currently in that position shifts backward.
  • To end: Moves the selected file to the end of the Sequence, shifting all files that were placed after it backward.

How to Delete Files from the Sequence Panel

For convenient removal of files from the "Sequence" panel, there are several methods available. You can delete unwanted files by selecting them on the panel and pressing the Delete key on your keyboard. Each file on the panel also features a red cross icon for quick deletion.

To delete multiple files at once, you can use the "Remove" option on the toolbar above all files: simply select the files you want to remove and click the corresponding button.

If you need to delete all files simultaneously, just click on the arrow next to the "Remove" option and choose "Remove all files" from the dropdown menu.

How to Edit Files on the Sequence Panel

For editing files there are the following tools on the Sequence:

  • Select All: Selects all the objects on the Sequence Panel. If you expand this option’s menu, you’ll also see “Invert Selection”, which selects all files and deselects the current one. This is useful when you need to delete or modify several objects at once (e.g., for rotating them).
  • Duration Field: Allows you to adjust the duration of photo files in the slideshow (in seconds) or displays the duration of the selected video files. If you set a duration for photo files, be sure to click the green checkmark to apply the changes.
  • Rotate 90 Degrees: Rotates the selected file(s) 90 degrees clockwise.
  • Rotate -90 Degrees: Rotates the selected file(s) 90 degrees counterclockwise.
  • Crop Borders: Helps you crop the selected file.
  • Cutting and Splitting: Allows you to split the selected video into parts or trim unnecessary segments.
  • Quick Styles: Lets you apply one of the available preset styles or filters to the selected file.
  • Background Color: Allows you to change the background color of the selected file.
  • Properties: Opens a separate window displaying the properties of the selected file.

Take into account that if you click on the file name in the Objects Explorer on the left, the Properties Window will open on the right. Additionally, if you click on “Click here to add effect” under the object’s name, an additional menu will open, allowing you to add video or audio effects.

Note: All of the options mentioned above are also available by right-clicking on the object.

How to Apply Video Transitions

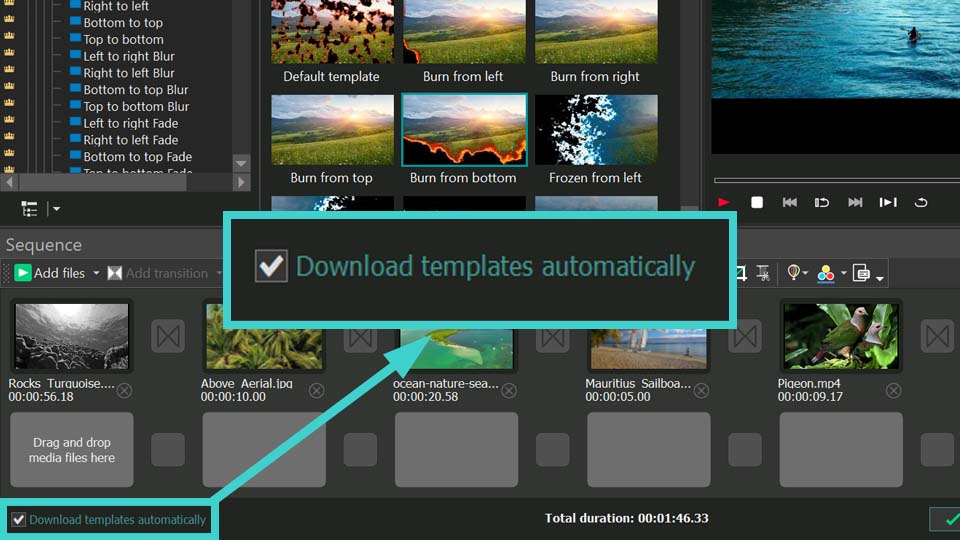
For many of you the most enjoyable step in creating slideshows is applying video transitions. Before starting it, make sure the “Download templates automatically” option is enabled in the bottom left corner of the window. This way you won’t have to wait for templates to download before using them.

Location of the “Download templates automatically” option

To add a transition, first you need to choose it in the Templates window. You can click on a transition group in the Templates window to display all transitions from that group in the Preview Template window.Alternatively, you can click on a specific transition in the Templates window to show only its preview. The preview in the Preview Templates window will activate when you hover your mouse over it.

Once you’ve chosen your transition, click and hold the left mouse button on the desired effect, then drag it to the required transition point on the Sequence Panel.

You can also pre-select one or more transition points on the Sequence Panel, then select a transition effect in the Templates or Preview Templates window and click on the “Add a transition” option. This will apply the selected transition to the chosen positions.

Note:

  • If you expand the “Add a transition” menu, you’ll see the “Add a random transition” option, which applies a random effect from the Templates window to the selected position.
  • There is also the “Add random transitions to all files” option, which applies random transitions to all files.

How to Modify Video Transitions

If you need to change a transition, the process is identical to applying it. Simply add a new transition in place of one you want to replace. You can also adjust the transition duration in the Duration field (in seconds) and immediately view the result in the Preview window.

To modify multiple transitions at once, you can use the following tools:

  • Select All: Selects all transitions on the Sequence Panel based on your current selection. If one transition is selected, this option will select all others.
  • Invert Selection: Available in the dropdown menu under “Select All”, this option selects all transitions except the current one.

If you need to delete a transition, you can select it and press the “Delete” key on your keyboard or use the “Remove” option in the toolbar. To delete all transitions, expand the “Remove” menu and select “Remove all transitions”.

How to Preview the Slideshow

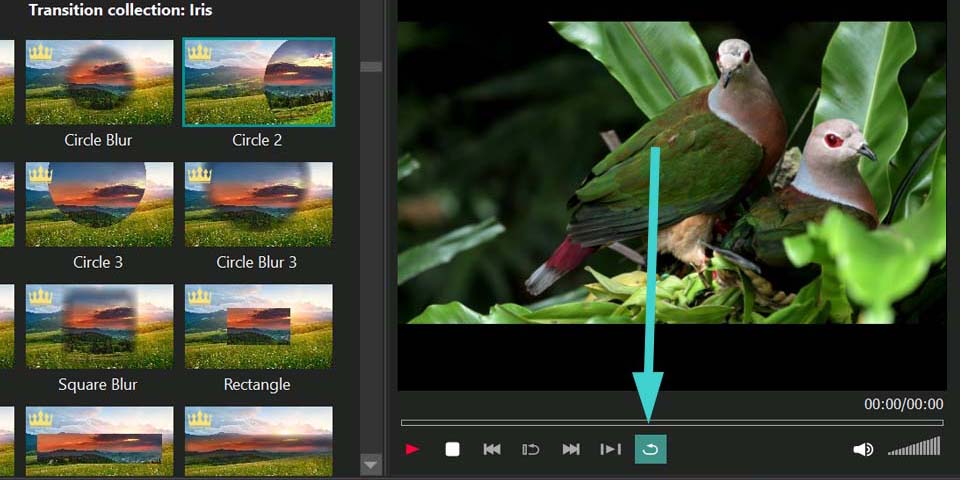
To preview the slideshow, use the Preview window on the right. By default, it only displays the currently selected file on the Sequence Panel, and the “Loop Playing” option is enabled, meaning playback will automatically repeat. This is useful when you’re still building the slideshow and want to review your files and transitions.

Location of the “Loop Playing” option

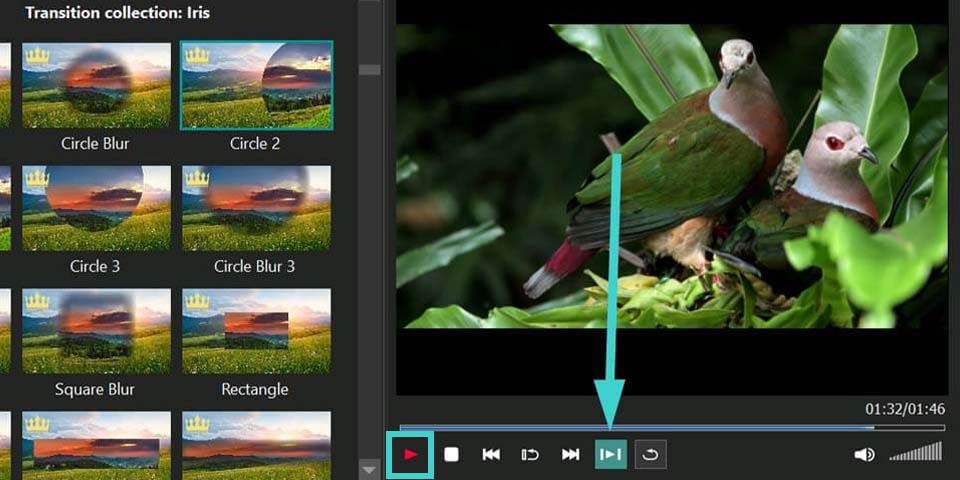
Once your slideshow is created, enable the second-to-last option, “Play all objects in the sequence”, and then press the red “Play” button to play the entire slideshow.

Location of the “Play all objects in the sequence” and “Play” tools

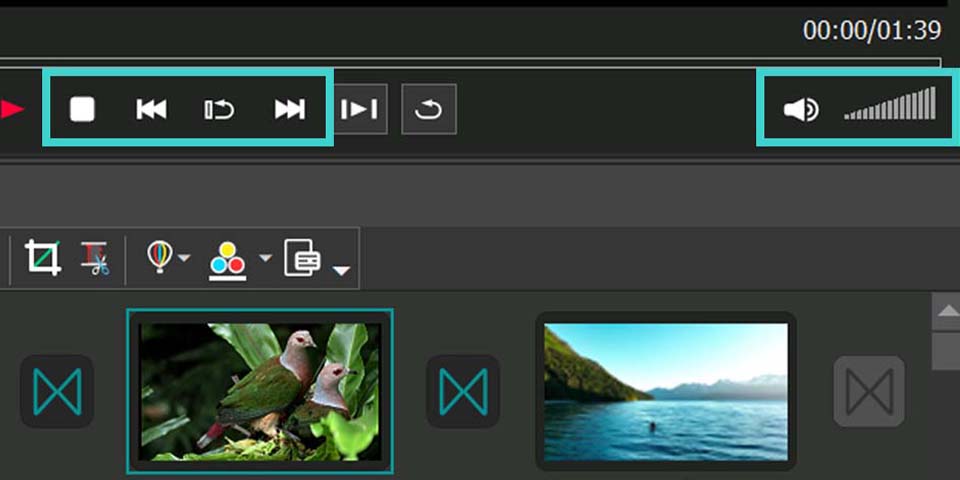
Additionally, the Preview window offers several controls:

  • Stop Playing: Stops the playback.
  • Play the Previous Object (it is active, if you have already clicked on “Play all objects in the sequence”): Moves the playback to the previous file in the sequence.
  • Repeat Currently Playing Object: Repeats the playback of the current file.
  • Play the Next Object (it is active, if you have already clicked on “Play all objects in the sequence”): Moves the playback to the next file in the sequence.
  • Mute Audio: Mutes the sound, and there is also a volume adjustment slider.

You can also see the full duration of the slideshow or the selected file in the Preview window. Note that the total slideshow duration is displayed at the bottom of the Wizard.

Preview control options

How to Apply Settings and Finalize the Slideshow

Once you're satisfied with the preview, click on the “Apply Settings” button and your slideshow will appear on the main timeline of VSDC Video Editor.

If you need to make any changes after applying the settings, simply select the sequence on the timeline, then go to the Ribbon on the “Editor” tab, click the dropdown menu under “Run Wizard” on the left, and select “Edit Object Sequence”. The Files Sequence Wizard will reopen, allowing you to make adjustments.

After that, you can proceed to export your project. Read this article to learn how to export and save your project in the desired format.

We hope you found this article helpful and that you've explored all the linked resources to fully understand this new tool. To discover more possibilities, be sure to check out our tutorial video on our YouTube channel.

If you have any questions, don't hesitate to email us at This email address is being protected from spambots. You need JavaScript enabled to view it. or reach out to us on social media platforms like Facebook, X, Reddit or Discord.

How to use VSDC cloud service

Looking to work on your VSDC projects from anywhere? The VSDC Cloud Service is designed for you. This platform allows you to store, upload, download, edit and share files wherever you are. You can access and manage your projects and media from any computer with an internet connection and VSDC Video Editor installed. And guess what? VSDC Cloud isn't just for desktops — it's also at your fingertips on iOS devices.

VSDC cloud video services

Getting Started with VSDC Cloud Service

Before you can start using the features of the VSDC Cloud Service, you’ll need to subscribe and set up an account.

Note: The iOS version does not support subscribing to the VSDC Cloud Service, creating an account, modifying account details and recovering passwords. These actions can only be done through the desktop version.

To subscribe, head over to the official VSDC website and choose one of the six available subscription plans that best fits your needs. Once you've selected a plan, complete the purchase form with your personal information and the email address you want to use for registration. Follow the on-screen instructions to finalize your purchase.

After subscribing you can create your account by visiting the VSDC Cloud Service page. Use the email address you provided during the purchase to register. Then set up your username and password, review and accept the Terms of Use and EULA and click on the registration button to finish setting up your account.

For more details refer to our updated Help User Manual.

Once your account is set up, you can sign in to it in both the desktop and iOS versions. To sign in to the cloud on your iOS device, simply open the VSDC Video Editor app, tap on "Settings" from the main screen and select "Cloud." Then enter the login credentials you created during registration.

Editing Your User Account (only in the Desktop Version)

To modify your account settings, click on the three-dot icon in the upper right corner of the webpage and select "Settings" from the dropdown menu.

In the "Profile" section you can update various details such as your password, avatar, username, first and last names, email and phone number. In the iOS version you can view your username and email under the "Account" tab, but modifications cannot be made there.

Additionally, here you can monitor all devices currently logged into your account in the "Sessions" section of the desktop version. To protect your account, you can terminate any session by clicking the "X" next to the device.

If you need to change language settings for the VSDC Cloud Service, you can do it on any page in the desktop version via the option located at the bottom of the screen. The iOS version is only available in English.

Main Tabs in the VSDC Cloud

In the desktop version of VSDC the menu bar features four main tabs. Below we'll explain each tab and where to find similar functions in the iOS version.

  1. Apps Tab

    This tab lists all VSDC products that are available for download. To view detailed information about a specific VSDC product and its system requirements, click on the "More" button. To start installing an application, click on the "Install" button.

    In the iOS version there is no such tab.

  2. Projects Tab

    In the desktop version all your projects are located in this app. For convenience, they are divided into the following categories:

    • My Projects: Displays all projects uploaded to the Cloud service.
    • Shared: Shows projects that have been made publicly accessible through sharing links.
    • Favorite: Contains projects marked as favorites (indicated by a "star").
    • Recent: Displays the projects that were recently accessed.
    • Trash: Contains projects that have been deleted.

    Selecting one of these categories opens a list of all projects stored there. For each project the following information is displayed: date and time added, file name and size. In the "My Projects" group only the file name and size are displayed.

    To view detailed information about a project (its project type, owner, upload date, last modification date and last access date), click on the icon "i" on the right to the desired project.

    In the iOS version you can see the projects uploaded to the cloud on the “Remote” tab located on the main screen of the VSDC Video Editor app on iOS.

  3. Support Tab

    If you experience any issues or have questions about the VSDC Cloud service, you can use the feedback form found under this tab to leave your message.

    In the iOS version you can reach our support team by selecting the “Report a problem” option in the Settings. Besides, you can suggest new features by tapping on the “Suggest new features” option also located in the Settings.

    Our support staff will respond to your inquiry via email within 72 hours.

  4. Files Tab

    This tab organizes all your media files uploaded from VSDC Video Editor into categories for efficient management:

    • My Files: Shows all files stored in the Cloud service.
    • Shared: Displays only the files that have been shared via generated links.
    • Favorite: Contains files marked with a "star" for quick access.
    • Recent: Lists the most recently accessed files.
    • Trash: Contains files that have been deleted.

    For all categories, except My Files, you can see file name, size and date and time of creation. In the “My Files” category only file name and size are displayed.

    To view more details about a file, click on the information icon “i” next to the file you are interested in. This will display details such as the file type, owner, upload date, last modification date and last access date.

    In the iOS version your files are located on the dashboard and divided into two groups:

    • Cloud Files: Shows all files stored in the Cloud.
    • Local Files: Displays files downloaded from the Cloud.

    Here you can see only file names, with no additional details.

Adding Files to the VSDC Cloud

To add files to the VSDC Cloud, click on the “Upload” button in the top left corner of the screen, then click on the upload window to select files from your computer or drag and drop them. Multiple files can be uploaded simultaneously. Once uploaded, the files will be marked with a checkmark and will appear in the “My Files” section.

In the iOS version you can add your files by tapping on the “+” icon in the right lower corner of the screen in the Home tab and selecting the “upload” option. After that you can add files from:

  • Photos: device photo library.
  • Files App: a tool for managing files stored on the device, iCloud and other cloud services.
  • App’s folder: local storage in the VSDC app if you have previously saved files from Cloud.

Creating Folders in the VSDC Cloud

To better organize your files, you can create a new folder. In the desktop version simply click on the “New folder” button located in the top left corner of the screen. A pop-up window will appear where you can enter the folder name. Once you've done that, click on "Create" and your new folder will be added to the "My Files" section.

In the iOS version the process is just as simple. Tap the "+" icon in the bottom right corner of the Home tab, then select "Create folder". After naming your folder, choose the files you'd like to add.

Managing Files in the VSDC Cloud

You can manage each file by clicking on the three-dot icon next to it or by right-clicking on the file in the desktop version. A menu will appear with various options, including:

  • Preview: Opens the file in a full-screen preview window, where you can flip the file horizontally or vertically, rotate the file clockwise or counterclockwise, reset any changes made, toggle the full screen mode, zoom in or out, download the file.
  • Share: This option allows you to share files with platform users or non-registered individuals. To generate a shareable link, click on "Get link".
  • Segmentation: This feature is used for partitioning an image into multiple regions based on object boundaries. Please note that this option is not available for .vproj project files. Learn more about the segmentation tool in VSDC Video Editor.
  • Download: This option starts the process of downloading the selected file to your PC.
  • Add to Favorite / Remove from Favorite: This feature is designed for quick access to frequently used or important files.
  • Rename: Selecting this option from the dropdown menu opens a window where you can enter a new name for the file.
  • Copy: This option allows you to create a duplicate of the selected file in one of your existing folders.
  • Move: The "Move" option allows you to transfer the selected file to a different folder within the platform.
  • Trash: This option is used to move the selected file to the Trash bin, removing it from the "My Files" list.

In the iOS version you have a slightly limited functionality compared to the desktop version. You can:

  • View folder contents.
  • Upload files to or from Cloud.
  • Copy, move, delete, rename your files.
  • Add to Favorite / Remove from Favorite.

Adding Projects to the VSDC Cloud

Adding projects to the VSDC Cloud service is directly connected to working in VSDC Video Editor PRO or FREE and requires an active internet connection. To add a project, follow these steps:

  • Install VSDC Video Editor if you haven’t yet and open it on your PC or iPhone.
  • Create a new project or open a previously created project in the video editor.
  • After making all necessary changes, go to the “Projects tab” and save the project to the Cloud using the "Save to Cloud" or "Save as to Cloud" option if you need to rename the project.
  • Enter your login and password for your VSDC Cloud account and click on "OK".
  • In the "Save as" window that opens, select the folder for saving the project and, if necessary, change its name in the "File name" field. Then click on Save.

The project will be saved in the Cloud with all resources (videos, images, audio) used to create it.

Note: If a project is added to the Cloud service similarly to adding a media file, and not through the VSDC Video Editor, all resources used to create the project will be lost (they will not be displayed in VSDC Cloud).

A project created in the VSDC Video Editor app on iOS can also be uploaded to the Cloud and then imported to any other iOS device. Project formats between iOS and Windows are not compatible, so, remember, that you can open a project only on the device on which it was created.

To export a project to the Cloud in the iOS version, you need to:

  • tap the project list icon on the VSDC Video Editor app's home screen.
  • tap the three dots at the bottom right corner of the project tile.
  • select “Save external”.

The projects uploaded to the Cloud can be seen on the “Remote” screen with names according to the “YYYYY-MM-DD_HH.MM.iosproject” template in the VSDC app.

Loading Projects from the Cloud to the Video Editor

To start working in VSDC Video Editor with a project saved in VSDC Cloud, follow these steps:

  1. Go to the Projects tab in the top horizontal menu of the editor and select the "Open from Cloud" option. Alternatively, click the program icon in the top left corner, then select Cloud >> Open Project.
  2. Enter your login and password for your VSDC Cloud account.
  3. In the "Open" window, select the desired project from the available folders. Once you've selected the project and clicked "Open," the project and all its resources will be loaded into the editor.

To import a project from the Cloud to VSDC Video Editor in the iOS version, you need:

  • Open VSDC Video Editor app on your iOS device.
  • Tap the “Video” option on the lower horizontal panel and select the “Cloud” option.
  • Choose the project from the appeared Home screen and tap on the three dots next to it;
  • Tap on “Select”;
  • Once your project is loaded from the Cloud, it will be added to the timeline.

Importing Media Files from the Cloud to the Editor

If you want to import a media file from VSDC Cloud Service into a project in VSDC Video Editor, you need to:

  1. Navigate to the Resources window.
  2. Right-click on an empty space in the window or click the plus icon at the bottom of the window and select the "Add from the Cloud" option.
  3. Choose the type of file you want to import: Videos, Images, Sounds or LUTs.
  4. Enter your login and password for your VSDC Cloud account.
  5. In the "Open" window select the file you wish to import.
  6. Drag and drop the file from the Resources window onto the Timeline to use it in your project.

In the iOS version this process is simpler, like loading projects from the Cloud to the Video Editor.

  • Open VSDC Video Editor app on your iOS device.
  • Tap the “Video” option on the lower horizontal panel and select the “Cloud” option.
  • Choose the media file you wish to import from the appeared Home screen and tap on the three dots next to it.
  • Tap on “Select”.

If you have any questions or encounter difficulties with VSDC Cloud, please contact us at This email address is being protected from spambots. You need JavaScript enabled to view it. or post your question on any of our social networks, for example, Facebook or X, where not only VSDC staff, but also users will be able to join your problem.

Page 1 of 36

News

VSDC Christmas Update 9.4: Enhanced Effect Management, 100+ Background Templates and Streamlined Editing

This holiday season embraces new beginnings with the latest update of VSDC Video Editor! We’ve listened to your feedback and decided to focus on enhancing the tools you love most—all while laying the...

VSDC 9.3: 150+ Templates, Text Transformer, Sprite Auto-Detect and GUI Update

Change is all about improvement, and this process wouldn't be possible without your input. After carefully reviewing your feedback, we’ve addressed several key issues and introduced updates designed...

Best Special Effects Software

Intro In 2024 the options range for creating visual effects is incredibly diverse and it becomes more and more challenging to identify the top choices. Here you can find a guide to the top visual FX...

VSDC 9.2: AI Segmentation Models, 300+ Transitions, VSDC Cloud and New Templates Pack

Are you ready to explore new heights with the latest major VSDC update? Finally, Version 9.2 is here! Packed with groundbreaking features, including the new AI-powered Segmentation tool, this update offers...

How Black and White Movies Were Colorized

Are you a fan of classic black and white films? Ever been curious about how they would appear if they were in color? Many filmmakers have pondered the same, leading to numerous classic movies being colorized....

The Best Online Video Editors in 2024: Benefits and Drawbacks

July 15, 2024 published by Amy Shao In today’s digital landscape, the popularity of video content is gaining momentum, with users increasingly turning to video creation both for personal advantage and...

New Transition Addition Methods, RAW/BRAW Files Support and Free Waveform

Welcome to the next level of video editing with VSDC's latest release, Version 9.1! Packed with an array of fresh features and enhancements, this update is designed to make your video editing experience...

VSDC 8.3 – 100+ New Templates, Key Editor Window, AV1 and Enhanced GUI

Welcome to the latest VSDC update, Version 8.3! We've been working hard and we’re ready to present a feature-packed release for you to discover an exciting array of over 100 fresh free video templates,...

Free video editing in 2024: Unlock Your Creativity without Breaking the Bank

May 7, 2024 published by Tom Shinat In today's digital world creativity reigns supreme. It offers endless possibilities for individuals and brands to captivate audiences and leave a lasting impression....

6 iMovie Alternatives for Windows You Should Try in 2024

June 15, 2024 published by Amy Shao Of all video editing tools for Mac, iMovie is our favorite one, and we’ve recommended it many times on this blog. iMovie comes pre-installed on most Apple devices;...
 

Screen Recorder Box

This program allows you to capture the video of your desktop and save it on your PC in various formats. Coupled with a video editor, the program is a great tool for creating presentations, tutorials and demo videos.

Read more about Screen Recorder...


Video Capture Box

The program captures video from external devices and records it to computer in a free format. You can save video from video tuners, webcams, capture cards and other gadgets.

Read more about Video Capture...


Reviewed by


"VSDC Free Video Editor is a surprisingly powerful, if unconventional video editor"

- PC Advisor


"This video editor gives you tons of control and editing power"

- CNet


"The editor handles many common formats and boasts a good deal of capabilities when it comes time to alter lighting, splice video, and apply filters and transitions in post production"

- Digital Trends