")


Como Trabalhar com Segmentação de Vídeo com IA no VSDC
O que é Segmentação de Vídeo?
A segmentação de vídeo com IA é uma maneira inovadora de gerenciar conteúdo de vídeo dividindo-o em segmentos ou tomadas menores para extrair informações e características significativas. O VSDC oferece segmentação de vídeo como uma ferramenta gratuita baseada em modelos de IA: a IA permite identificar precisamente os limites de um ou vários objetos e capturá-los para isolar ou destacar elementos estáticos e em movimento. Dessa forma, você pode recortar um objeto e inseri-lo em outro vídeo, realizar correção de cor, desenhar contornos em torno de personagens, criar máscaras ou aplicar outras opções de edição para criar efeitos visuais únicos.
Hoje vamos mostrar como trabalhar com essa ferramenta e fornecer exemplos. Então, baixe o Editor de Vídeo VSDC e vamos começar!
 Baixe o Editor de Vídeo VSDC
Adicionando Segmentação
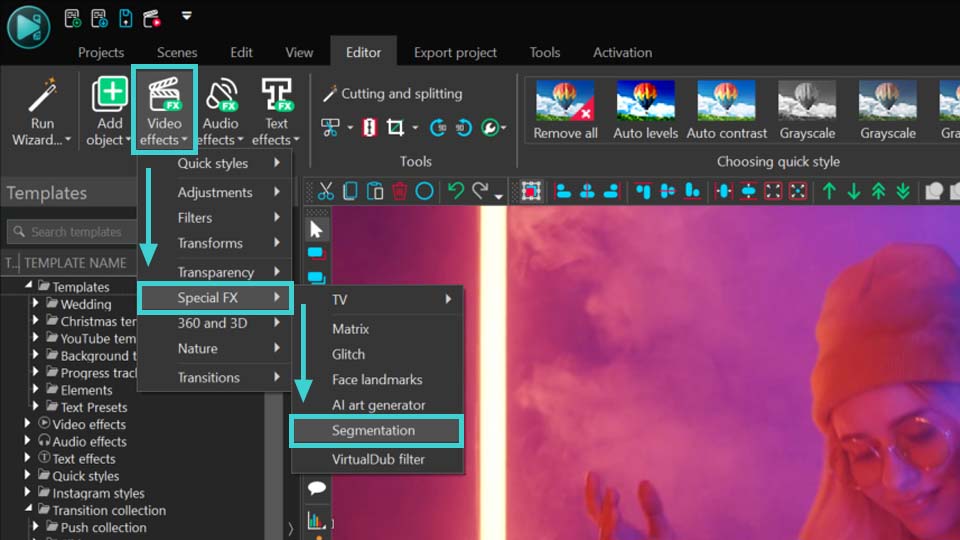
- Para começar a trabalhar com segmentação, adicione seu arquivo de mídia à cena. Selecione este arquivo clicando nele na linha do tempo e adicione segmentação por um dos seguintes métodos:
- Clique com o botão direito no objeto selecionado e escolha Efeitos de vídeo >> Efeitos especiais >> Segmentação;
- Vá para a aba Editor, navegue até Efeitos de vídeo >> Efeitos especiais >> Segmentação.
- Então você verá a janela Configurações de posição de objeto. Ajuste os parâmetros (se necessário) e pressione Aceitar.
- Em seguida, navegue até a Janela de propriedades onde você pode ajustar os parâmetros, descritos abaixo.
Parâmetros de Segmentação
Existem três grupos principais de parâmetros, disponíveis na Janela de propriedades:
- Definições comuns: permitem especificar o nome do objeto adicionado, tempo de criação do objeto, duração do desenho do objeto e se ele está (ou não) vinculado ao objeto pai. Estas são configurações básicas que podem ser aplicadas a qualquer objeto ou efeito.
- Configurações de ajustes de efeitos: não funcionam para a ferramenta de Segmentação.
- Parâmetros de segmentação: sta seção permite configurar parâmetros únicos de segmentação. Abaixo neste artigo, vamos trabalhar com eles. Vamos considerá-los em detalhes na próxima parte.

Começando com a Segmentação
- Se você é novo no trabalho com a ferramenta de segmentação, na seção Parâmetros de segmentação você inicialmente verá apenas duas opções: Baixar modelo de dados e Importar modelo de dados. Clique na opção Baixar modelo de dados para acessar uma página da web onde você pode escolher entre 4 modelos para baixar:
- FB-SAM: Este é um modelo básico com alta precisão no reconhecimento de objetos estáticos em imagens. Observe que ele pode exigir bastante memória do PC em comparação com outras opções de IA e operar de maneira mais lenta.
- SAM-HQ: Este é um modelo avançado, oferecendo reconhecimento preciso de pequenos elementos. Melhor desempenho com objetos em movimento, embora seja mais lento e exija mais memória.
- EdgeSAM: Este é um modo aprimorado com requisitos de RAM mais baixos e desempenho mais rápido, perfeito para processar arquivos de vídeo longos em PCs menos potentes. Ele fornece boa precisão de segmentação na maioria dos projetos.
- MobileSAM: Este é outro modelo aprimorado que apresenta desempenho rápido e baixo uso de memória do PC e uma boa alternativa ao EdgeSAM.
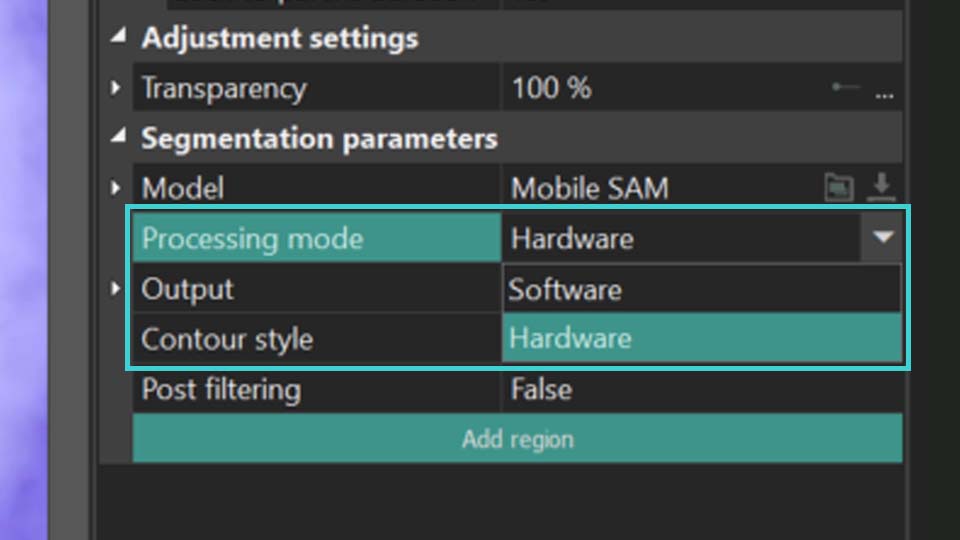
- Após baixar o modelo de IA desejado, importe-o para o programa usando o botão Importar modelo de dados. Esta ação atualizará o menu Parâmetros de segmentação, onde a primeira opção da lista agora incluirá um campo Modelo. Este campo permite selecionar, baixar ou importar novos modelos de IA clicando nos ícones à direita.
- O próximo passo é selecionar o Modo de processamento. Ele determina se deve utilizar sua placa gráfica (Hardware) ou os recursos do seu PC (Software) ao trabalhar com a ferramenta de Segmentação. Para desempenho ótimo, recomendamos definir Hardware para reduzir a carga no seu PC. Para mais informações, consulte o guia de solução de problemas.
Para continuar trabalhando com os parâmetros de segmentação, você precisa definir a região de segmentação. Veja como fazer isso:
Adicionando Regiões de Segmentação
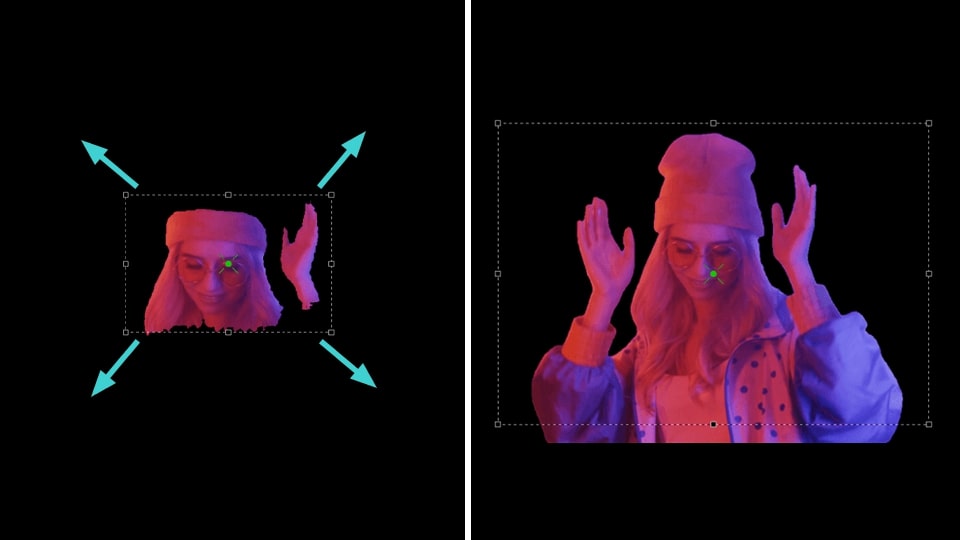
- Selecione o botão Adicionar região na Janela de propriedades e escolha a opção Incluir região para marcar a área na cena que contém o objeto para segmentação.
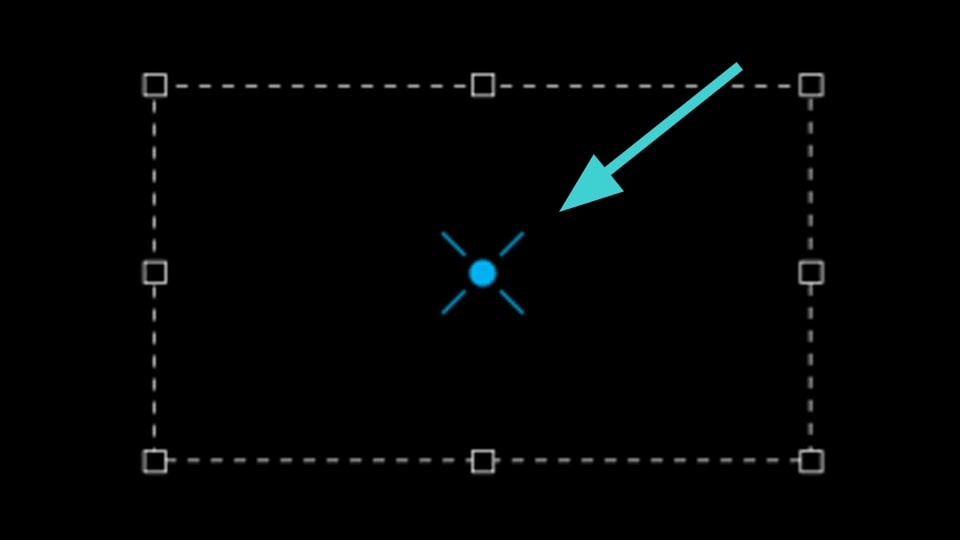
- Em seguida, você verá uma área definindo a região de segmentação na janela de visualização. Se necessário, altere o tamanho desta área esticando os marcadores ou mova-a arrastando com o mouse. Repita esses dois passos conforme necessário para criar múltiplas regiões de segmentação.
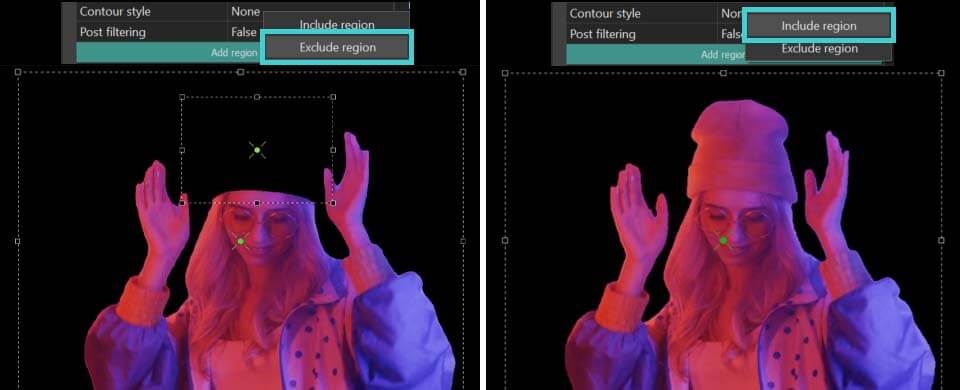
- Se a região adicionada mostrar uma área que deve ser excluída, clique no botão Adicionar região novamente na Janela de propriedades e escolha Excluir região. Posicione esta nova área sobre o objeto indesejado para removê-lo. NOTA: testa zona de exclusão deve sempre estar dentro da Incluir região e ser menor do que ela.
Adicionar região >> Incluir região Adicionar região >> Excluir região
Ajustando Finamente os Resultados da Segmentação
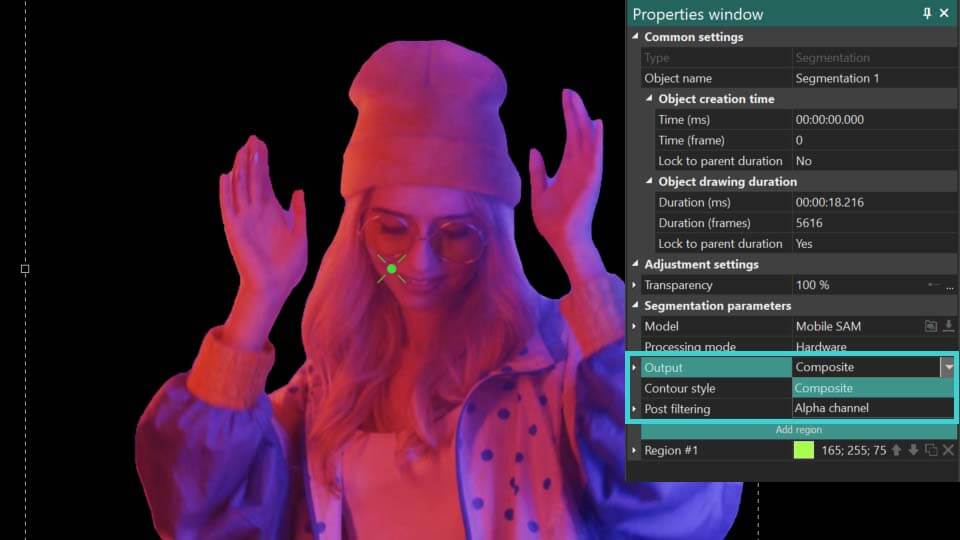
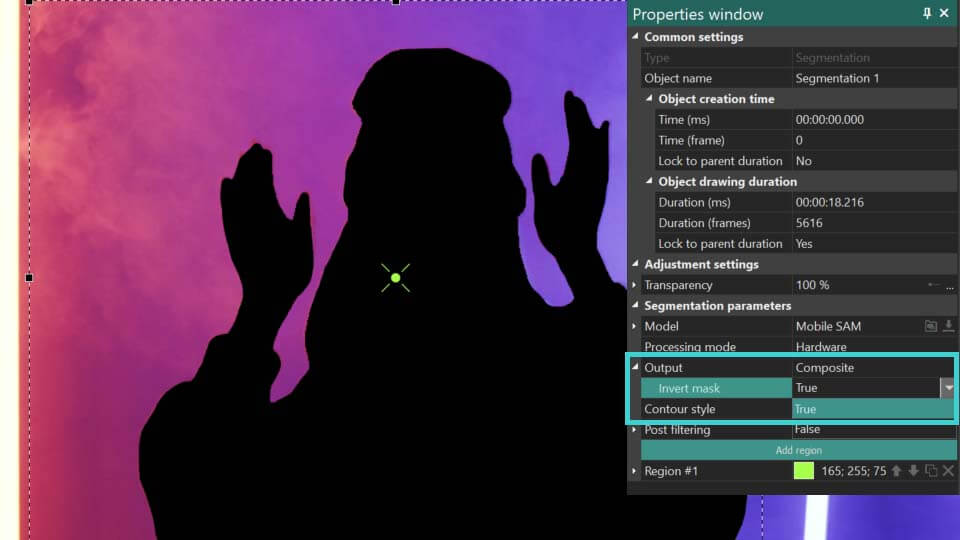
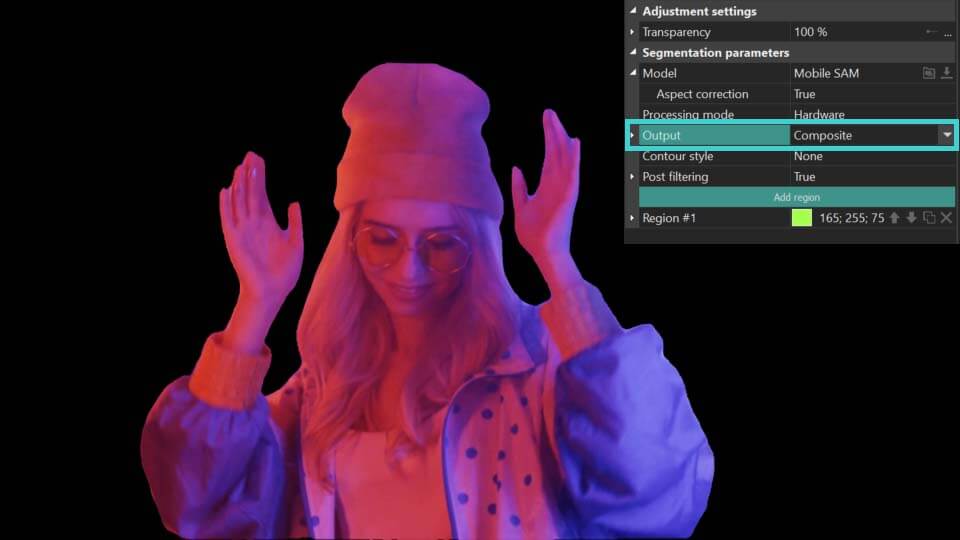
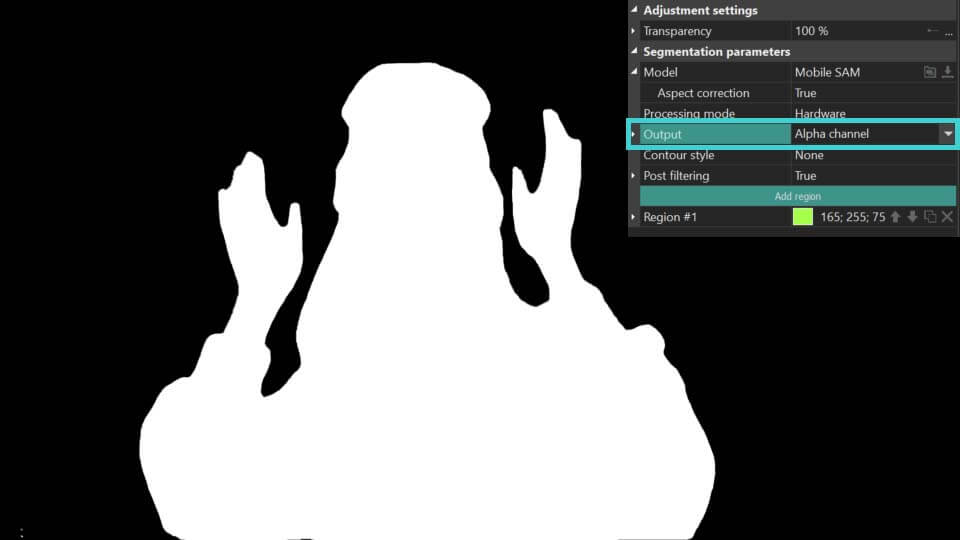
- Saída: define como os resultados da segmentação são exibidos:
 Composto: oculta tudo atrás do objeto segmentado sem modificar o próprio objeto. Adicionalmente, habilita uma opção de Máscara Invertida, que revela o fundo enquanto torna o objeto segmentado invisível.
Canal alfa: destaca o objeto segmentado em branco, com todas as áreas fora do objeto aparecendo em preto. Também apresenta uma opção de Máscara Invertida, que reverte este efeito colorindo o objeto de preto e a área ao redor de branco. As cores para a máscara podem ser personalizadas usando os campos Cor da máscara e Cor de fundo.
Composto: oculta tudo atrás do objeto segmentado sem modificar o próprio objeto. Adicionalmente, habilita uma opção de Máscara Invertida, que revela o fundo enquanto torna o objeto segmentado invisível.
Canal alfa: destaca o objeto segmentado em branco, com todas as áreas fora do objeto aparecendo em preto. Também apresenta uma opção de Máscara Invertida, que reverte este efeito colorindo o objeto de preto e a área ao redor de branco. As cores para a máscara podem ser personalizadas usando os campos Cor da máscara e Cor de fundo.
- Aspect correction: can be found in the Correção de aspecto: pode ser encontrada no parâmetro Modelo. Refina o contorno dos objetos segmentados para resultados mais precisos.
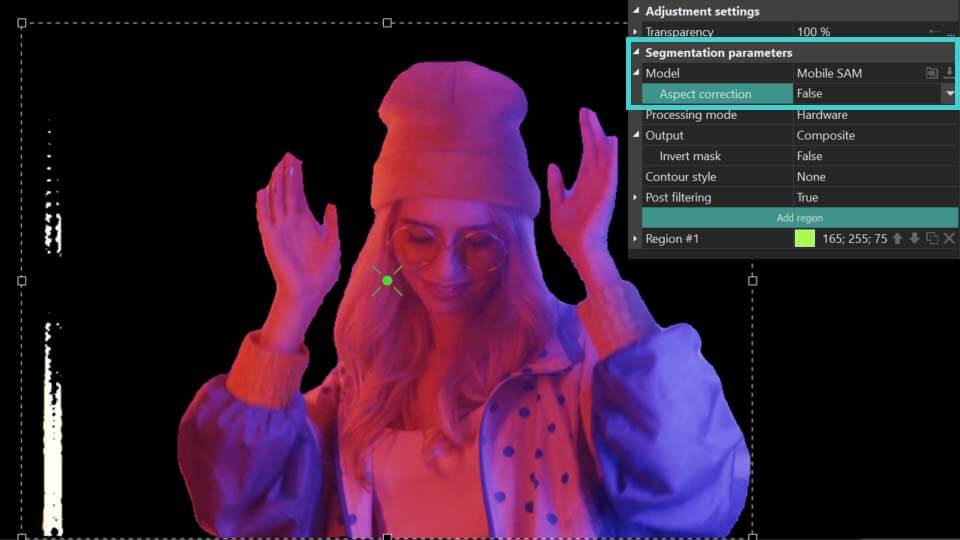
Como você pode ver no exemplo acima, quando o parâmetro Correção de aspecto é definido como Verdadeiro, o programa determina mais precisamente o contorno do próprio objeto na área de segmentação. Se o resultado não mudou ou piorou, defina-o como Falso e use as ferramentas descritas abaixo para refinar o contorno do objeto segmentado.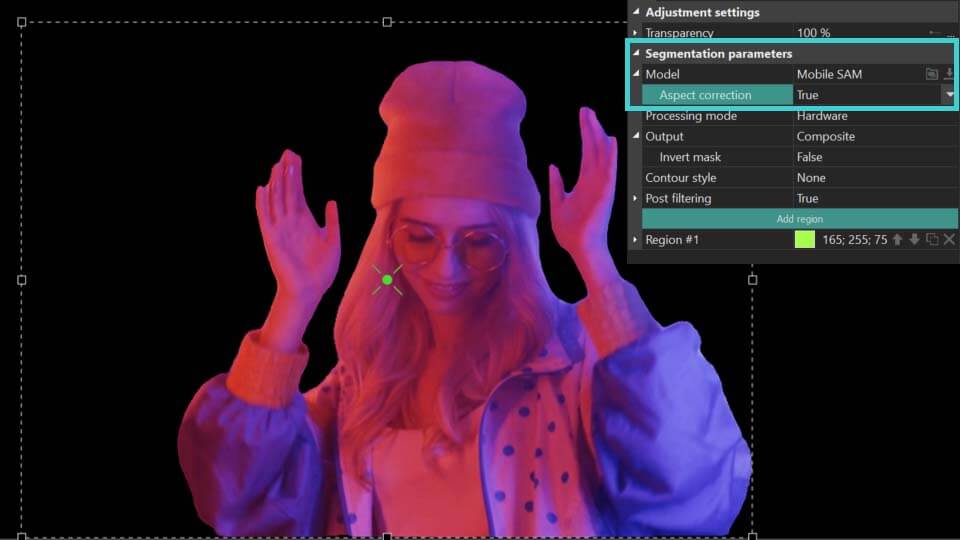
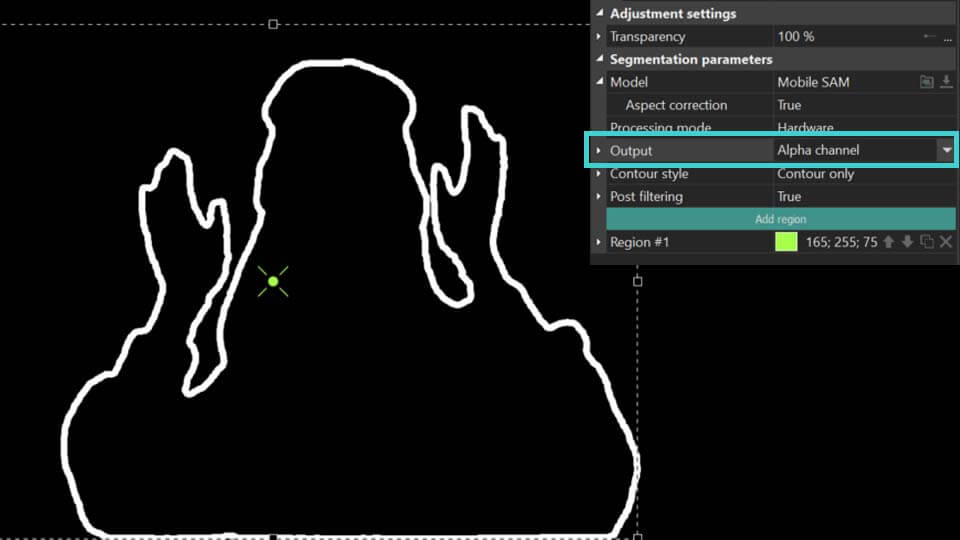
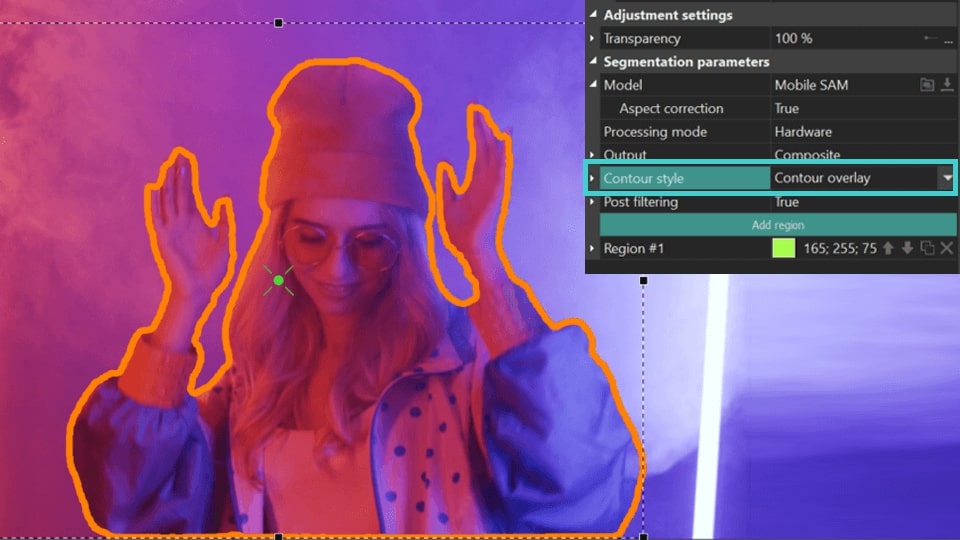
- Contour style: customizes the contour of the segmentation. The following options are available here:
None: no contour displayed
 Contour and object (available for Output = Composite): shows both segmentation result and its contour.
Contour only: displays only the contour.

 Contour overlay (available for Output = Composite): shows the contour of the segmentation on the original object in the preview window .
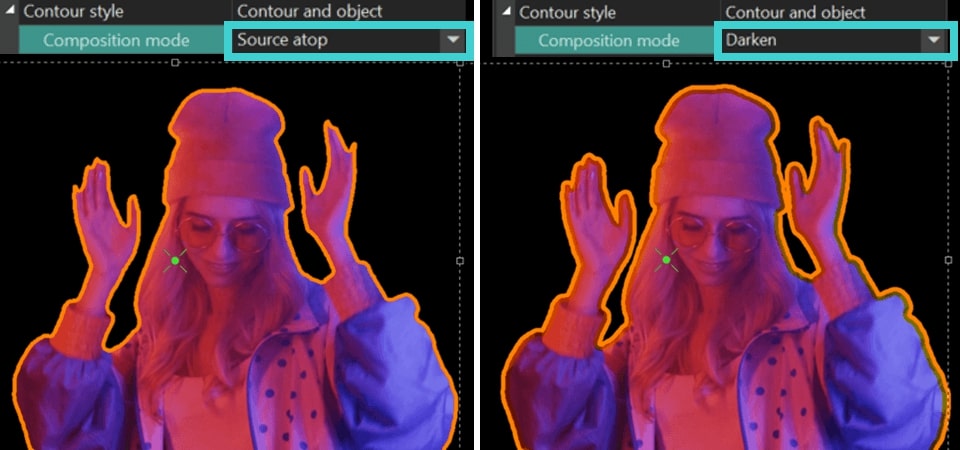
- Composition mode (available for Contour Style = Contour overlay, Contour and object): offers various styles for contour display including Destination over which builds contours at the segmentation edge without extending into the object boundaries, Source atop where contours directly overlay the segmentation, Darken which constructs the contour along the edge and creates a subtler duplicate inside it, and more. Experiment with these styles to find your preferred look!
Destination over
Source atop and Darken:
- Color (available for Contour Style = Contour overlay, Contour and object): sets the contour color for all segmentation regions on the scene and includes two additional parameters:
RGB Color: helps to identify the exact color code or modify it to a new one.
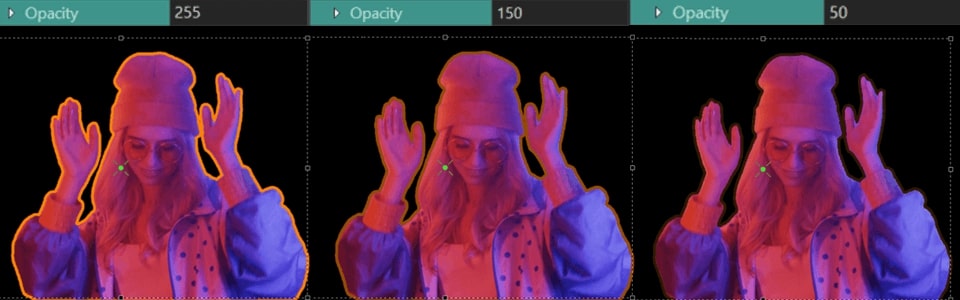
Opacity: adjusts transparency of the contour: if set to 255, it means fully opaque contours, if set to 0—fully transparent. Here you can also set the Initial/Final value for the contour transparency at the beginning/end of the display.
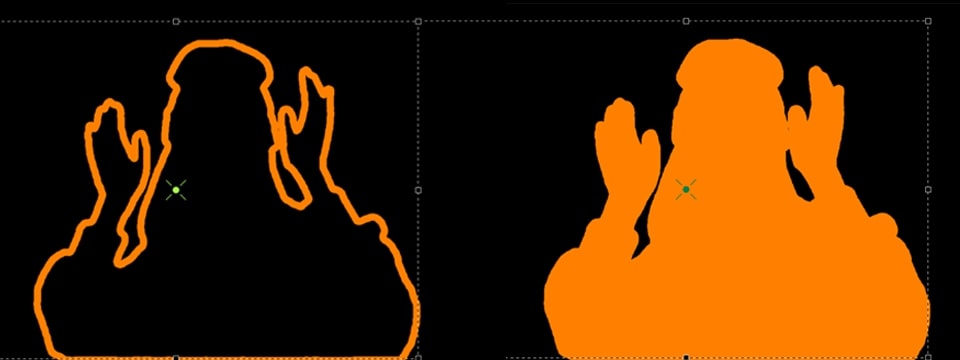
- Thickness (available for Contour Style = Contour overlay, Contour and object, Contour only): sets the thickness of the contour (calculated in % of the length of the edited object, the range is from 0% to 10%). Here you can also set the Initial/Final value for the contour thickness at the beginning/end of the display. ).

- Fill background (available for Contour style = Contour only, Contour overlay): fills the area inside the contour with the contour color .
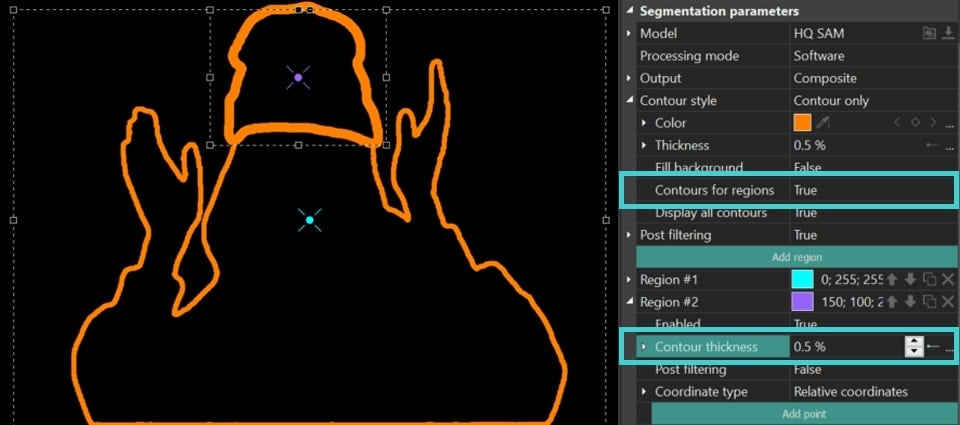
- Contours for regions: adjusts contour thickness separately for each region individually. When set to True, an additional Contour thickness option appears in the individual region settings.
NOTE: if you previously adjusted the contour thickness using the Thickness option described earlier, it will double your values when modifying individual region settings. Therefore, it's recommended to set it to zero.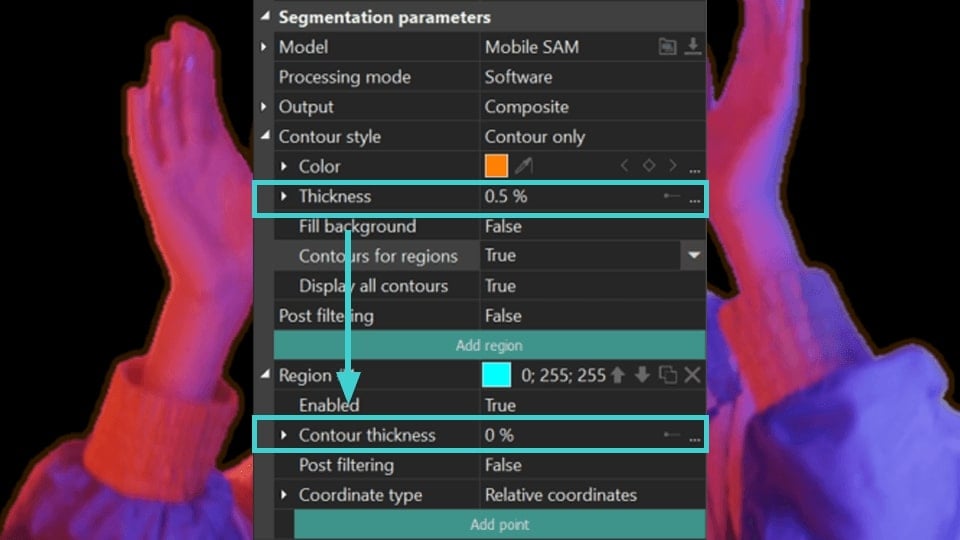
- Display all contours: enables drawing contours for all areas found, otherwise only for the largest area. To use this parameter, it is recommended to switch to Alpha channel for more accurate segmentation.
This tool ensures accurate segmentation: when Display all contours = True, the program highlights/overlays all the smallest points of the original edited object in the segmentation region not removed during the segmentation process. Upon identifying these details, you can refine the segmentation by excluding them with special points. For more details on these points, refer to the section Setting Up Points to Refine Segmentation Regions.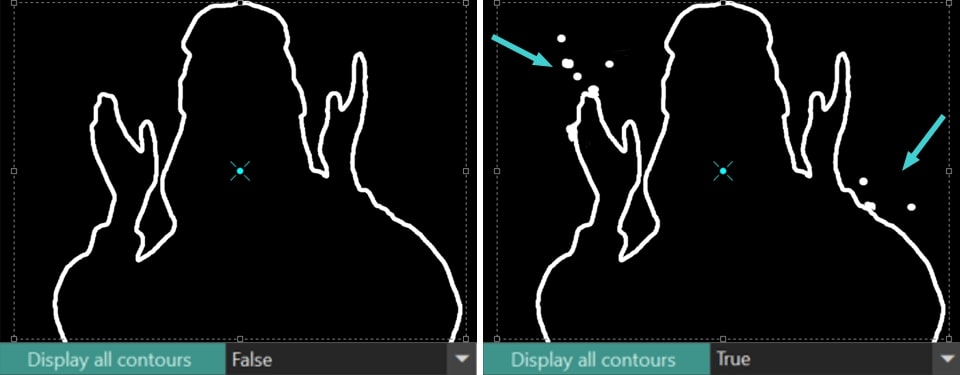
- Post filtering: fine-tunes the segmentation contour across all regions. When set to True, the following tools become available:
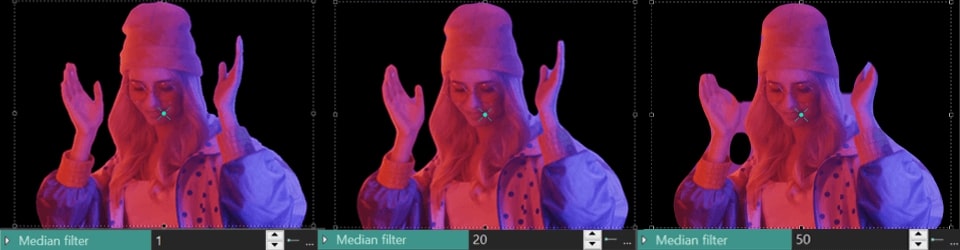
Median filter: smooths the contour by removing noise. Here you can also set the Initial/Final value for the contour filter at the beginning/end of the display. The higher the value of this parameter, the smoother the contour.
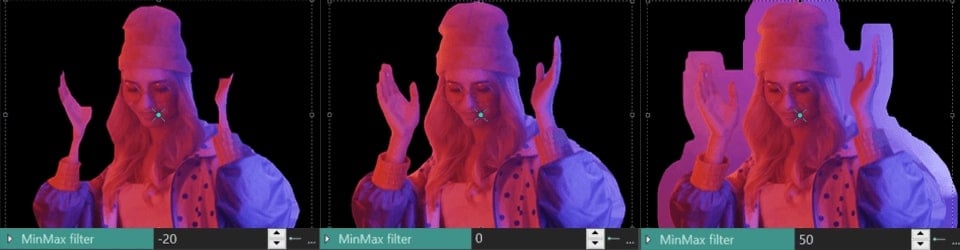
 MinMax filter: adjusts the size of the segmentation area in pixels. Positive values increase the area around the segmented region, while negative values decrease it. The Initial/Final value for the contour can be adjusted at the start and end of the display.
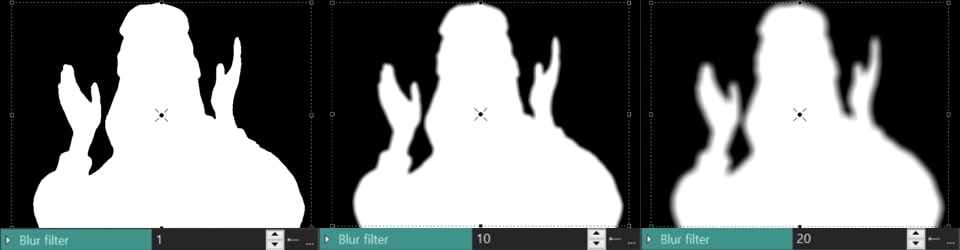
 Blur filter (available for Contour Style = None/Contour and object): blurs the edges of the segmented region . Here you can also set the Initial/Final value for the contour filter at the beginning/end of the display. The higher the value of this parameter, the wider the blur contour.
 Contour blur level (available for Contour style = Contour and object): blures only the outline of the segmented area without affecting the edges. The Initial/Final value can be adjusted at the start and end of the display to control the level of blur.

Adjusting Segmentation Regions
This section allows precise management of segmentation regions using the following icons under the Add region button. The primary option is Region, which allows you to modify several segmentation settings at once:
- Color: a square, colored icon that sets the color value for a particular segmentation region, displayed in the center of an area.
- Region level: two arrows (up and down) that adjust the sequence of segmentations to move a region higher or lower in the list.

- Changing region modes: an icon with two squares that switches between the Exclude region and Include region modes for each segmentation region.

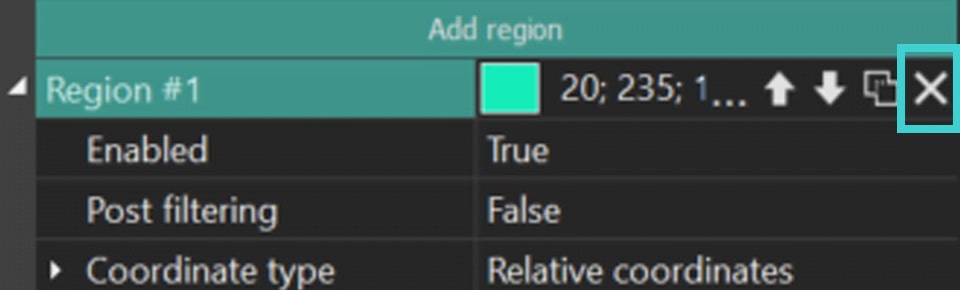
- Delete region: an icon with cross that removes an unnecessary segmentation region.
Expanding the Region menu reveals additional options, each detailed below:
- Enabled: activates or deactivates a specific segmentation region.
- Contour thickness (available for Contours for Regions = True): adjusts the thickness of the contour in a selected region. It also features a hidden menu that allows for modifying the Initial and Final values separately.
- Post filtering: refines the contour of the segmentation result of a particular region. Options include Median filter, MinMax filter and Blur filter, as well as two additional options:
Contour blur level: applies a blur effect to the contour with options to set Initial and Final values.
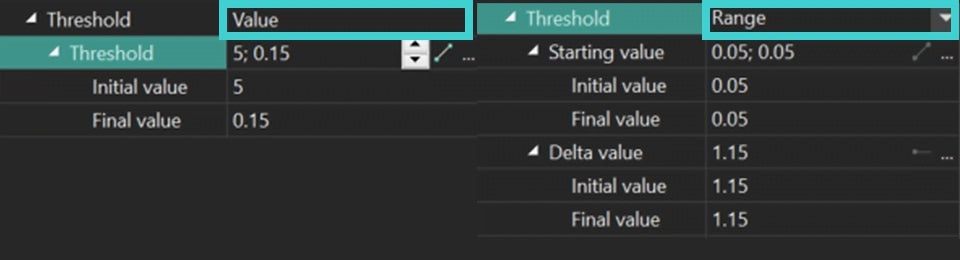
 Threshold: sets a threshold value for pixels in a particular segmentation region. If a pixel has a value lower than this threshold in the selected region, the program "excludes" this pixel from the segmentation result of a particular region.
The modes are:
- None: the Threshold parameter is disabled.
- Value: sets a precise Threshold value and adjusts the Initial/Final Threshold values as needed.
- Range: A more refined mode that uses the Starting value option to limit each pixel in the segmented object, thereby affecting the effectiveness of object detection. The lower the Starting value, the better the object detection, as it essentially indicates the colors in which the object is found. The Delta parameter smooths transitions between pixels if there is a stark limit set by the Starting value.
- Coordinate type:
- Relative coordinates: defines how coordinates are set for a particular segmentation region:
- Left / Right: sets vertical sides as percentages of the object's length.
- Top / Bottom: sets horizontal sides as percentages of the object's width.
Here you can also set the Initial/Final value for the vertical/horizontal value at the beginning/end of the display.
- Whole Image: applies segmentation to the entire object without adjusting coordinates, using points added through the Add point button to find objects for segmentation. The process of working with points in this mode is identical to the one described below, while the search for objects will be performed around the Include point, and with the help of Exclude point you can "cut off" unnecessary/faulty areas.

- Relative coordinates: defines how coordinates are set for a particular segmentation region:
Setting Up Points to Refine Segmentation Regions
Another tool for refining a particular segmentation region is the refinement points. To start working with them, go to the segmentation region in the Properties window in which you want to implement the refinement and click on the Add point button. In the drop-down menu, select one of the positions:
![]() Include point: the area around the added point will be included in the segmentation result of this region.
Include point: the area around the added point will be included in the segmentation result of this region.
![]() Exclude point: the program will cut out the area around the added point (including it) from the segmentation results of the region.
Exclude point: the program will cut out the area around the added point (including it) from the segmentation results of the region.


In the menu that appears, you will see the Point field where you can also adjust settings such as changing the point's color, modifying its mode, or deleting it. If you expand the Point menu, you can access additional settings such as:
- Enabled: allows to enable (=True) or disable (=False) a specific refinement point.
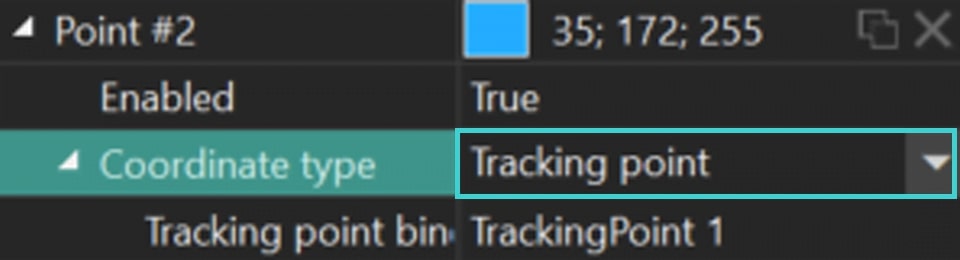
- Coordinate type:
Relative coordinates: allows to manually adjust the coordinates for a specific refinement point on the X and Y axes, where with the Initial/Final value X / Y is the coordinate value at the beginning/end of the display.
Tracking point: segments an object during some video clip. Below we consider this option in details.
How to Use Tracking Points for Segmentation
- To begin, locate the segmentation object on the timeline and hide it using the eye icon located to the left of to display the object without any modifications.
- Select the Add tracking point option from the vertical toolbar menu on the left side of the scene and set this point on the object you want to track.
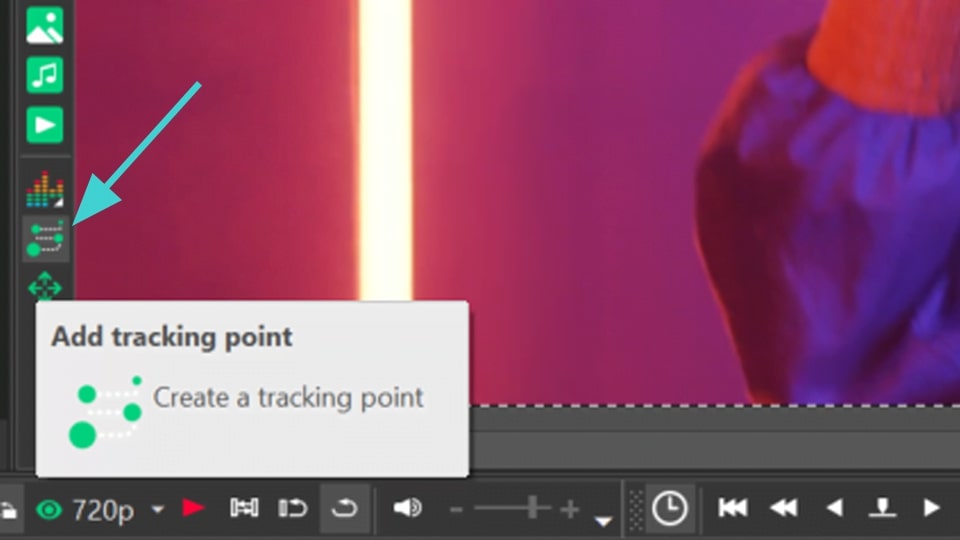
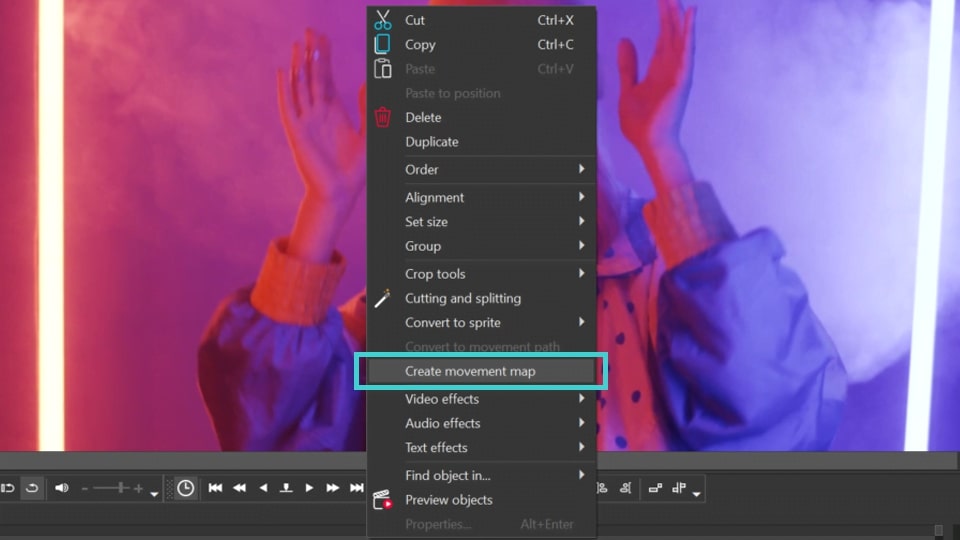
- Right-click on the preview screen to open the drop-down menu and select Create movement map. In the window that appears, give a name to the future motion map and save it.
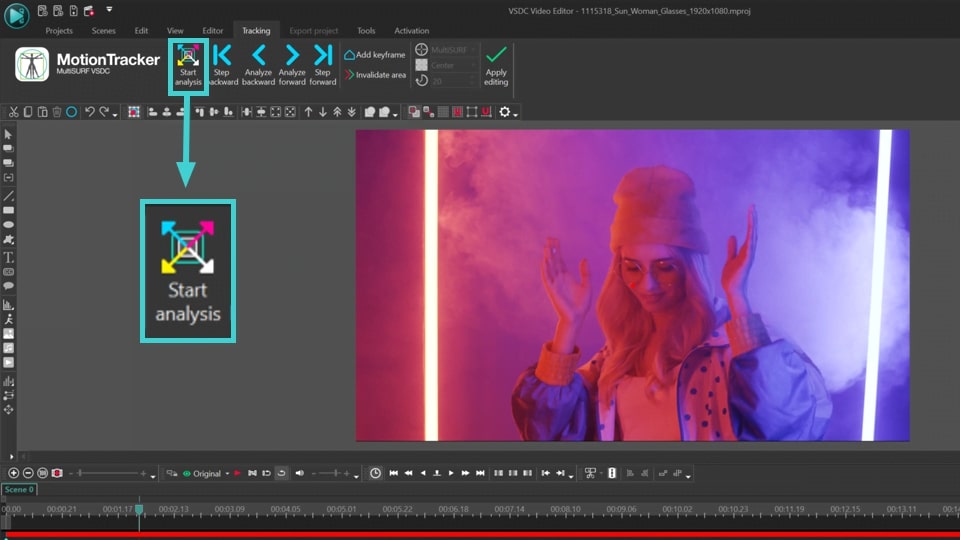
- In the new Tracking window select the region where the object you want to track is located. Then click on the Start analysis button, and the program will create a motion map of the selected object. If you are satisfied with the result, click Apply editing.
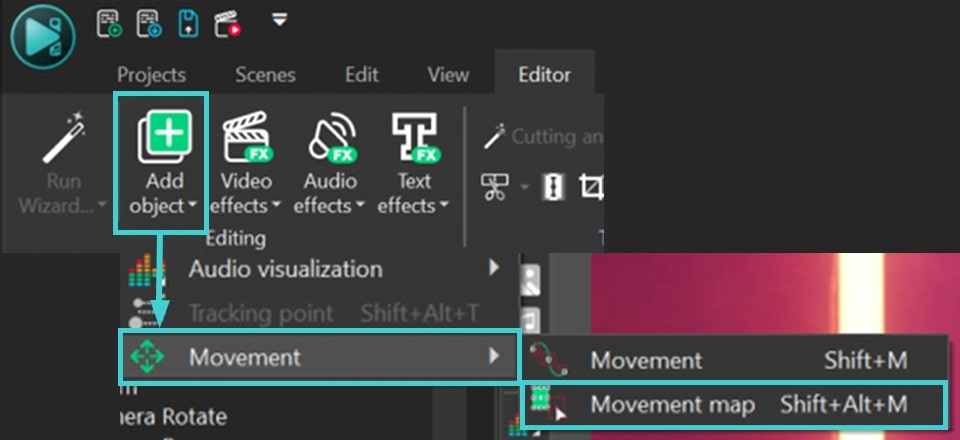
- Double click the Tracking Point object on the timeline, go to the Editor tab and click Add object >> Movement >> Movement map. This will apply the movement map you created to the point.
- Reveal the Segmentation object on the timeline by returning the eye icon on the left side of the layer. Then go to the segmentation Properties, find the point to which you want to apply Tracking point and set Tracking point in Coordinate type.
Export Your Project
As soon as you are satisfied with the result of segmentation, go to the Export project tab and select the desired format on the Ribbon. Select the Profile and adjust export settings (if necessary) and click the Export project icon above the scene. To learn more about exporting files, check out our video guide.
NOTE: the segmentation feature is quite resource-intensive, so we recommend using hardware acceleration on the export stage. For this, you need to upgrade to VSDC Pro.
Conclusion
AI segmentation is an innovative tool designed to enhance your video projects. Experience it by upgrading to Version 9.2 of VSDC Video Editor. Follow our latest news on Facebook and X, and subscribe to our Youtube channel. For any assistance, reach out to us at O endereço de e-mail address está sendo protegido de spambots. Você precisa ativar o JavaScript enabled para vê-lo.—we're always here to help!
© 2011-2024, www.videosoftdev.com, FLASH-INTEGRO LLC. Política de privacidade | Termos de uso | Sobre nós
Todas as marcas comerciais mencionadas neste documento são de propriedade exclusiva de seus respectivos proprietários.
A cópia de qualquer material deste site é permitida apenas com o consentimento por escrito da Administração do Site.