Новостная лента

Color

Balance Image Color

Shooting colorful HDR videos on your iPhone 15 Pro or GoPro Hero 12, but ending up with blown-out skies, odd skin tones or noisy shadows? Yeah, it happens. Without proper color grading even the most impressive footage can fall flat. But here’s the fix, and you don’t need pricey software like DaVinci Resolve or a film degree to get it right! Meet VSDC: a user-friendly video editor that helps you correct overexposure, boost colors and get your HDR footage ready for Dolby Vision or ProRes in just minutes. It works perfectly with footage from iPhones, GoPros, Sony cameras, even older action cams.
No editing skills? It’s not a problem. This editor can bring the cinematic look to all your content: YouTube vlogs, TikTok edits, Instagram Reels, you name it! And the coolest thing is that it is for free! So don’t wait, read further to learn more about the possibilities of this video editor

Master Color Balance in VSDC: Remove Tints, Adjust Brightness and Grade

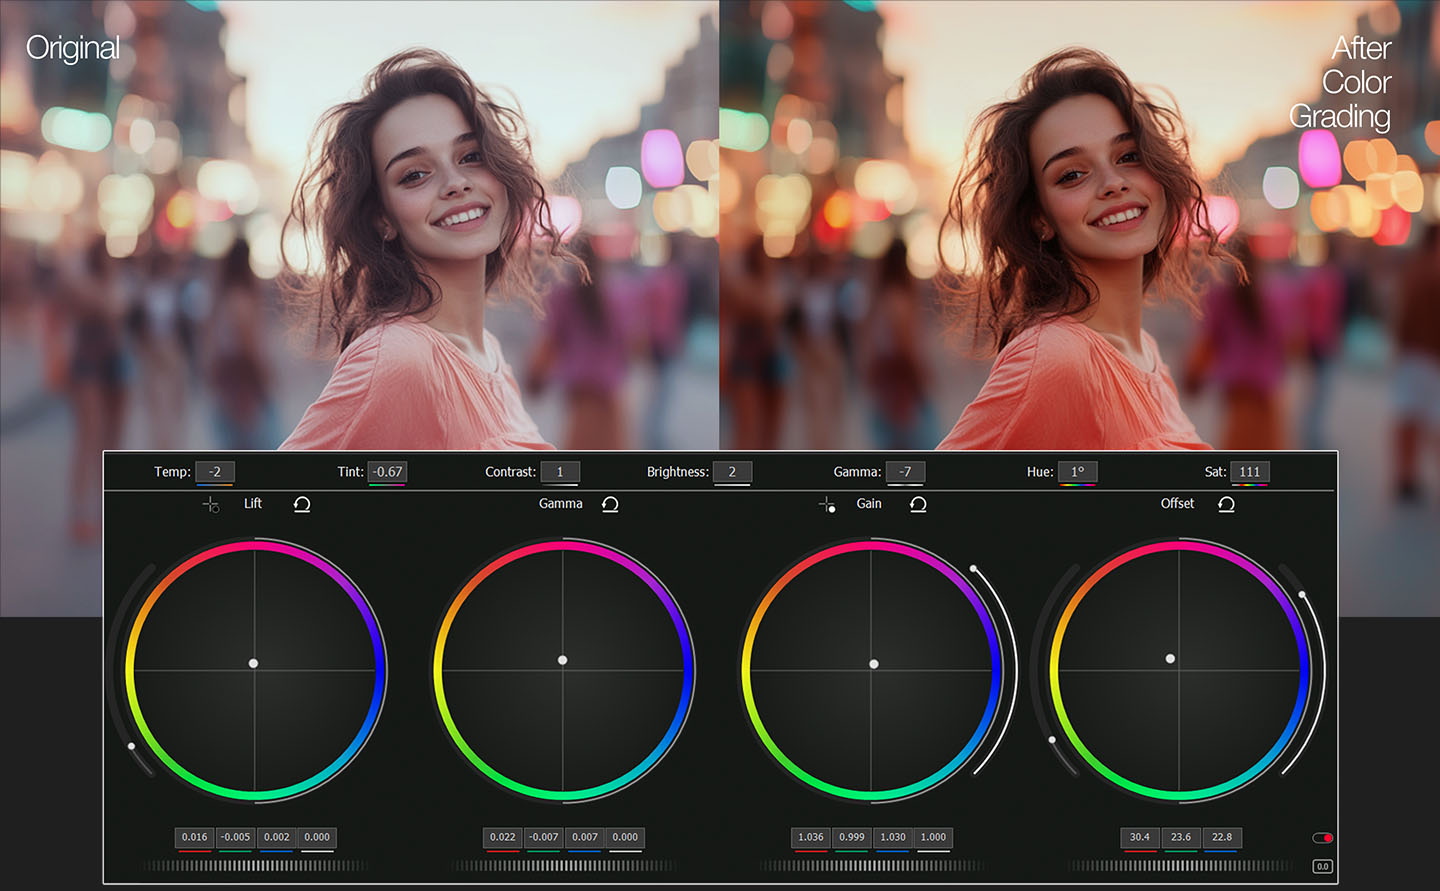
Color correction is the first step to achieving professional videos. With VSDC Free Video Editor you can quickly fix color casts, correct exposure issues and balance colors to create a clean, neutral base, ideal for advanced color grading. No need for DaVinci Resolve or complex software.

1. Why Balance Colors First?

Do you often notice how some videos just feel off like when skin tones look strange or indoor shots have a weird greenish tint? That’s what happens when colors aren’t properly balanced. By starting with color balance, you give your video a natural, true-to-life look. And with VSDC’s color correction tools, it only takes a few tweaks to make your YouTube vlogs, TikToks or Instagram Reels look great!

2. Unlock the Power of Primary Color Correction Tools

Inside the intuitive interface of VSDC you’ll find powerful color correction tools that give you full control over your footage. With them you can:

  • Fix Color Casts for eliminating unwanted blue tints in shadows or orange hues from tungsten lighting with just a few tweaks.
  • Adjust Brightness & Contrast for recovering blown-out highlights or lift crushed shadows.
  • Create a Neutral Base for consistent grading across all clips.
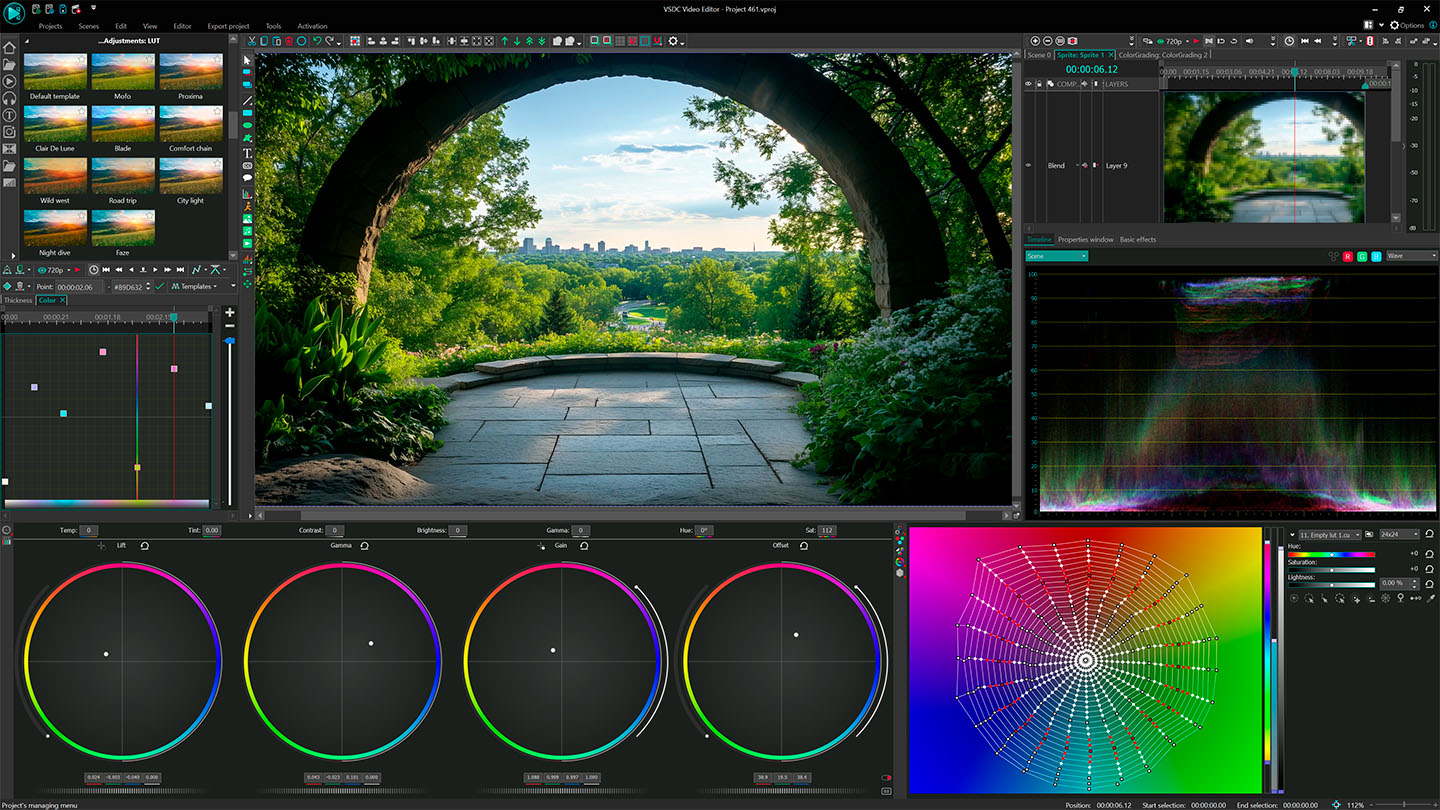
  • Fine-tune shadows, midtones and highlights separately using intuitive color wheels or sliders.

All changes instantly appear in your video. No extra clicks or closing windows.

3. Pro Tips for Beginners

  • Use the RGB Parade Scope to spot uneven color distribution.
  • Match Shots Fast to Balance one clip, then copy settings to an entire sequence.
  • Use a neutral base that makes adding cinematic LUTs or moody tones.

VSDC 2025 Handles Every Codec & Color Space: From HDR10 to Rec. 2020

With support for HDR10, HLG, Dolby Vision and the Rec. 2020 color space, your videos will always look vibrant and dynamic. Footage and photos shot on devices like the iPhone 16 Pro (ProRes RAW), GoPro Hero 12 (10-bit HEVC) or DJI Pocket 3 (HLG) retain every shade and depth of color.
Hardware acceleration makes processing 10-bit color and HDR significantly faster: with GPU-accelerated export to HEVC and AV1, your 4K HDR videos render in just minutes. VSDC supports a wide color gamut and effortlessly works with all modern formats (HDR10, HLG, Dolby Vision, Rec. 2020, and more). Preparing HDR content for YouTube, HDR10+ TVs or Apple ProMotion displays is now just a few clicks away.
Forget about banding, artifacts and washed-out areas: VSDC lets you easily adjust any image or video, work with HLG clips and experiment with different HDR formats preserving even the smallest details.
HDR is no longer a luxury. VSDC gives you full color control, so you can bring any creative idea to life.

VSDC 2025 Supports:

  • HDR10 & HLG (iPhone, GoPro, Sony)
  • ProRes RAW & HQ (iPhone 16 Pro/Max)
  • HEVC 10-bit (GoPro Hero 13, DJI Pocket)
  • AV1 HDR (Next-gen streaming)

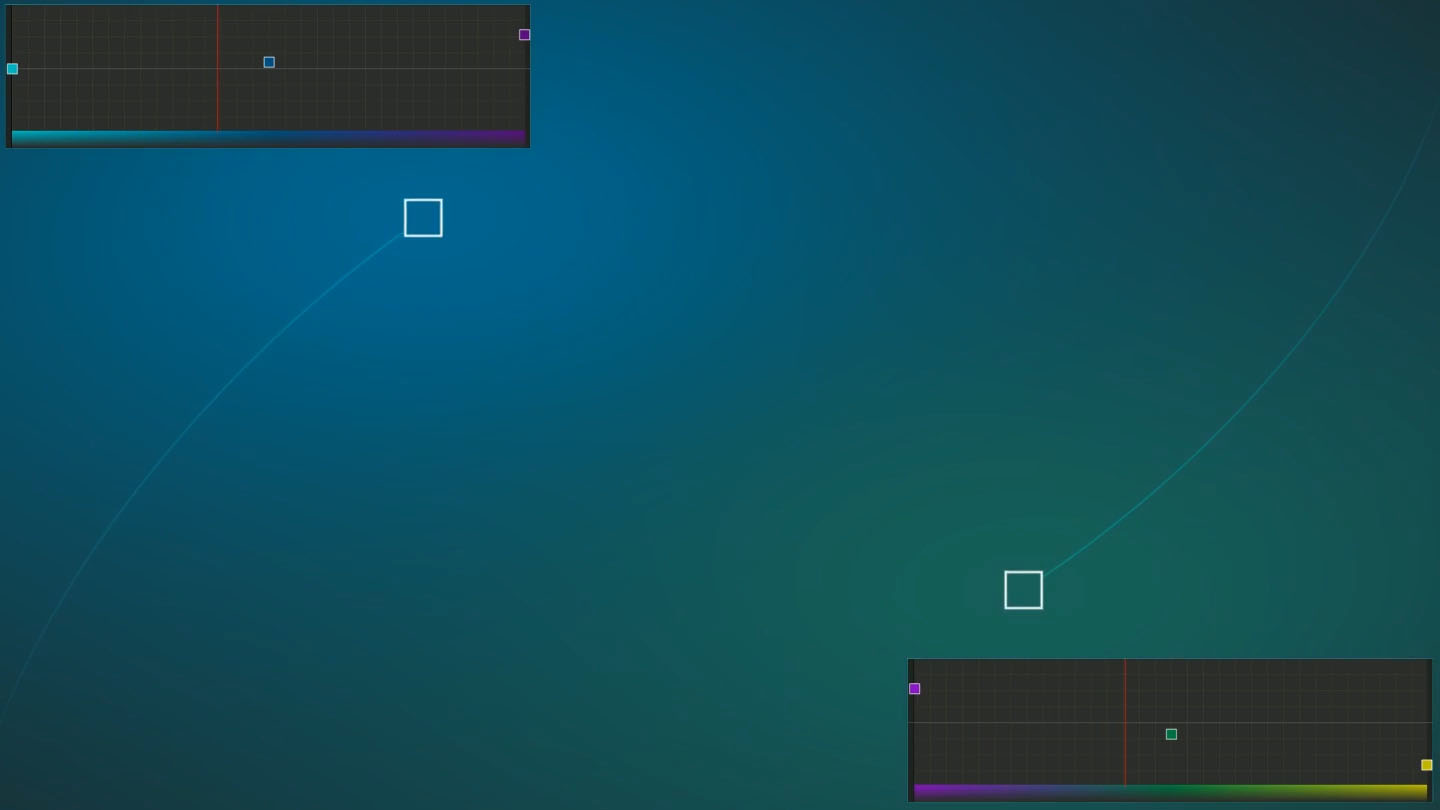
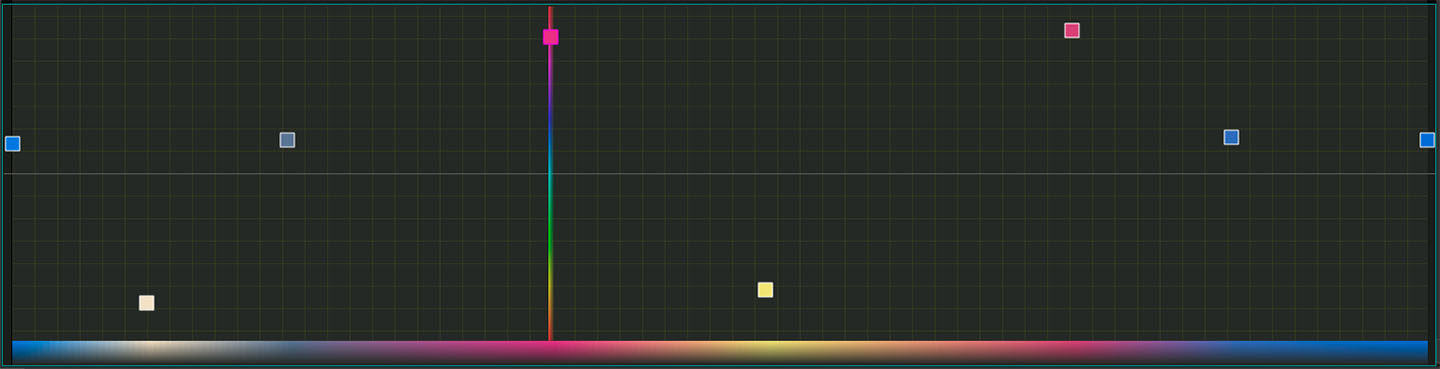
Precision Color Grading Tools: Advanced Curves

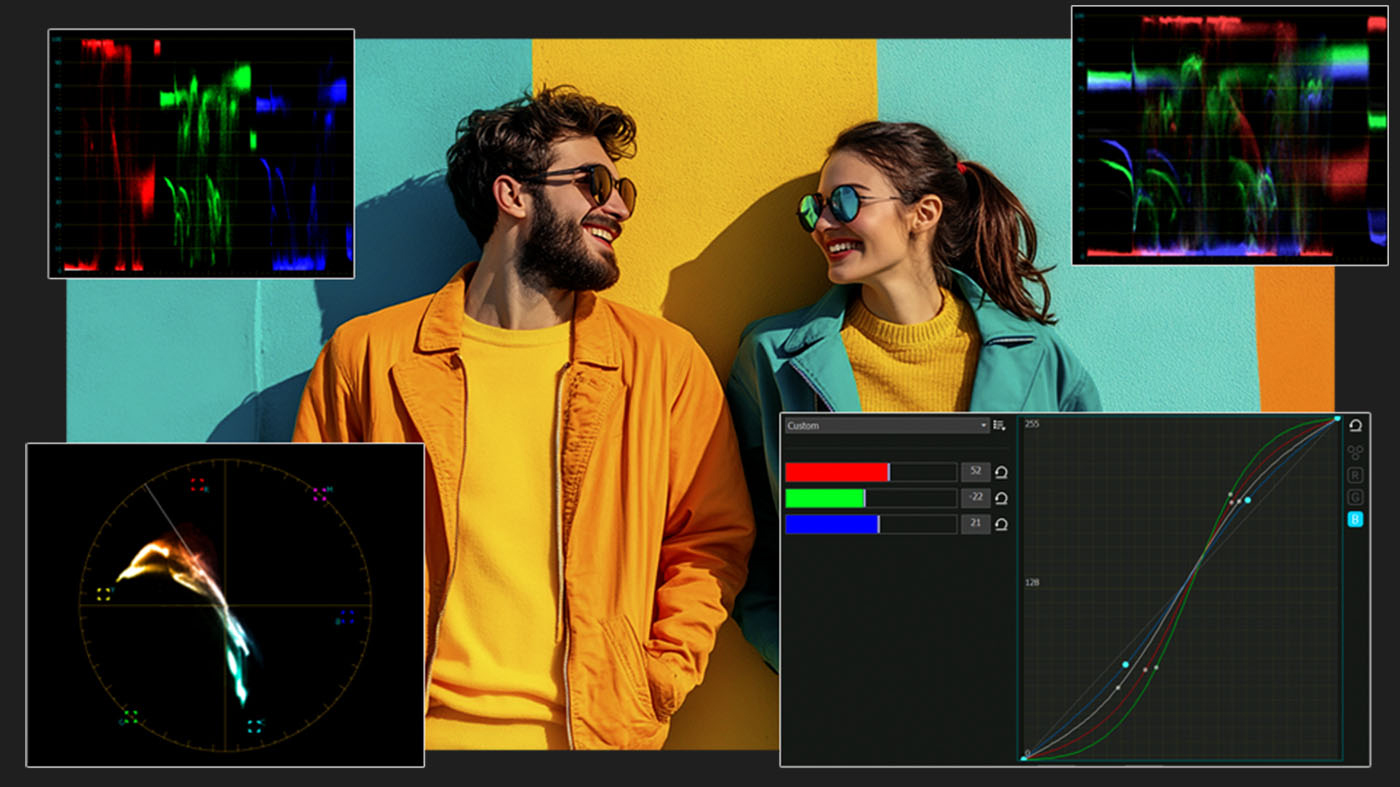
Primary correction tools set the foundation, but for much better results it deserves to try something more powerful! VSDC Curves offer granular control over every pixel. They are accessible via a single click in the adjustment panel and allow you to:

  • Adjust RGB and Luminance Channels Individually

    Fine-tune red, green, blue and brightness levels separately using a real-time histogram. It helps avoid overexposure, correct crushed blacks and ensure accurate tonal balance across your footage.

  • Enhance or Isolate Specific Colors Using Hue-Based Curves

    Select and modify individual hues with precision from boosting sunset tones without affecting skin color to muting distracting greens in landscape shots.

  • Control Saturation

    Use the Saturation curve to emphasize muted areas or soften oversaturated regions. This is especially useful when grading HDR videos and balancing intense highlights or color-rich scenes.

While many professional video editors come with cluttered, overwhelming interfaces, VSDC makes advanced color grading tools easy to use:

  • Real-time previews, even in 4K, for instant visual feedback as you grade.
  • Built-in LUT support to quickly apply cinematic color presets and speed up your workflow.
  • GPU-accelerated performance for smooth editing, regardless of your system specs.

Why creators choose VSDC: it lets you focus on your work process, not the interface. From GoPro rescues to bold, moody color grades you get perfect results without the usual complexity.

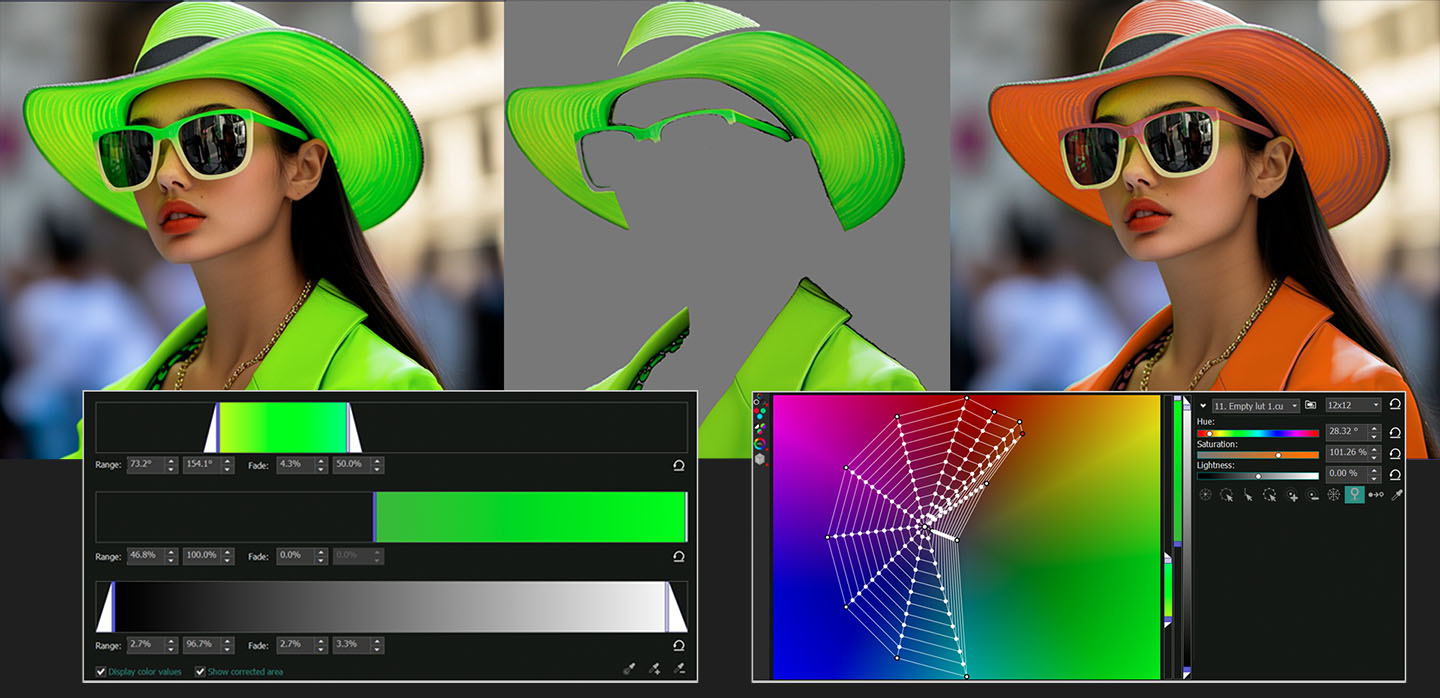
Secondary Color Correction

Secondary color correction, or secondary grading, lets you isolate and adjust a specific part of the image. You can use it for targeted color changes without affecting the entire frame. For instance, you need to change the color of a shirt while keeping the background untouched. All you need is the qualifier color palette, which allows you to select parts of an image based on hue, saturation or luminance. Start by using the eyedropper tool to click and drag over the area you want to correct. Your selection will appear highlighted in the hue, saturation and luminance strips. Сomplete your grading with curves, color wheels and other advanced tools.

Create Custom Gradient Backgrounds

The creative possibilities in VSDC Video Editor are endless — especially when it comes to designing gradient backgrounds. You can add as many color points as needed, fine-tune every shade individually and build smooth or dramatic transitions between hues. With the help of keyframes, your gradient background can shift and evolve over time, adding dynamic movement and atmosphere to your video.

Blend Gradients with Footage, Logos and More

Want to combine your custom gradient with a logo, an image or your original video footage? VSDC makes it easy. Simply apply composition modes to blend layers together and create striking visuals. And that’s not all — with VSDC keyframes you can animate each element and define exactly how the gradient shifts, evolves and interacts with other visuals over time. The result? Professional-looking scenes that feel unusual and truly yours.

Editing

Добавление всех типов видеофайлов

более 5 способов добавления видео в программу включая интелектуальный ассистент который автоматически по добавляемому вами видео файлу настроит разрешение и фрэймрейт проекта

Простые и быстрые инструменты обрезка и удаления видео фрагментов

simple trim tools

functionality cut tool

1. Primary Color Correction Tools

Located in VSDC’s user-friendly interface, these tools let you adjust the entire image with precision:

  • Fix Color Casts (e.g., blue tints in shadows or orange hues from tungsten lighting).
  • Adjust Brightness & Contrast to recover blown-out highlights or lift crushed shadows.
  • Create a Neutral Base for consistent grading across all clips.

Simply drag the color wheels or sliders to tweak shadows, midtones, and highlights separately. The real-time preview lets you see changes instantly, even in 4K HDR footage.

2. Why Balance Colors First?

  • Problem: Unbalanced colors make skin tones look unnatural and scenes appear “off” (e.g., greenish indoor shots).
  • Solution: VSDC’s tools help you achieve true-to-life colors, so your YouTube vlogs, TikTok clips, or Instagram Reels look polished and professional.

3. Pro Tips for Beginners

  • Use the RGB Parade Scope (built into VSDC) to spot uneven color distribution.
  • Match Shots Fast: Balance one clip, then copy settings to an entire sequence.
  • Prep for Creative Looks: A neutral base makes adding cinematic LUTs or moody tones effortless.

Многослойный таймлайн

Функциональный таймлайн позволяет вам создавать неограниченное количество слоев даже в бесплатной версии программы. Полностью нелинейный - гибкий функционал сделает задачи добавления текста на видео или создания эфекта картинка в картинки легким и интуитивно понятным.

Transitions and Effects

Если вам нужно настроить длительность перехода, например, растворения или вытеснения, вы можете кликнуть на край значка перехода в точке редактирования. Теперь вы можете напрямую перетаскивать длительность перехода. Во всплывающей подсказке будет отображаться числовое значение времени длительности.

Import and Sort Media

Редактор работает практически со всеми форматами камер, поэтому вам не нужно конвертировать медиафайлы или создавать прокси перед началом монтажа. На стартовой странице в левом верхнем планке экрана есть кнопки для быстрого импорта отдельных файлов или целых папок с клипами. Медиа файлы будут помещены в окно ресурсов отображает миниатюру клипа вместе с ключевой информацией: сцена, дубль, название, таймкод и т.д. Метаданные также можно редактировать в инспекторе.

Quick Export

Быстрый экспорт проектов использует всю мощь графического процессора - позволяет моментально выполнить рендеринг и загрузить ваш готовый проект в самые разные видео форматы mp4, mov, avi, а также на онлайн-сервисы, такие как YouTube, Vimeo, Twitter и другие. В инструменте Эксорт Вы найдёте предустановки для YouTube, Vimeo и Twitter, а также шаблоны для создания и экспорта файлов в H.264 или H.265.

поворот видео в одно нажатие

Одним нажатием в панели базовых эффектов вы можете повернуть ваше видео на 90 градусов.

Unlike cluttered interfaces in premium software, VSDC keeps curves intuitive:

  • Real-time previews for instant feedback, even in 4K.
  • Preset LUT integration to jumpstart cinematic looks.
  • GPU-accelerated performance for lag-free editing on any setup.

Why creators love it: Whether you’re fixing washed-out GoPro clips or adding mood to vlogs, curves give you the precision of high-end suites — without the complexity.

Добавление эффекта перехода между двумя видео

Добавление эффектов перехода непосредственно на таймлайне в одно движение. вОЗМОЖНОСТИ ВЫБОРА ИЗ ОГРОМНОЙ КОЛЛЕКЦИИ ШАБЛОНОВ ВИДЕО ПЕРЕХОДОВ, А ТАКЖЕ гибкий функционал по настройке и длительности самого перехода делает стыкование видео файлов в увлекательное действие. Получите идеально сшитые видео сцены.

Create Custom Gradient Backgrounds with Full Color Control

The creative possibilities in VSDC Video Editor are endless — especially when it comes to designing gradient backgrounds. You can add as many color points as needed, fine-tune every shade individually and build smooth or dramatic transitions between hues. With the help of keyframes, your gradient background can shift and evolve over time, adding dynamic movement and atmosphere to your video.

Blend Gradients with Footage, Logos and More

Want to combine your custom gradient with a logo, an image or your original video footage? VSDC makes it easy. Simply apply composition modes to blend layers together and create striking visuals. And that’s not all — with VSDC keyframes you can animate each element and define exactly how the gradient shifts, evolves and interacts with other visuals over time. The result? Professional-looking scenes that feel unusual and truly yours.

Unlike cluttered interfaces in premium software, VSDC keeps curves intuitive:

  • Real-time previews for instant feedback, even in 4K.
  • Preset LUT integration to jumpstart cinematic looks.
  • GPU-accelerated performance for lag-free editing on any setup.

Why creators love it: Whether you’re fixing washed-out GoPro clips or adding mood to vlogs, curves give you the precision of high-end suites — without the complexity.

Blackmagic RAW vs. ProRes RAW: Сравнительный обзор

Современному видеографу очень важно уметь разбираться в форматах видео, которые приобретают всё большую популярность, и иметь представление об их свойствах и различиях. Сегодня мы поговорим о сравнительно новых разновидностях RAW-файлов Blackmagic RAW и ProRes RAW, которые многие профессионалы выбирают за высокое качество видеоматериала и гибкость при постобработке (в частности, цветокоррекции). В этой статье мы проведём сравнительный анализ этих форматов и рассмотрим уникальные характеристики каждого из них.

Разобраться в особенностях видеоформатов может быть непросто, поэтому начнем с того, что же такое RAW-файл. В отличие от стандартных видеоформатов, которые сжимают цветопередачу и обеспечивают сравнительно невысокую детализацию, RAW-формат полностью сохранят данные, захваченные матрицей камеры, подобно цифровому негативу. Таким образом при редактировании в файле сохраняется максимальный объём информации, что позволяет точно настроить цвет и экспозицию.

Blackmagic RAW vs. ProRes RAW

ProRes RAW: Инновация от Apple

ProRes RAW - последняя разработка компании Apple для съёмки видео высокого качества в формате RAW с гибким размером файла. В его основе лежит кодек ProRes, который сохраняет нерастрированное изображение с большим объёмом метаданных, в максимальной степени реализуя все преимущества RAW-формата.

Blackmagic RAW (BRAW): Удобная альтернатива

Blackmagic RAW (BRAW) разработан компанией Blackmagic Design и представляет собой полусжатый RAW-формат. Он сохраняет баланс между высоким качеством видео в формате RAW и сравнительно небольшим размером файла. Несмотря на то, что обработка видео частично происходит непосредственно в процессе съёмки, BRAW предоставляет достаточный объём данных для последующей обработки, например, для настройки ISO и баланса белого.

Сравнение Blackmagic RAW и ProRes RAW

В дальнейшем обзоре мы не будем углубляться в технические особенности видеокодеков, однако важно понимать, как выбор кодека влияет на размер файла и последующую обработку, в особенности - на цветокоррекцию. В отношении межкадрового и внутрикадрового сжатия каждый кодек обладает определенными преимуществами и ограничениями.

Comparing the Two Formats Blackmagic RAW vs. ProRes RAW

Как BRAW, так и ProRes RAW-файлы обеспечивают большую гибкость по сравнению с традиционными форматами сжатого видео. Оба формата доступны в основных камерах и устройствах записи, в отличие от оборудования от RED или ARRI. Однако на сегодняшний день немногие модели камер поддерживают BRAW и ProRes; среди них, например, - Panasonic S1H, EVA1, SIGMA fp и некоторые устройства из серии Nikon Z.

Несмотря на то, что Blackmagic RAW отлично функционирует в экосистеме Blackmagic (в частности, DaVinci Resolve предоставляет удобную площадку для видеоредактирования подобного формата) его совместимость с другими устройствами значительно более ограничена по сравнению с ProRes RAW. К слову, совсем недавно VSDC Video Editor присоединился к ряду программ, поддерживающих форматы RAW и BRAW. Что касается ProRes RAW, то он более гибкий и доступен для работы в Final Cut Pro, Adobe Premiere Pro и VSDC, поэтому его можно расценивать как более универсальный.

Если говорить о размере и сжатии файлов, BRAW-файлы сохраняют баланс качества и размера: высокий коэффициент сжатия особенно важен при работе с материалами высокого разрешения. Размер файлов ProRes RAW обычно меньше в сравнении с традиционными необработанными форматами, однако коэффициент сжатия по сравнению с BRAW здесь ниже. Тем не менее, этот формат не в меньшей степени подходит для профессионального видеоредактирования.

Наконец, BRAW и ProRes RAW применяют разные подходы к записи видео. BRAW обеспечивает большую гибкость при последующей обработке, чем ProRes RAW, позволяя изменять различные параметры, как, например, баланс белого и экспозицию, без существенного ухудшения качества изображения. Но стоит отметить, что в некоторых случаях, например, при использовании S1H с некоторыми устройствами, регулировка баланса белого на основе метаданных может работать не так эффективно, как в камерах Blackmagic, что создает некоторые трудности при пост-обработке.

balance between the high quality of RAW video

С другой стороны, ProRes RAW сохраняет баланс между высоким качеством видео и удобством работы. Он сохраняет много деталей и текстур, особенно в градиентах и тенях. В отличие от BRAW, в ProRes RAW не применяется шумоподавление, однако изображение всё равно остается насыщенным деталями. Эту особенность очень важно отметить, поскольку порой необходимо произвести настройку шума вручную при сохранении высокой детализации.

balance between the high quality of RAW video

Редактирование RAW-файлов в VSDC

Видеоредактор VSDCVSDC обеспечивает поддержку обоих форматов и предлагает широкие возможности для их редактирования, включая детальную цветокоррекцию, настройки баланса белого и многое другое, а использование готовых LUTs или же создание собственных позволяют добиться яркого и реалистичного изображения, полностью раскрывая возможности съемки в формате RAW.

The Tool for RAW Editing

Заключение: Эффективная работа с RAW-файлами

Выбор между Blackmagic RAW и ProRes RAW зависит от потребностей, удобства рабочего процесса и используемого оборудования отдельного пользователя. ProRes RAW может предложить лучшее качество и высокую детализацию, в то время как BRAW легко интегрируется в экосистему Blackmagic Design и обеспечивает гибкий и удобный рабочий процесс. Понимание преимуществ и ограничений обоих форматов поможет выбрать нужный инструмент для воплощения творческого замысла в жизнь.

The Tool for RAW Editing

VSDC Video Editor: Бесплатная версия vs. Версия PRO

Инструмент

Бесплатная

PRO

Полнофункциональный видеоредактор
Экспорт файлов 4K UHD
Импорт и экспорт в большинстве доступных форматов
Векторная графика
Анимация
Редактирование видео 360/3D
Режимы смешивания
Генератор рисунка ИИ
Экспорт 10-бит видео
Визуализация аудио
Режим нелинейного изменения параметров
Моушн трекинг
Редактировать бит
Аппаратное ускорение
Создание масок
Режимы наложения: Telea, Navier-Stokes
Карта движения
Базовый
Продвинутый
Хромакей
Базовый
Продвинутый
Режим мультикамерного монтажа
Базовый
Продвинутый
Цветокоррекция
Базовый
Продвинутый
Библиотека шаблонов
Базовый
Продвинутый

Инструменты

Захват видео
Запись экрана
Видеоконвертер
Запись на диск
Стабилизация видео
Запись голоса
Базовый
Продвинутый

Видеоэффекты и переходы

Фильтры и параметры настройки цвета
Экспорт LUT
Эффекты трансформации
Стандартный набор переходов
Эффект горящей бумаги
Эффект трансформации потока
Эффект разбитого стекла
Стандартный набор эффектов природы
Эффект объёмного света
Стандартный набор спецэффектов
Эффект матрицы

Поддержка пользователей

Техническая поддержка
Базовый
В приоритете
Мониторинг отчётов о сбоях в программе
Базовый
В приоритете

Application

Feature 360

360/3D Editor

Convenient preview and editing of your panoramic and VR footage
Feature tracking

Motion tracking

Advanced toolset for attaching any objects, for example, masks, titles, or images, to a moving element in a video
Feature edit the beat

Edit the beat

Syncing any elements of your video, from text to effects, to the beat of your audio
Feature AI Art generator

AI Art Generator

Turning your footage into art masterpieces by neural networks
Feature video effects

Video effects

Quick color correct styles, pro filters, transparency and transformation effects, 70+ dynamic transitions
Feature 4K export

UHD&HD

2k and 4k support,adjustable output resolution, framerate, bitrate, video and audio codecs
Feature blending

Blending modes

Modifying the look of your video image according to your preferences with color blending or applying ready Instagram-like filters in one click
Feature masking tool

Masking tool

A choice of different shaped masks for hiding, blurring or highlighting certain elements in your video
Feature chroma key

Chroma-key

Background removal in an image or a video per one or several colors
Feature waveform

Waveform

Zoomable audio intensity curve for comfortable professional editing
Feature 3D chats

3D pro charts

20+ customizable chart types including 3D dynamic models
Feature multimedia converter

Multimedia combiner

Conversion into multiple formats and extra apps for your creative work - video manager, dvd burner and screen recorder
VSDC
VSDC FREE
Video Editor is the perfect tool to bring your creative ideas to life and share them with the world. Make your videos rock with special effects
VSDC
VSDC PRO
Video Editor is the perfect tool to bring your creative ideas to life and share them with the world. Make your videos rock with special effects, keyframe animation, and ready-made intros. Apply Chroma Key to easily change the background of your clips to anything you like.
* The business license permits the use of the software for commercial purposes in a business environment. The personal and business versions of the software are identical in terms of features and functionality.


I 30-day money back guarantee
If you experience technical or other problems that cannot be solved, you can get a complete refund of your purchase price within 30 days. Check our Refund Policy to find out if you are eligible for a full refund.
I Totally secure payments
Our payments are processed via the 2Checkout payment gateway. 2Checkout provides the highest standards of online security. It guarantees the safety of your payments and personal information.
I What do I get?
15 minutes after purchase, you will receive an email with a download link and activation key to the account used to make the purchase. Use these to download and activate the program.